Как транслировать (передать) видео с macOS на телевизор
Начиная с OS X 10.9 Mavericks, у владельцев Mac появилась возможность беспроводного вывода изображения с компьютера прямо на экран телевизора при помощи функции AirDisplay. Однако для этого нужно было использовать исключительно режим зеркалирования, не позволявший транслировать отдельное видео без отображения всего экрана.
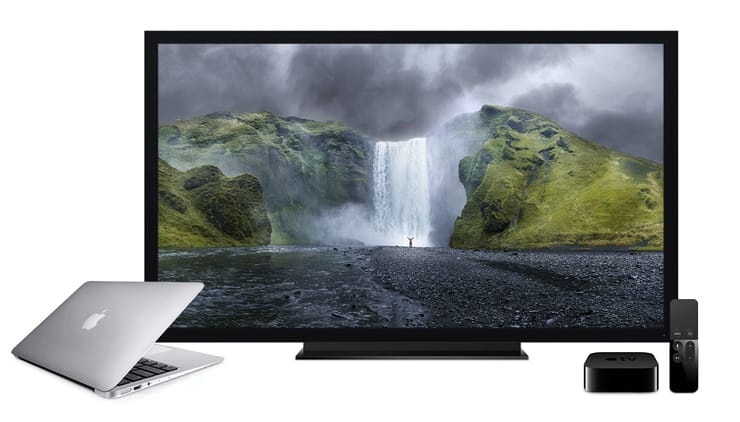
Apple устранила это ограничение в версии OS X 10.11 El Capitan, добавив более полную поддержку AirPlay, что позволяет транслировать видео из Safari и других приложений на экран телевизора с поддержкой AirPlay или на приставку Apple TV.
Системные требования для использования AirPlay на Mac
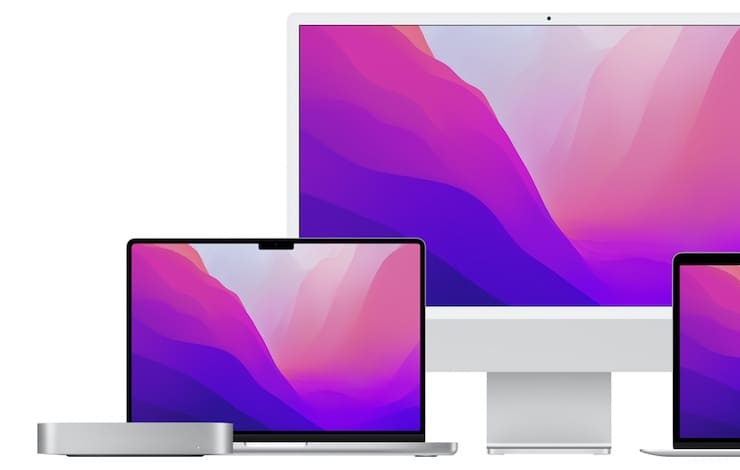
Вы можете использовать режим зеркалирования в AirPlay для беспроводной передачи контента с экрана Mac на телевизор с поддержкой технологии AirPlay или на любой телевизор, оснащенный интерфейсом HDMI с подключенной к нему приставкой Apple TV. Для работы с функцией необходим компьютер Mac под управлением OS X Mountain Lion 10.8 и выше:
- iMac (середина 2011 года и более поздние версии);
- Mac mini (середина 2011 года и более поздние версии);
- MacBook (начало 2015 года и более поздние версии);
- MacBook Air (середина 2011 года и более поздние версии);
- MacBook Pro (начало 2011 года и более поздние версии);
- Mac Pro (конец 2013 года и более поздние версии).
AirPlay также поддерживает одноранговую сеть, что позволяет вашим друзьям подключить свои Mac или iOS-устройства к приставке Apple TV или совместимому телевизору без необходимости ввода пароля и подключения к Wi-Fi.
Использование AirPlay предполагает подключение Mac, телевизора и Apple TV к одной локальной сети (Wi-Fi).
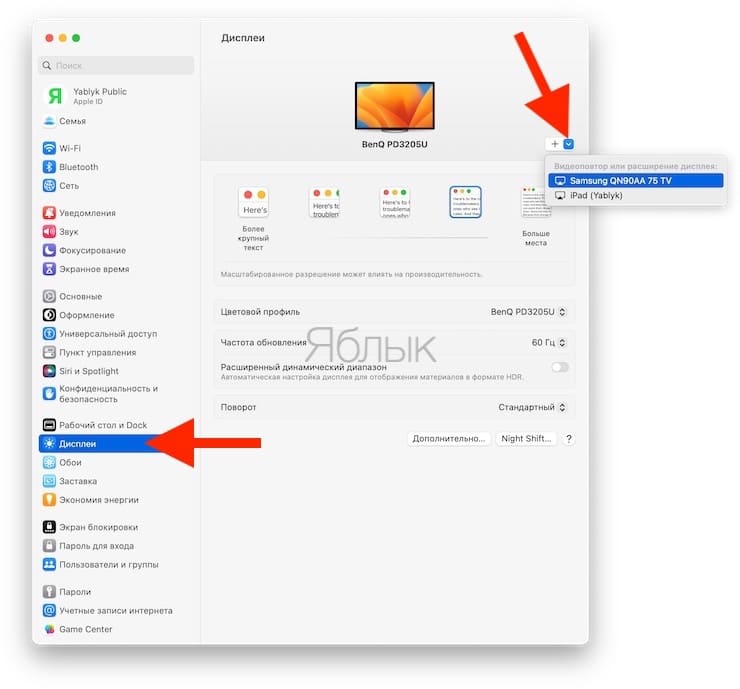
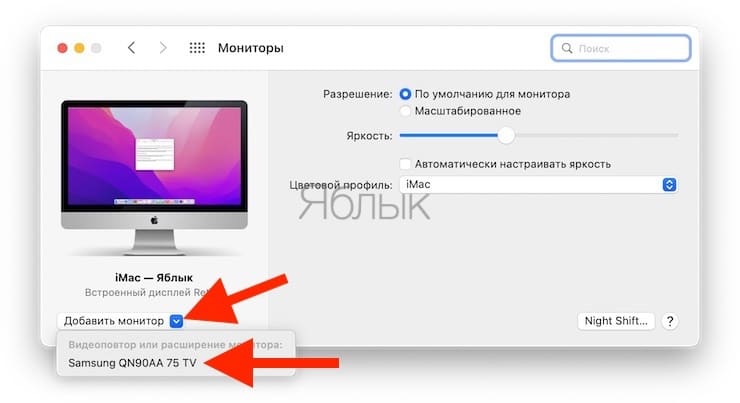
Для того чтобы проверить наличие поддержки AirPlay, откройте приложение «Системные настройки» и перейдите в раздел «Дисплеи». В случае, если имеется совместимый с AirPlay телевизор, он появится в выпадающем списке (см. скриншот ниже).
В более старых версиях macOS проверить наличие поддержки AirPlay можно следующим образом: приложение «Системные настройки» → «Мониторы».
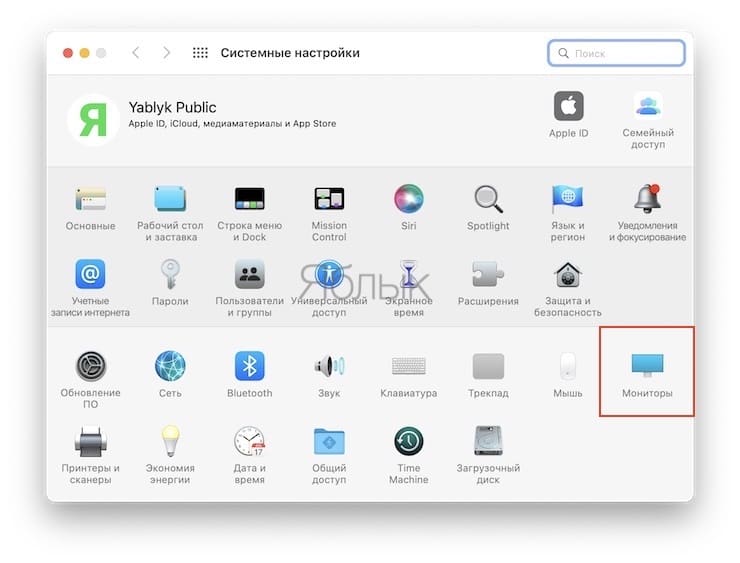
Если опция «Добавить монитор» не отображается, значит ваш Mac не удовлетворяет требования AirPlay. Здесь же можно сразу и выбрать телевизор или приставку Apple TV для осуществления зеркалирования (видеоповтора).
Как транслировать видео из Safari в Mac на экран телевизора
1. Запустите Safari и включите любое видео.
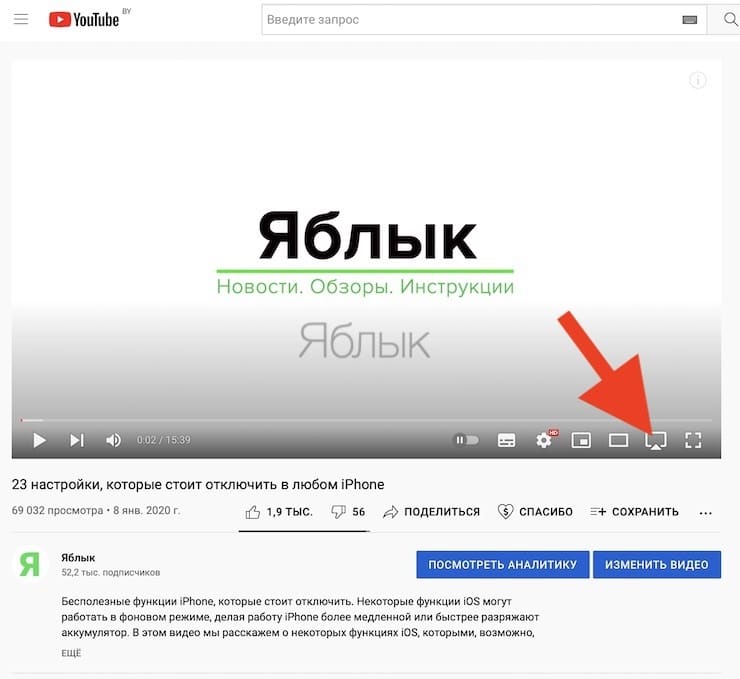
2. Проигрывая видео, нажмите на значок AirPlay, расположенный в нижнем правом углу видеоплеера YouTube (иконка AirPlay может находиться и в другом месте в зависимости от сервиса).
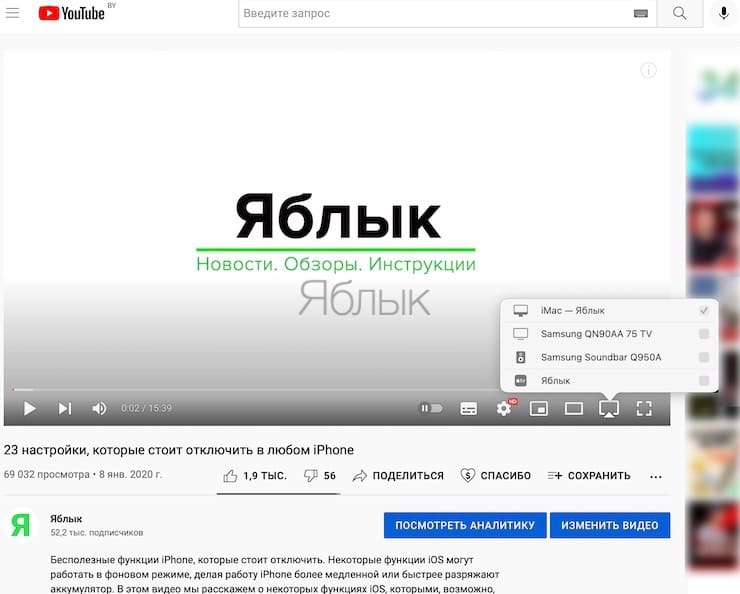
3. В появившемся списке совместимых устройств выберите телевизор с поддержкой AirPlay или приставку Apple TV.
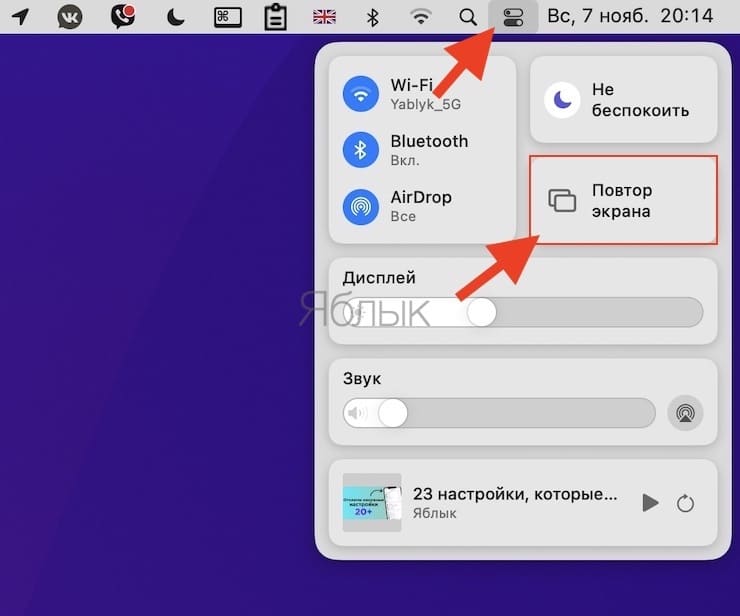
Если видео размещено на видеохостинге, который не поддерживает AirPlay, откройте Пункт управления macOS, нажмите кнопку-виджет Повтор экрана и выберите телевизор (приставку Apple TV).
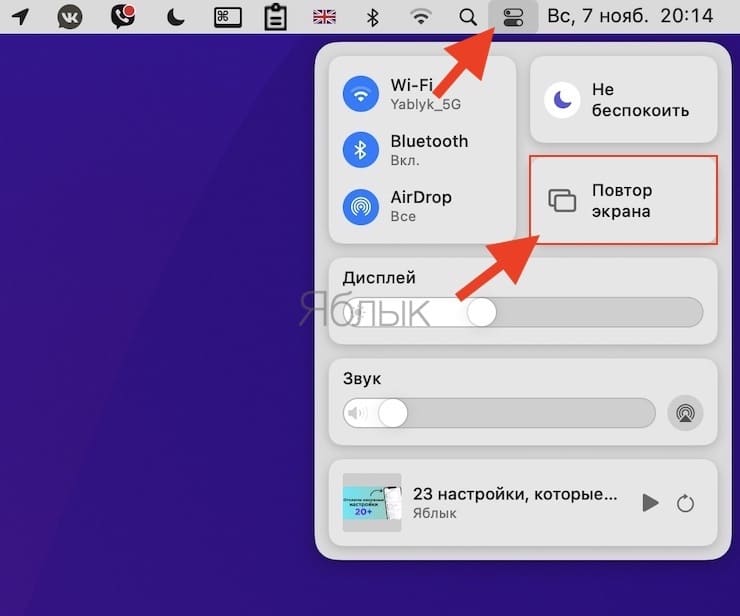

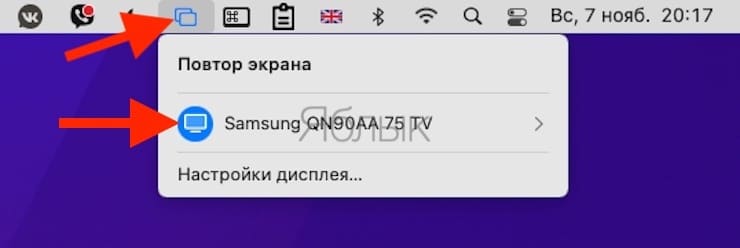
Значок подключенного устройства окрасится в синий цвет:
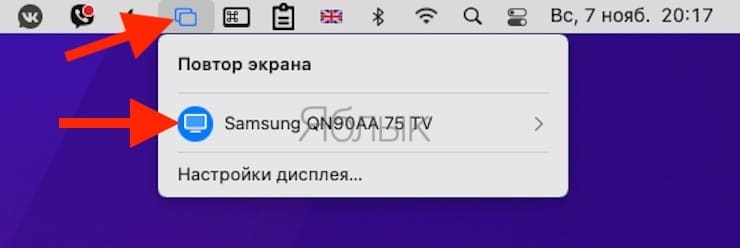
4. Видео начнет проигрываться на экране телевизора.
В старых версиях macOS используйте кнопку AirPlay в строке меню.

Как транслировать видео из медиаплеера QuickTime Player в Mac на экран телевизора
1. Запустите медиаплеер QuickTime Player на Mac, нажав на значок плагина в Dock, или с помощью двойного клика на иконку приложения в папке «Программы». Также можно воспользоваться функцией Spotlight для быстрого поиска.
2. Откройте уже загруженное видео или используйте URL из файлового меню QuickTime Player.
3. При воспроизведении видео иконка AirPlay должна отобразиться в элементах управления воспроизведением QuickTime Player.
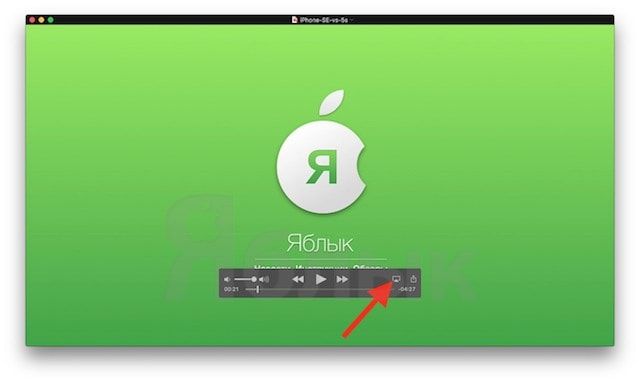
Нажмите на нее, чтобы увидеть доступные опции.
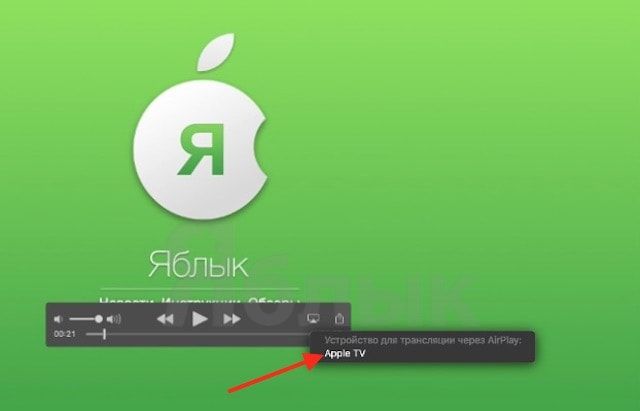
4. Выберите в меню совместимый телевизор или приставку Apple TV.
5. Видео начнет транслироваться на экран телевизора.
Как остановить трансляцию видео
Процесс выключения трансляции экрана с Mac на телевизор обратен процедуре включения. Например, для выключения зеркалирования видео с YouTube, нажмите на значок AirPlay и в появившемся списке устройств снимите галочку напротив подключенного устройства.
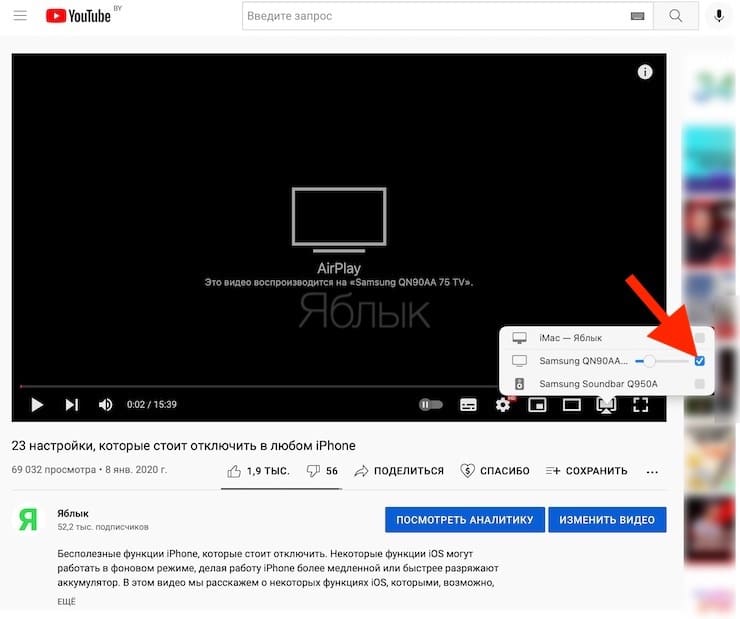
Также отключение можно произвести из Пункта управления:
Кроме того, активный статус AirPlay будет отображаться специальным значком и в строке меню. Отсюда тоже можно произвести отключение трансляции.
Возможные проблемы при работе с AirPlay
По большей части проблемы с использованием AirPlay возникают из-за некорректной работы Wi-Fi или несоответствия аппаратного обеспечения. Если Mac, совместимый телевизор или приставка Apple TV находятся в локальной сети в рабочем режиме, а иконка AirPlay все равно не отображается, это может означать, что «начинка» вашего компьютера не удовлетворяет требования AirPlay. Проверьте соответствие аппаратного обеспечения Mac системным требованием AirPlay. Если все впорядке, а иконка по-прежнему не отображается, значит проблема может заключаться в настройках межсетевого экрана. Для того чтобы проверить настройки, необходимо выполнить следующие действия:
1. Откройте меню → «Системные настройки» → «Защита и безопасность» → «Брандмауэр».
2. Кликните на значок замка и введите логин и пароль администратора.
3. Если функция включена, выберите параметр «Брэндмауэр».
4. Снимите флажок «Блокировать все входящие соединения».
5. Выберите опцию «Автоматически разрешать подписанному ПО входящие подключения».
Иногда AirPlay может отключаться сам по себе. Это значит, что Wi-Fi-сеть перегружена или подключение прерывается из-за большого количества помех.
Miracast в Mac OS X — AirPlay на MacBook Air и Pro — Подключение Макбука к Телевизору Samsung и LG по WiFi
Итак друзья, продолжаю развивать тему технологии миракаст. Сегодня покажу, как можно подключить макбук к телевизору по WiFi — у Apple это называется AirPlay. Несмотря на то, что у меня MacBook Air 2011 года производства, на нем прекрасно себя чувствует Mac OS X, в которую поддержка трансляции экрана на монитор или ТВ встроена в оболочку по умолчанию. Причем подключиться можно также и с Pro, iMac или Mac Mini к абсолютно любому телевизору, будь то Samsung, LG, Philips и т.д. без всяких приставок, типа Apple TV.
Подключение Макбука к телевизору по Miracast в Mac OS X
Все что нужно, чтобы работать с miracast на Mac OS X — это телевизор, который имеет поддержку стандарта wifi связи AirPlay, который является аналогом миракаста от Apple. Это может быть либо встроенный модуль, либо внешний адаптер. О том, как подключить беспроводной адаптер к Самсунгу или LG и настроить на прием сигнала я уже писал, поэтому прочитайте сначала первую часть, так как здесь речь пойдет непосредственно о подключении самого макбука к телевизору по вай-фай.
Соединение происходит напрямую, минуя всякого рода маршрутизаторы или репитеры. ТВ с миракаст адаптером с поддержкой АирПлей раздает беспроводной сигнал, а макбук к нему подключается. Это удобно, так как не отнимает лишних ресурсов и не тормозит роутер, который может быть занять другими сложными задачами, типа раздачи файлов по сети или онлайн игры.
Как включить Airplay в Mac OS на MacBook Air?
Процесс подключения по AirPlay не сложный. Прежде всего нужно присоединиться к беспроводному сигналу с телевизора. Для этого жмем на иконку wifi и выбираем сеть «MiraScreen»

После коннекта появится значок «AirPlay» — нажимаем на него и снова выбираем МираСкрин.
How to mirror screen from MacBook on any Airplay enabled modern TV

I recently bought Samsung’s 50' TV which had an AirPlay functionality. After my basic tv setup I had the television up and running. However, to my biggest disappointment, I could not enable Mirror Screen functionality on a tv whereas my I-pad and I-phone were able to.
As usual, I sought help from Google search. Most of my search were key-worded “Could not connect to Samsung Series 7” however none of the suggested suggestion addressed my issue. Most of the suggested answer were to go into the Display settings and to enable the checkmark on the “Show mirroring options in the menu bar when available” checkbox. Mine had it enabled so my TV was populated on the list. Tried couple of days could not find what was going on, so tried with the HDMI cable and was able to cast my screen. However was very disappointed to not be able to utilize the built in airplay functionality.
Today, after a week, I was messing with it to see if there was some sort of Firewall preventing the mirror functionality. As a surprise, came to find out that Firewall(inside Security and Privacy) was preventing it from casting as my mac had Block all incoming connection check mark enabled. As I unchecked the checkmark and enabled the Automatically allow built-in software to receive incoming connections enabled along with the bottom two enabled — BOOM I could mirror my MacBook on the TV. (Attaching the picture just in case for someone to see what the options looked like inside the Firewall tab)
Since this issue might be preventing some people from utilizing the in-built AirPlay functionality on some modern TV. I thought of writing this article. So, anyone in the similar situation will not have to go through the similar issue again.
Find out how to connect your MacBook to a TV

Having spent some years coding applications for macOS, we’ve created a tool that everybody can use. The all-round problem fixer for Mac.
So here’s a tip for you: Download CleanMyMac to quickly solve some of the issues mentioned in this article. But to help you do it all by yourself, we’ve gathered our best ideas and solutions below.
Features described in this article refer to the MacPaw site version of CleanMyMac X.
There are plenty of reasons for wanting to connect your MacBook to a TV, and all of them are great. A big-screen TV makes for an impressive external monitor from which to stream Netflix or enjoy a Hollywood blockbuster. It’s also a more accessible way for people to view the contents of your Mac, rather than having to gather around a small display. It’s particularly useful if you’re giving a presentation of some kind.
Hooking your Mac up to a TV is easier than you might think. You can be up and running in a couple of minutes. However, there are different ways of connecting to a TV and different cables for doing so. That’s what this post is all about: showing you what you need and how it’s done.
Before we get into choosing a Mac-to-TV cable and streaming your content, though, there’s some general housekeeping to take care of.
Choosing the right cable to connect your MacBook to a TV
The first thing you need to do is see what kind of ports you’re working with.
As far as your TV is concerned, HDMI has been standard in all TVs for the past seven or eight years, so that’s one end of the cable sorted. Now it’s time to look at the ports on your Mac.

Macs that are equipped with any of the following ports can connect to HDMI devices:
- If your Mac has an HDMI port, you can connect directly to HDMI with an HDMI cable.
- If your Mac has USB-C ports, you can use an adapter, like the Apple USB-C Digital AV Multiport Adapter, to connect to HDMI.
- If your Mac has a Thunderbolt 2 or Mini DisplayPort connection, you’ll need a Mini DisplayPort-to-HDMI adapter and an HDMI cable.
While Apple does offer HDMI-to-HDMI cords for Mac, they don’t make Mini DisplayPort-to-HDMI cables. They are, however, widely available on Amazon and eBay, so you shouldn’t have much trouble finding one.
If your system has a Thunderbolt 3 port, a USB-C to HDMI adaptor is what’s needed. These are available from Apple and third-party manufacturers, but for performance, you’re better off sticking with Apple.
Configuring the TV display
With your Mac-to-TV cable at the ready, you’re just about set to start viewing.
By running the cable from your Mac to the TV’s HDMI port and choosing the correct output, your computer should instantly recognize the TV and automatically extend your desktop. With this setup, you can use the TV like an external display and do most of the things you need to. But if you feel like the resolution isn’t the best for streaming movies or playing games, here’s what you should do:

- Go to System Preferences > Displays.
- Select «Default for Display» to set the resolution automatically or select Scaled to manually set a resolution.
Using HDMI, the audio should automatically switch from your Mac to the TV once connected. If this isn’t the case, you can do it manually.
- Go to System Preferences > Sound.
- Click the Output tab and select the HDMI option under Type.
Finally, if you start streaming a video from the web and notice black bars on either side of the screen, you can remove them by zooming in.

- Go to System Preferences > Accessibility.
- Select Zoom and check the boxes for «Use keyboard shortcuts to zoom» and «Use scroll gesture with modifier keys to zoom.»
How to connect a Mac to a TV with Apple TV
If you have Apple TV, you can connect your Mac to your TV without the need for a cable. All you need to do is look for the AirPlay icon in the menu bar and choose to mirror your display:
- Ensure your Mac and Apple TV are on the same network.
- Go to Control Center on your Mac and click the Screen Mirroring icon.
- Choose your Apple TV.
- Click the AirPlay status icon and then choose This Mac or your Apple TV to set whether your desktop matches the size of your Mac or the TV screen. The AirPlay status icon will be lit blue when you’re using Mirroring.
Apple TV lets you stream content from your desktop and the web. Once you have the correct cable, connecting your Mac to a TV is an easy task. HDMI ensures audio takes care of itself, and adjusting display settings can be done in a few clicks.
Monitoring the health of your Mac with CleanMyMac X
As some users have reported, macOS can overheat whenever a second screen is added, in some cases reaching upwards of 60 degrees. Hooking your Mac up to a TV increases pressure on the GPU, which gets hotter as it works harder. In turn, the fans have to work harder to keep the system cool, and performance suffers.
If you plan on regularly streaming content from your Mac to a TV, you’ll need to look after your system. Overheating doesn’t just affect performance, it can take years off Mac’s life.
For this reason, we suggest you use CleanMyMac X to ensure everything is ticking over smoothly. It has a handy Menu that helps control battery health, CPU load and prevent overheating and keep your Mac running smoothly whenever you need it.
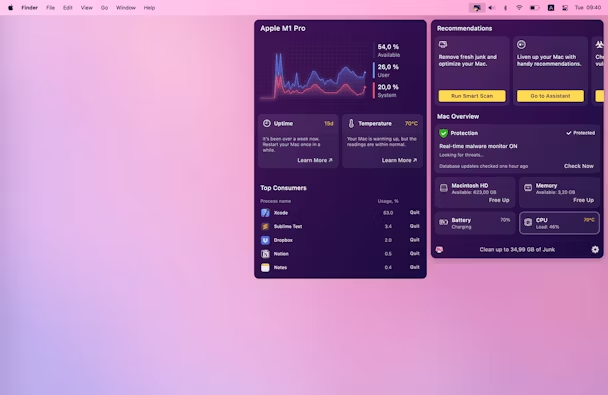
You can download CleanMyMac for free here.
Once installed, you can run a Smart Scan to remove any unneeded junk files that may have been accumulated. Finding and deleting outdated, broken, and unwanted files take little more than a few clicks:
- Launch CleanMyMac X.
- Select Smart Scan from the sidebar.
- Click Scan and wait for CleanMyMac X to complete its scan.
- Click Run to remove junk files and run quick optimization routines.
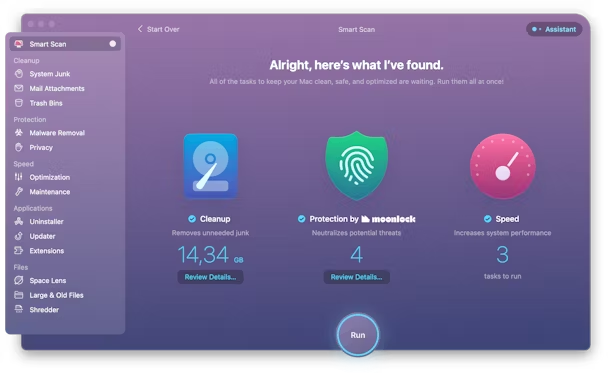
Do this regularly to ensure your system isn’t clogged up with useless junk files.