Все способы установки macOS Monterey. От стандартного обновления до загрузки с флешки
 В закладки
Вчера вечером стала доступна для загрузки финальная версия macOS 12. Систему уже можно установить на любой поддерживаемый компьютер Mac.
Сейчас расскажем обо всех доступных способах обновления и переустановки системы.
Обновиться получится на таких компьютерах Mac:
▪️ iMac 2015 и новее
▪️ iMac Pro 2017 и новее
▪️ MacBook 2016 и новее
▪️ MacBook Air 2015 и новее
▪️ MacBook Pro 2015 и новее
▪️ Mac Pro 2013 и новее
▪️ Mac mini 2014 и новее
Сколько места понадобится для установки macOS Monterey
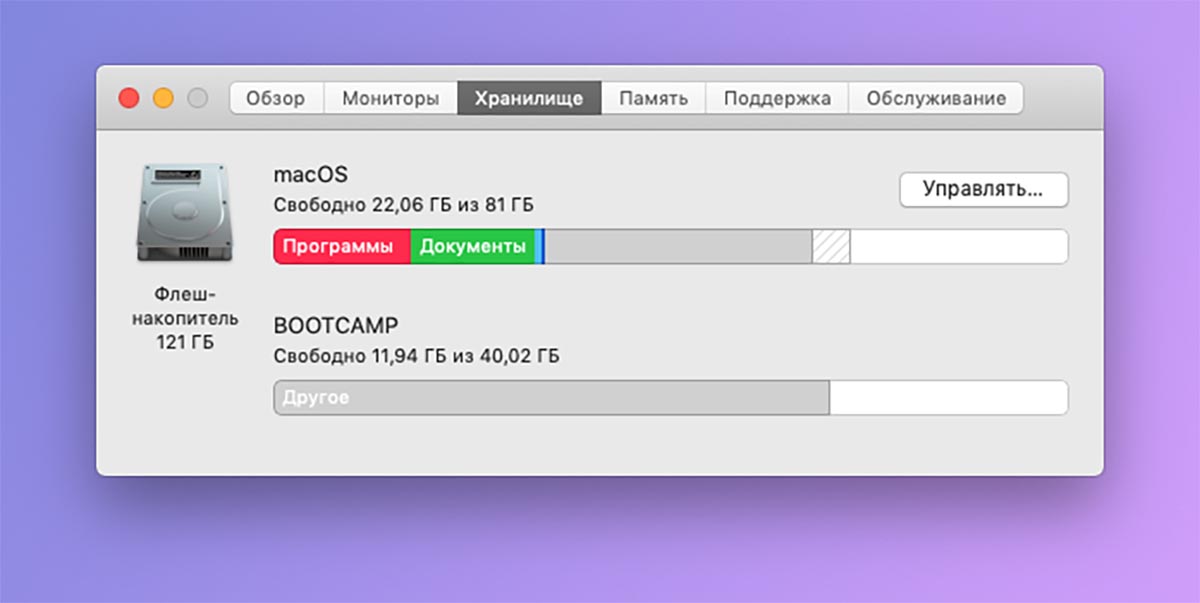
Если обновляетесь с одной из последних бета-версий системы, вам потребуется меньше всего дискового пространства. Финальное обновление для релизной версии занимает около 2.5 ГБ и еще нужно иметь около 5 ГБ свободного места для быстрой и беспроблемной установки.
При обновлении с macOS Big Sur или предыдущих версий операционной системы, обновление займет более 12 ГБ. В этом случае системе понадобится 20-25 ГБ места для загрузки, распаковки и обновления данных.
Таким образом для подобного вида установки желательно иметь не менее 30 ГБ места на встроенном в Mac накопителе.
Проверить наличие свободного места на диске можно по пути Apple – Об этом Mac – Хранилище. Здесь же доступны штатные средства очистки системы по нажатию кнопки Управлять. Для освобождения места будет предложено очистить корзину, сгрузить данные в iCloud или удалить большие файлы.
Не забывайте, что перед любым обновлением операционной системы нужно делать бекап всех данных при помощи Time Machine или сторонних средств резервного копирования.
Как обновиться с последних бета-версий macOS Monterey
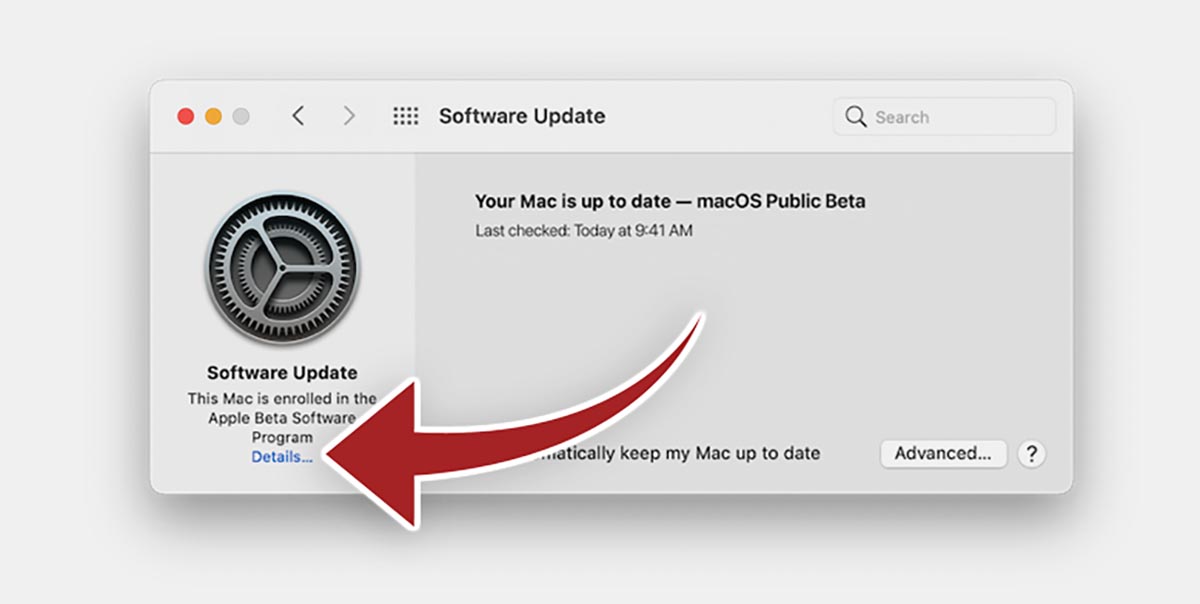
Для начала нужно отказаться от участия в программе тестирования macOS, чтобы вместо финального релиза Monterey вам не прилетела новая тестовая сборка более позднего обновления. При желании в дальнейшем снова сможете обновляться до доступных бета-версий, но обновление лучше произвести на финальную версию macOS 12.
▶ Перейдите в Системные настройки – Обновление ПО.
▶ Нажмите кнопку Подробнее и выберите пункт Настройки по умолчанию.
▶ Подтвердите действие вводом пароля администратора.
▶ Дождитесь проверки наличия обновления и подтвердите апдейт до финальной версии macOS Monterey.
Процедура не займет много времени. В зависимости от мощности компьютера и скорости интернет-соединения обновление пройдет за 20-40 минут. Установщик поменяет ряд системных файлов и обновит номер сборки. Чем более поздняя бета-версия Monterey была установлена на компьютере, тем быстрее она обновится до финальной.
Как обновиться с macOS Big Sur и более старых версий системы
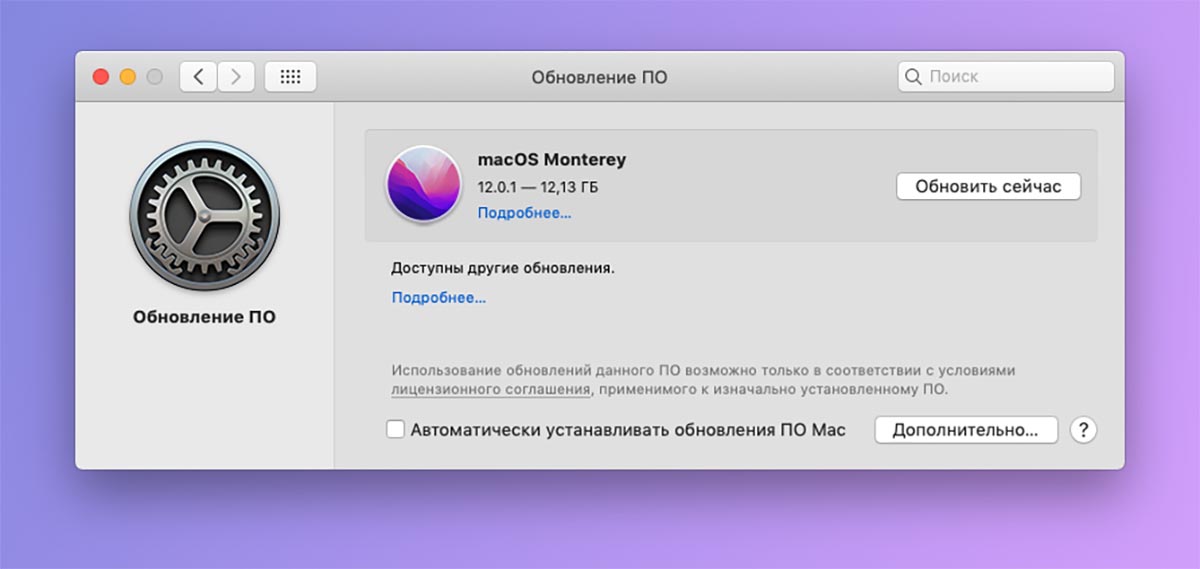
Такое обновление займет гораздо больше времени, потребует больше свободного места на диске и произойдет в полуавтоматическом режиме.
Апдейт по предыдущей инструкции не потребует от пользователя подтверждения каких-либо операций и завершится автоматически. В случае переустановки с предыдущих систем отходить от компьютера не рекомендуется, чтобы не пропустить очередное диалоговое окно или запрос пароля администратора.
◈ Для запуска обновления перейдите в меню Apple – Об этом Mac – Обновление ПО.
◈ Дождитесь окончания проверки доступных обновлений.
◈ Нажмите кнопку Обновить сейчас и следуйте инструкциям мастера установки.
Процесс займет больше времени, все будет зависеть от мощности устройства и скорости подключения к сети. На обновление может потребоваться от получаса до нескольких часов.
Как произвести чистую установку macOS Monterey через режим восстановления
Некоторые пользователи предпочитают производить чистую установку macOS при выходе новой версии системы. Так вместе с обновление получится удалить накопившийся мусор и кэш.
Чистая установки предполагает удаление всех приложений и пользовательских данных с накопителя. Поэтому заранее побеспокойтесь о сохранение файлов, фото и рабочих документов. Их можно загрузить в любое доступное облако или на внешний накопитель.
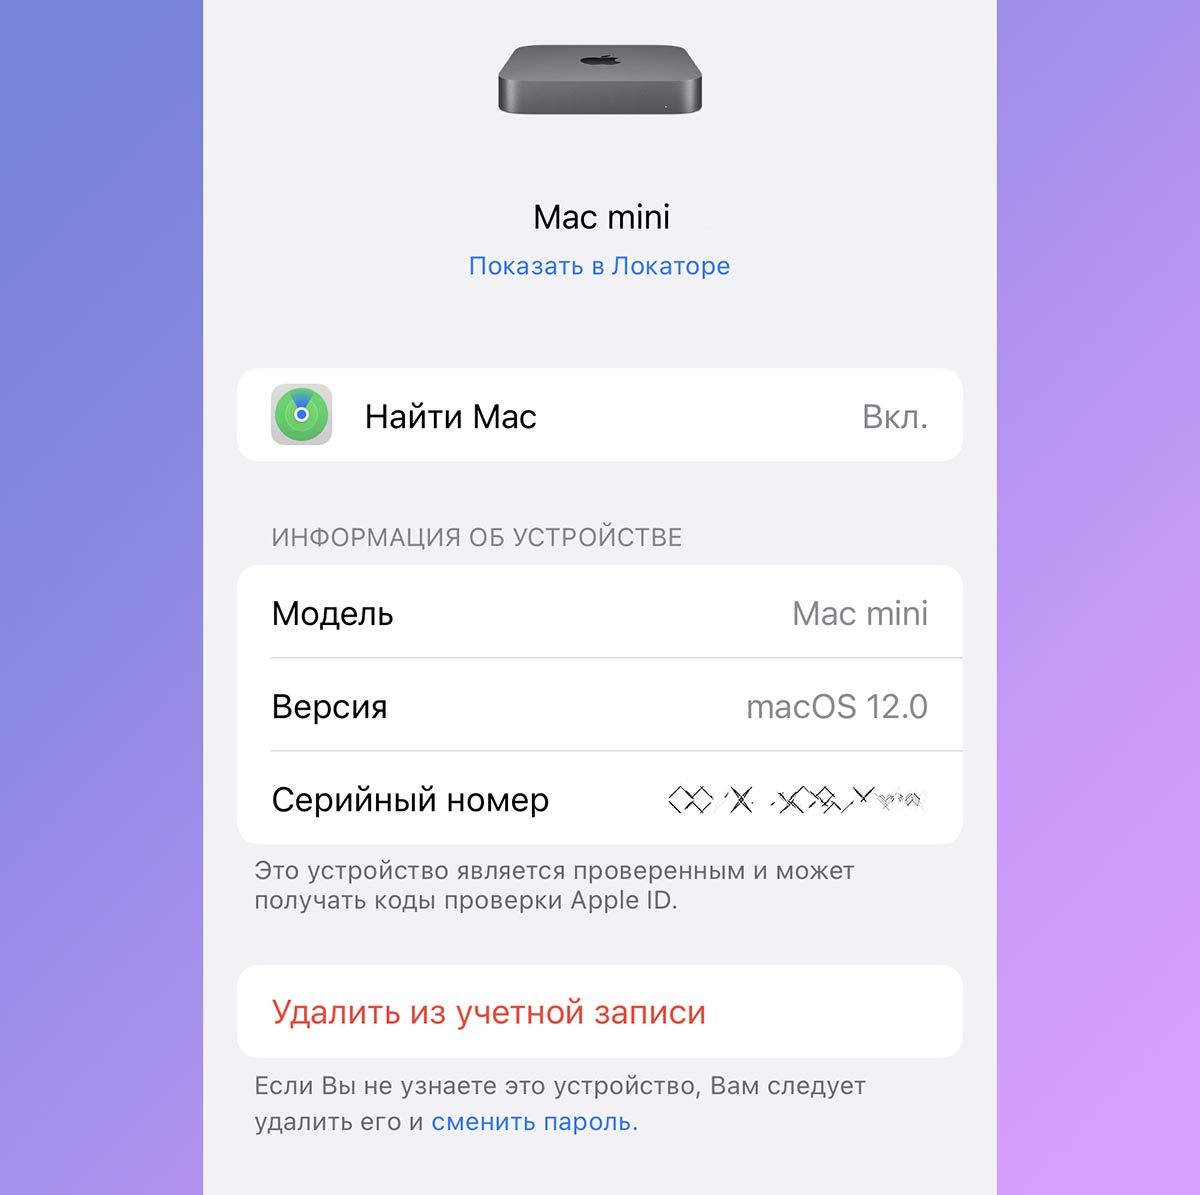
◉ На любом iPhone или iPad со своей учетной записью Apple ID перейдите в Настройки – Учетная запись Apple ID и найдите нужный компьютер.
◉ Откройте раздел с параметрами устройства и нажмите Удалить из учетной записи. Без данной процедуры произвести чистую установку системы не получится.
◉ Выключите Mac и запустите его с зажатыми клавишами Command + Option (Alt) + R на клавиатуре. Так вы попадете в режим восстановления системы с возможностью загрузки последней доступной версии macOS для вашего Mac.
◉ После загрузки выберите Дисковую утилиту.
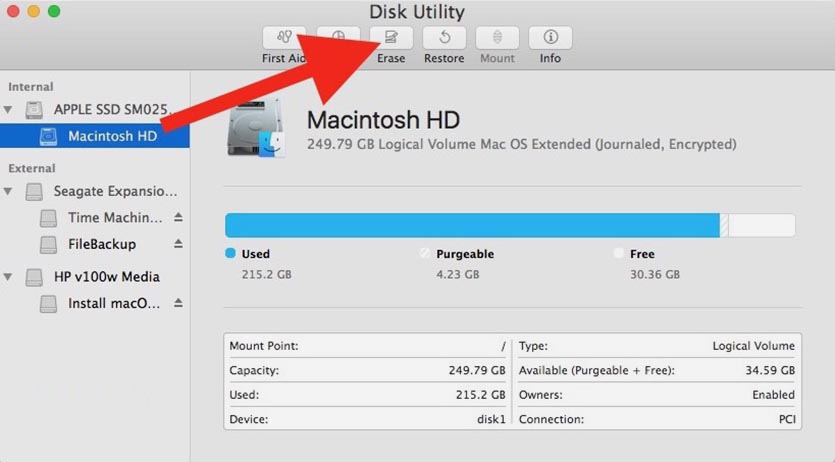
◉ Удалите системный раздел со старой установленной macOS либо полностью сотрите системный диск, если на нем нет других логических разделов.
◉ Закройте Дисковую утилиту и выберите пункт Переустановить macOS.
◉ Следуйте подсказкам мастера установки и дождитесь окончания процесса.
Данный способ является достаточно долгим и зависит в первую очередь от скорости интернет-соединения.
При медленном и нестабильном подключение к сети лучше произведите чистую установку с использованием флешки. Так система к моменту перестановки уже будет загружена на съемный диск, что ускорит процесс.
Как произвести чистую установку macOS Monterey с флешки
Этот способ чистой установки macOS более сложный, но при этом и более безопасный. При этом вам потребуется фишка или внешний накопитель объемом 16 ГБ и более.
Внимание! При установке macOS с внешнего накопителя на Mac с чипом T2 придется отключить защиту прошивки по нашей инструкции.
Это касается таких моделей Mac с процессорами Intel:
▪ Mac Pro 2019
▪ iMac Pro 2017
▪ iMac 27″ 2020
▪ Mac mini 2018
▪ MacBook Air 2018-2019
▪ MacBook Pro 2018-2020
Для подготовки накопителя и установки с него новой версии macOS 12 сделайте следующее:
▣ Подключите флешку или накопитель к Mac.
▣ Откройте приложение Дисковая утилита и отформатируйте съемный диск в формате Mac OS Extended.
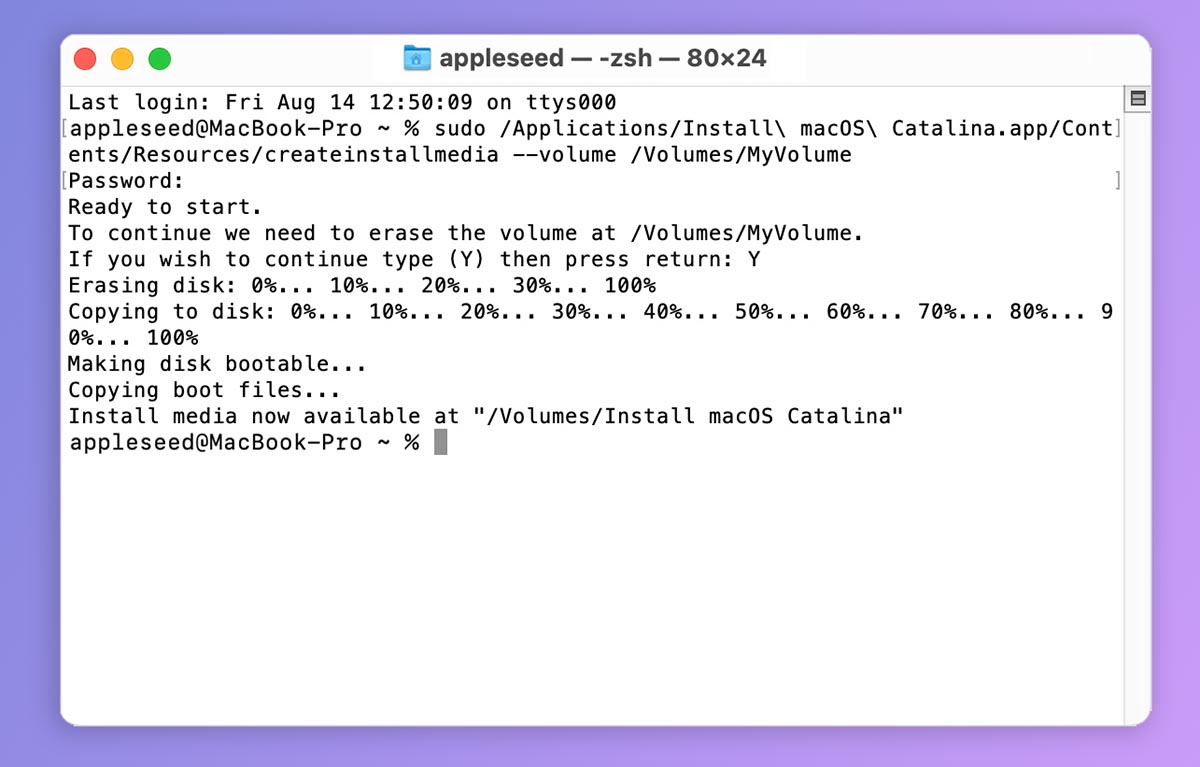
▣ Запустите Терминал и введите следующую команду:
sudo /Applications/Install\ macOS\ Monterey.app/Contents/Resources/createinstallmedia —volume /Volumes/MyVolume
В команде вместо MyVolume подставьте название отформатированной флешки или диска.
▣ Нажмите кнопку Ввод и подтвердите действие паролем администратора.
▣ Дождитесь окончания загрузки данных на флешку.
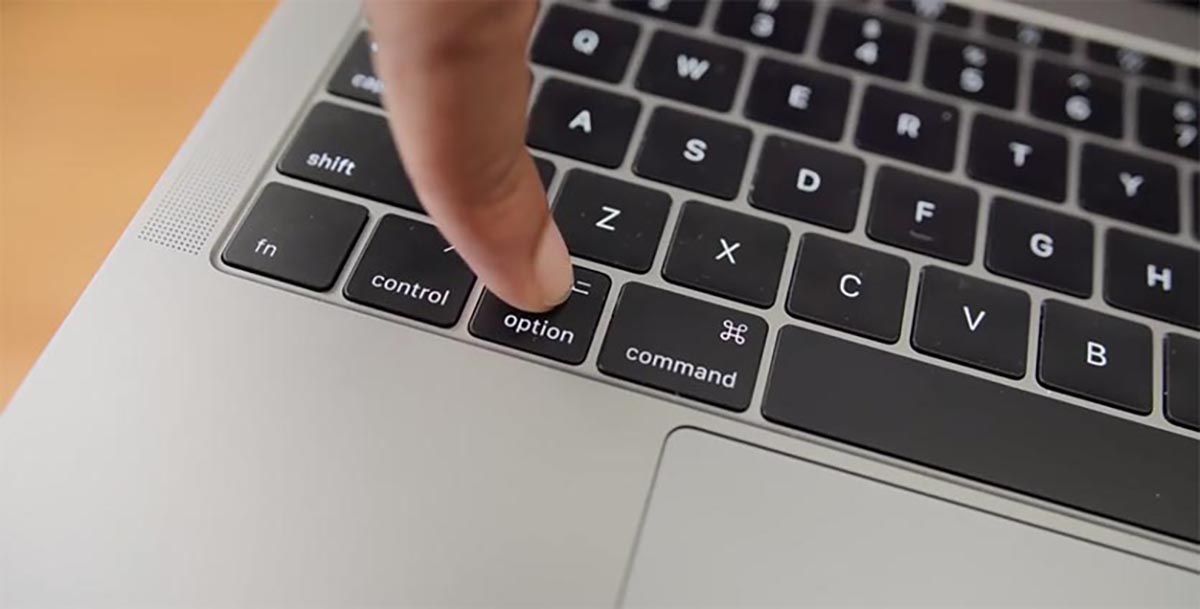
▣ Перезагрузите Mac с подключенным накопителем. Для перехода в меню выбора загрузочного диска удерживайте кнопку Option (Alt) ⌥ (на Mac с процессорами Intel) или кнопку питания (на Mac с процессорами Apple).
▣ Выберите вариант загрузки со съемного диска и следуйте инструкциям мастера установки macOS Monterey.
Данный способ потребует от пользователя максимум внимания и времени. Установить систему в автоматическом режиме таким способом не получится.
Выбирайте подходящий тип апдейта или переустановки системы в зависимости от времени и желаемого результата.
Легкого всем обновления!
В закладки
# macOS 12: Monterey
Reminder that Dortania and any tools mentioned in this guide are neither responsible for any corruption, data loss, or other ill effects that may arise from this guide, including ones caused by typos. You, the end user, must understand this is beta software on unsupported machines so do not pester developers for fixes. Dortania will not be accepting issues regarding this mini-guide except for typos and/or errors. This guide expects you to have a basic understanding of hackintoshing. If you are not familiar with it, we highly recommend you to wait until there is an easier and more straight-forward solution available.
# Table of Contents
# Prerequisites
# Supported SMBIOS
SMBIOS dropped in Monterey:
- iMac15,x and older
- Macmini6,x and older
- MacBook8,1 and older
- MacBookAir6,x and older
- MacBookPro11,3 and older
- MacBookPro11,4 and 11,5 are still supported
If your SMBIOS was supported in Big Sur and is not included above, you’re good to go!
- iMac16,1 and newer
- MacPro6,1 and newer
- iMacPro1,1 and newer
- Macmini7,1 and newer
- MacBook9,1 and newer
- MacBookAir7,1 and newer
- MacBookPro11,4 and newer
Click here for a full list of supported SMBIOS.
For those on Haswell or Ivy Bridge, here are some simple conversions:
- Ivy Bridge desktops with dGPU should use MacPro6,1
- Haswell desktops with dGPU should use iMac17,1
- Haswell desktops with only an iGPU should use iMac16,2
- Haswell laptops should use MacBookPro11,4 or MacBookPro11,5
# Supported hardware
Dropped GPU Hardware:
- Ivy Bridge (HD 4000 and HD 2500)
- NVIDIA Kepler (GTX 6xx/7xx Cards)
- You can use OpenCore-Legacy-Patcher
- No support is provided for Hackintoshes using OCLP!
- You will lose access to non-full updates (Small 1-3GB updates)
- Requires SIP, Apple Secure Boot, and AMFI disabled.
Haswell iGPUs are still supported in Monterey
- Macmini7,1 uses these drivers
# AMD Patches
For those on AMD CPUs, make sure to update your kernel patches
(opens new window) for Monterey. Don’t forget to update your patches as well with the core count of your CPU. The patches which need to be edited are all named algrey — Force cpuid_cores_per_package , and you only need to change the Replace value. You should change:
- B8000000 0000 => B8 <core count> 0000 0000
- BA000000 0000 => BA <core count> 0000 0000
- BA000000 0090 => BA <core count> 0000 0090
Where <core count> is replaced with the physical core count of your CPU in hexadecimal. For example, an 8-Core 5800X would have the new Replace value be:
- B8 08 0000 0000
- BA 08 0000 0000
- BA 08 0000 0090
# Bluetooth
Note that all cards have not been fixed yet, and that bluetooth support is being worked on still.
Do not be surprised if your card does not work, and please be patient!
With Monterey, Apple has completely rewritten the bluetooth stack. As of writing, many bluetooth devices do not work (legacy Broadcom and Intel). With the rewrite, injector kexts break bluetooth support in Monterey, though firmware uploader kexts are still needed. Make sure that you:
- Disable injector kexts
- IntelBluetoothInjector.kext for Intel cards
- BrcmBluetoothInjector.kext for Broadcom cards
- If you still boot Big Sur or older, you can instead set the MaxKernel field to 20.99.9 for your injector kext in your config.plist.
- IntelBluetoothFirmware.kext for Intel
- BrcmPatchRAM2/3.kext + BrcmFirmwareData.kext for Broadcom
- Needed for all non-native Bluetooth devices (Including Intel)
- If you still boot Big Sur or older, you can set the MinKernel field to 21.00.0 to prevent BlueToolFixup loading on older OSes.
See the below issues for more details:
# Ethernet
Intel I211 chipset (typical for some AMD boards i.e. B450) no longer works with SmallTreeIntel82576 kext (network remains in Cable Unplugged status).
(opens new window) confirmed working on I211 @ B450, but NICs on other boards might experience issues (please report
See the below issues for more details:
The boot-arg for enabling Intel I225-V ethernet controller has changed since macOS Monterey 12.3. Use e1000=0 instead of dk.e1000=0 .
# OTA Updates
Starting with Monterey, updates are not delivered to T2 Macs which don’t have Secure Boot enabled, and updates do not install properly if your SecureBootModel does not match your machine (ie. non-T2 SMBIOS using j137 or iMacPro1,1 using j160). Hackintoshes which use a T2 SMBIOS MUST have OpenCore 0.7.4+ with SecureBootModel set to Default . If your SMBIOS does not have a T2 chip, then either Default or Disabled is ok. More information is available on the Apple Secure Boot page
SMBIOS Minimum macOS Version iMacPro1,1 (December 2017) 10.13.2 (17C2111) MacBookPro15,1 (July 2018) 10.13.6 (17G2112) MacBookPro15,2 (July 2018) 10.13.6 (17G2112) Macmini8,1 (October 2018) 10.14 (18A2063) MacBookAir8,1 (October 2018) 10.14.1 (18B2084) MacBookPro15,3 (May 2019) 10.14.5 (18F132) MacBookPro15,4 (July 2019) 10.14.5 (18F2058) MacBookAir8,2 (July 2019) 10.14.5 (18F2058) MacBookPro16,1 (November 2019) 10.15.1 (19B2093) MacPro7,1 (December 2019) 10.15.1 (19B88) MacBookAir9,1 (March 2020) 10.15.3 (19D2064) MacBookPro16,2 (May 2020) 10.15.4 (19E2269) MacBookPro16,3 (May 2020) 10.15.4 (19E2265) MacBookPro16,4 (June 2020) 10.15.5 (19F96) iMac20,1 (August 2020) 10.15.6 (19G2005) iMac20,2 (August 2020) 10.15.6 (19G2005) Note: You do not need the -revsbvmm boot argument from RestrictEvents. Use OpenCore 0.7.4 or later.
# Troubleshooting
# No Updates
Make sure that SIP is enabled. Two bits in SIP specifically cause issues:
How to Install macOS 12 Monterey on an Unsupported Mac

Apple has recently launched its new OS, the MacOS 12 Monterey. They have made numerous new improvements with this release. These includes screen sharing, a streamlined Safari, much improved FaceTime etc. However, the MacOS 12 Monterey is supported only by a handful of devices which, obviously, has disappointed many Mac users.
Fortunately, you can still install MacOS 12 Monterey on an unsupported Mac thanks to the developers who found the hacks. For that you need to follow a process. The first step of the process is where you determine if your Mac is already supported by MacOS 12 Monterey or not.
List of MacOS 12 Monterey Compatible Macs
Here’s a list of all Macs that are compatible with the MacOS 12 Monterey. This will help you determine if your device is already compatible, and you will get the update automatically.
- MacBook Pro (2014 or later)
- MacBook Air (2014 or later)
- MacBook (2015 or later)
- Mac Mini (2014 or later)
- iMac (2014 or later)
- Mac Pro (2014 or later)
- iMac Pro (2017 or later)
If you are not sure what device you are using, please click the Apple logo at the upper left corner and select About this Mac. You will see an overview information of Mac hardware:
Now that you have determined whether your Mac device falls under the supported list of devices or not, if it doesn’t and you still want to install the mOS 12 Monterey on an unsupported Mac computer, then read out the below tutorial carefully and follow the steps.
Part 1: Backup Your Mac
This is the most important step before getting started as installing macOS Monterey on unsupported Mac is not recommended by Apply. It might have potential bugs and issues during the entire process. We suggest testing macOS on a spare device instead.
You can backup the important file to external drive or cloud drive. For full backup, please use Time Machine or Carbon Copy Cloner app.
Part 2: Download macOS Monterey Beta
Now, download the gibMacOS tool which can download macOS Monterey InstallAssistant packages directly from Apple. For the follow the below steps:
- Go to the gibMacOS GitHub repository and click Code button as shown below and then select “Download Zip”.
2. Double click the zip file to extract content from it. Usually, it is in Download folder by default.
3. Go to extracted folder and click gibMacOS.command to open up the command line utility.
This will give you a list of available products that you can choose from, and in the end, you will have a number of options that you need to select. The first list is for public released products. As macOS Monterey is in Developer Beta, you need to type ‘C’ to list all public beta products and input ‘4’ to list all macOS versions in Developer Beta.
4. As and when you see the next screen, press “1” to begin the download. This should take a while as the file is over 11GB.
p.s You can also download macOS 12 Monterey if the Mac was enrolled in Apple Beta Software Program. You will see the download link once logging into Apple Developer account.
Part 3: Create macOS Monterey Bootable USB
Once the download has been completed, you can locate macOS Monterey Beta in Download folder as usual.
/Downloads/gibMacOS-master/macOS Downloads/developer/071–63739–12.0 macOS 12 Beta
Now, double-click the InstallAssistant.pkg file that you downloaded earlier. When prompted to input Mac’s login password, please do so and continue the installation.
Once you have installed the package file, the MacOS 12 Monterey installer will appear under the Applications folder.
Finally, use the following command to create a macOS 12 bootable USB installer:
Part 4: Create OpenCore Bootable USB
OpenCore is a famous bootloader utility designed for Mac users. It has been used millions of time for building a hackintosh, a machine that runs macOS on a PC. With the latest version of OpenCore, it can help you install macOS 12 on an unsupported Mac by tricking the macOS thinking the current device was a newer Mac. However, some of the macOS functions are not working, such as Boot Camp Assistant app and GPU acceleration.
First, download latest version of OpenCore Lagacy Patcher and unpack the zip file. Currently, it is only tool to be used for installing macOS 12 on unsupported Mac.
Go to extracted folder and open OpenCore-Patcher app. And you will see the following options:
Now, insert another USB drive into Mac and input ‘1’ in Terminal app to build OpenCore. Wait 3–5 minutes for the process.
When the download is finished, you will be redirected to the main menu. At this time, please choose ‘Install OpenCore to USB/internal drive’ and select the USB drive you just plugged in.
Part 5: Patch macOS and Install Monterey on UnSupported Mac with OpenCore
Connect macOS Monterey bootable USB along with OpenCore USB into the Mac you are trying to install macOS.
Reboot the Mac and keep pressing Option key to bring up Start Manager. From there, you can select a bootable drive. Now, click on EFI boot to patch macOS with OpenCore utility.
Once the Mac is loaded with OpenCore, select Install macOS 12 Beta from the boot list. Your Mac will be rebooted several times during this step. When the process is done correctly, you will see the installation screen of macOS 12 Beta.
This is a complete tutorial for installing macOS 12 Beta on an unsupported Mac. Hope you found these useful.
However, these are not officially supported by Apple. So there is not guarantee that they would work always. So, we would suggest you to take a backup of your present OS on the cloud and then try them.
Как создать установочную флэшку macOS 12 Monterey
В этой статье мы расскажем, как создать установочную флэшку macOS 12 Monterey. Благодаря установочной флэшке вы сможете установить бета-версию системы на несколько компьютеров, при этом каждый раз её не скачивая. Также можно сделать «чистую установку» и использовать режим восстановления, встроенный в установщик.

Вам понадобится пустая флэшка минимум на 16 ГБ. Можно использовать и SD-карту, если в вашем Mac есть слот для неё. Подойдёт и внешний жёсткий диск.
В данной инструкции речь пойдёт о публичной версии macOS Monterey 12.
Как создать установочную флэшку macOS 12 Monterey
1) Скачайте программу-установщик macOS 12 Monterey на своё устройство.
2) Когда скачивание завершится, ваш Mac запустит установщик macOS 12. Пока что закройте его, зайдите в папку с программами и найдите в ней установщик. Не меняйте его название и не перемещайте установщик.
3) Отформатируйте свою флэшку, использовав GUID Partition Map и Mac OS Extended (Journaled) в Дисковой утилите. Можете воспользоваться этой инструкцией.

4) Назовите отформатированную флэшку USB для удобства.
5) Запустите Терминал и вставьте эту команду:
- Удалите «–nointeraction» из команды, чтобы перед форматированием появился запрос на подтверждение.
- Часть «–downloadassets» скачивает элементы, которые могут понадобиться во время установки. Особенно полезно это для офлайн-установки.
- Использование «–applicationpath» приведёт к ошибке, так что лучше ничего не менять в команде выше.
6) Нажмите Enter и когда понадобится введите свой пароль.

На рабочем столе должен появиться файл Install macOS 12 Monterey.

Второй способ [обновлено]
- Скачайте macOS Monterey Beta на Mac, чтобы программа «Install macOS Monterey Beta.app» появилась в папке с программами.
- Подключите USB-носитель к Mac.
- Переименуйте USB-флэшку во что-нибудь вроде «MontereyBetaUSB».
- Запустите Терминал на Mac.
- Введите следующую команду, заменив «MontereyBetaUSB» на название своей флэшки:
Бета–версия для разработчиков:
Публичная бета–версия:
- Нажмите Enter и введите свой пароль.
Процесс займёт некоторое время, так что наберитесь терпения. После этого вы получите флэшку с установщиком macOS Monterey beta!
Как запустить Intel Mac с флэшкой macOS Monterey
- Подключите USB-флэшку к Intel Mac.
- Перезагрузите Mac и сразу же зажмите клавишу OPTION.
- Выберите установщик macOS Monterey 12 Beta в меню запуска.
Как запустить Apple Silicon / M1 Mac с флэшкой macOS Monterey
- Подключите USB-флэшку к своему ARM Mac.
- Включите Mac, зажав кнопку включения, и продолжайте держать кнопку, пока не появится меню запуска.
- Выберите macOS Monterey Beta в меню.
Сам установщик запускается одинаково на всех видах Mac.

Теперь вы можете наслаждаться новыми функциями macOS Monterey на своём устройстве!