How to install Android SDK and setup AVD Emulator without Android Studio

If you are trying to develop to Android, you probably will end up installing the Android Studio to get the Android SDK and the AVD Emulator working properly.
But if you are using another code editor, like Sublime Text or VSCode, installing the Android Studio will just mess up with your setup and consume your precious RAM for no good reason.
I had a hard time figuring out how to properly do this setup due the lack of documentation about it, so i hope this article helps you. ��
Recommended previous knowledge:
- SDK (Standard Development Kit); Read about on Wikipedia;
- AVD (Android Virtual Device); Read about on docs;
- CLI (Command Line Interface); Read about on Wikipedia;
- Android API levels; Read about on Vanderbilt University;
- How to open, navigate and execute files in your OS terminal;
- Know what are environmental variables;
Understanding the Android SDK
Basically, the Android SDK is a bunch of packages necessary to develop for Android.
These packages stays in subfolders of a folder called “sdk” (or “android-sdk” sometimes). You do not need to know how these packages really work, just what they do.
The picture below is my Android SDK folder, these are the basic packages you will need in order to get everything working properly.
Here is a brief explanation of each package:
- tools: This package is mainly used to manage the other packages and to create AVD’s;
- emulator: As the name suggest, this is the Android emulator;
- platform-tools: Some tools to communicate with Android devices when you plug then in your computer;
- patcher: This package is automatically downloaded by the SDK. I didn’t find what exactly this is for, so just leave it as it is;
The folders bellow contain sub-folders with the packages for each Android API level.
- platforms: The platform packages are required to compile your app for the specified API level.
- system-images: These are the android images used in the emulator.
- build-tools: These are necessary to build your Android apps
Installing the Android SDK
In order to install the SDK we will use the Command Line Tools. These are some quite simple CLI’s used to manage the Android SDK. You can read the documentation here for more details.
Step 1 — Download the tools package
First, you need to download the tools package. And with this package you can download the others.
- First, go to the Android Studio download page: https://developer.android.com/studio;
- Then click in “Download Options”;
- There you will find a table named “Command line tools only”;
- This table contain some zip files. Download the appropriate file for your system (Windows, Mac or Linux);
- Extract this zip and you will get a folder called tools: This is the tools package i explained earlier;
Create a folder anywhere you prefer to place your SDK. I recommend you to stick with one of these commonly used places:
on Windows:
- Globally: C:\Android\sdk or C:\android-sdk (this is not default, but i usually set my SDK here on Windows)
- One user only: C:\Users\<username>\AppData\Local\Android\sdk
on Linux
- Globally: /opt/android/sdk or /opt/android-sdk
- One user only: /home/<username>/.android/sdk
on MacOS
- Globally: /Library/Android/sdk
- One user only: /Users/<username>/Library/Android/sdk
And move the tools folder to this new sdk folder. Make sure you have admin access to this folder and any sub-folders inside it, or the tools package will fail to download new packages.
Note: You can also download a pre-build package for your SO (like the one available on Ubuntu repository). But i do not recommend you do to so, because they probably will not be updated and will be harder to manage, since it was automatically installed.
Step 2— You need Java 8!
The Android SDK packages require Java 8. If you do not have it, you need to download. If you are using a newer version, you have to downgrade to Java 8 or you will eventually get some errors, because it is not compatible.
If you do not have the Java 8 SDK, here is how you can install it:
- download it here: https://www.oracle.com/technetwork/pt/java/javase/downloads/jdk8-downloads-2133151.html;
On Ubuntu run these commands:
- # sudo apt-get update
- # sudo apt-get install openjdk-8-jdk
Sorry for MacOS users, i don’t know how to install it on this OS.
Step 3 — Download the essential packages
Now, download the platform-tools and the emulator packages, because they contain some CLI binary files you will need later. I decided to download these packages first in order to set all the necessary environment variables at once and make the rest of the process easier.
Open a terminal window (you need to use a terminal, not the file explorer), go to your sdk folder and navigate to the /tools/bin directory.
This folder contain the SDKManager binary: this is a CLI used to list the available packages in the Google’s repository and download, update or remove them from your SDK folder.
The bellow command will list all packages installed (the first items on the list) and all packages available to download:
To download the packages, simply copy the package names and pass it as a parameter to the SDKManager CLI using the terminal:
# ./sdkmanager platform-tools emulator
If you open your sdk folder you should see these packages folders there.
Step 4 — Set your environmental variables
You need to set the below environmental variables containing the path to our SDK, so any running program can find it in your pc:
ANDROID_SDK_ROOT = Path to your SDK folder
ANDROID_HOME = The same as ANDROID_SDK_ROOT. This variable is now deprecated, but i recommend setting it because some programs still using it to locate your sdk.
And add these folders to the PATH variable, making their binary files accessible from everywhere:
To add the environment variables on WIndows, just follow these steps:
- Open the “Control Panel”;
- Go to “System and Security” option in the side menu;
- In the window “System Properties” open the tab “Advanced”;
- Click in the button “Environment Variables” in the bottom of the page;
- In the “Environment Variables” window you will see two tables: “User Variables” and ”System Variables”.
- If you created your sdk folder for one user only, set the variables in the “User Variables” table;
- But, if you create your sdk folder globally, set the variables in the “System Variables” table instead;
On Linux, you can set your environment variables in many places. So i choose the ones I found the most appropriate:
-
If you created your sdk folder for one user only, set your environment variables in the file
Here is how i set these variables in my Ubuntu, using the file /etc/environment:
And sorry again, no MacOS instructions for this task.
You can find more about these environmental variables in the oficial docs here.
Now your SDK is ready! If you do not need to run the emulator there’s no need to follow the next steps.
Step 5 — Download the platform specific packages you want
You need more three packages: The platform, the system-image and the build-tools. You can download these packages for any Android version you prefer. In this article, i will download the packages for the API Level 28.
Use the “sdkmanager — list” command to find these packages and download them using the command “sdkmanager <package name>”.
Here’s an example:
Step 5 — Create a AVD device
Creating a AVD device is a simple task: run the AVDManager command (this is a binary file located in the tools/bin folder of your sdk) with the create avd option, a name for the new AVD and the image you want to use.
Here is a example:
# avdmanager create avd — name android28 — package “system-images;android-28;default;x86”
You will be asked if you want to alter some configurations. You can also modify these configurations later in the file config.ini, located in the avd folder (this folder usually is created in your user folder, under the android directory). The currently active configurations can be find in the file hardware-qemu.ini (this file just will be created after the emulator runs for the first time).
Step 6 — Run the Android Emulator
Now you just need to run the emulator command (remember that we added this package to the environmental variables?):
# emulator -avd <your_avd_name>
The emulator take some time to init for the first time. But if you done everything correctly you should see this screen:
How To Get The Android Sdk Tools
If you’re a developer working with Android, then you need to get the Android SDK tools. This is a set of tools that allow you to develop and deploy applications on the Android platform. There are a few ways to get the SDK tools. You can either buy them from Google or download them from the Android SDK website. The best way to find out which way works best for you is to experiment and see which tool works best for your development needs. Once you have the SDK tools, it’s time to start developing your first Android application.
The platform-tools section of the Android SDK is where you can access all the tools needed for Android app development. It contains tools such as adb, fastboot, and systrace. These tools can be installed on Windows and Linux systems and are essential for Android app development. You can also download the tools for Mac or Linux. Once you have them installed, you can begin developing Android apps.
The Android SDK is compressed, so you may need to extract it first. If you don’t know how to extract compressed files, stop here and learn how to do it. You can also install the Android SDK build-tools, if you’re building the AOSP from source. To install the SDK, you must have Java installed. The SDK manager will prompt you to accept the license agreement before installing the SDK tools.
How Do I Get Android SDK Platform Tools?#
If you are using an operating system other than Windows, you can download the Android SDK Platform Tools to install your development environment. You can do so by going to the Android SDK download site. This should include the tools folder, which contains several command-line tools. After you have downloaded the tools, you need to make sure they are on your system path. Luckily, installing them is easy! Follow the instructions below.
How Do I Get Android SDK Platform Tools?How Do I Manually Download Android SDK Tools?Where Do I Extract SDK Platform Tools?How Do I Install Platform Tools on Windows?How Do I Open Platform Tools?Where is the Android SDK Folder?Where is My Android SDK Installed?
First, download the SDK. This package contains the Android platform and the SDK Tools. You’ll also need the Google USB Driver for Windows and the Android SDK Build-Tools for building AOSP from source. These are available in the same download. After downloading the SDK package, you should unpack it into a location where you’ll have access to the SDK files. After that, you should find a folder called android-sdk in the root of your computer.
After you have downloaded the SDK package, you can install the necessary tools. The tools can be used by running Android Studio or using the command-line tool sdkmanager. You can also check the help output to see which compression methods are supported. To install the tools, you can use either of these methods. The SDK Platform Tools are an essential part of any Android development environment. So, download the latest version of these tools and start coding.
How Do I Manually Download Android SDK Tools?#
Before you can download Android SDK tools, you need to know how to use them. Usually, the tools are installed into the Windows user’s application data folder or ‘/Bashrc/sbin/android’ on OS X. However, you can use PATH to manually specify the path. You can also install Android tools into your PATH environment variable. To do this, follow the instructions on the following pages.
You can download Android SDK tools from the official site. These tools are contained in the tools folder, which is available to you in the platform-tools folder. To manually download these tools, you must have the Java compiler installed on your computer. If you don’t have Java installed on your computer, you should first download it to your computer and extract it. If you’re unfamiliar with these files, you can also learn how to extract the files.
Next, open the SDK Manager, click on Android, and then select the ‘Build’ option. The resulting dialog box will prompt you to choose a version of the Android SDK. The Android SDK is the latest version, which means that the Android platform will always be updated. It is essential that you update your SDK as necessary. You can use it to test and optimize your Android apps. Just be sure to download the latest SDK for your development environment.
Where Do I Extract SDK Platform Tools?#
You have downloaded the Android SDK and the platform tools. Now you can begin building and developing Android applications. First, extract the tools from the package. You will also need to extract the Android Native Development Kit (NDK) if you’re using IL2CPP scripting. Both of these files will be extracted into a single folder. If you’re unsure how to extract these files, refer to the documentation provided by Google.
The platform-tools folder contains a command window, which you can use to execute various tasks. To do this, open the platform-tools folder in Windows file explorer. Once you’ve opened the folder, type cmd in the Windows address bar. Type ‘android’ in the CMD window. In the platform-tools directory, you’ll find a hidden developer options folder.
You will also need Java. If you don’t have Java installed, you can download it from the Oracle website. You should be able to find 64-bit and 32-bit versions of Java. To install Java, you need to know more about your computer and how to install Java. If you’ve already downloaded the Android SDK platform tools, then you can start building apps! You can then extract Android SDK platform tools.
How Do I Install Platform Tools on Windows?#
If you want to customize your Android device with your own applications, you must install the Platform Tools for Android SDK on Windows. There are different ways to install these tools. One way is to download them from different platforms. Here are the steps that you need to follow. Once you have downloaded them, open the folder and run the command prompt. The help output will show you the supported compression methods. Ensure that you use the correct version.
Before installing the Platform Tools for Android SDK, you must download and install the SDK first. You must have API level 9 in order to install the SDK. This version of Android SDK contains the Android SDK platform and Android Studio. Once you have the SDK, you can use the software to create applications and run them on your Android device. The platform tools for Android are available on the Android SDK website.
How Do I Open Platform Tools?#
If you haven’t used the Platform Tools for Android SDK yet, you’re probably wondering what they are. They are tools that allow advanced Android users to perform advanced tasks without the need for a programming background. In the past, you’d have to download the entire SDK to run the tools, which would consume data on your device and Internet connection. However, this has all changed. Now, you can open Platform Tools from within Android SDK and get started immediately!
The Platform Tools for Android SDK are located in a folder or zip file. In order to open the tools, you can press Shift while right-clicking the folder. You can also open a PowerShell or command window to access these tools from a computer. After you’ve extracted the files, you can open the ADB/Fastboot binaries from your computer. You can also use the command line to access the Platform Tools.
Where is the Android SDK Folder?#
If you haven’t yet downloaded the Android SDK for your computer, you may be wondering where you’ll find it. The good news is that the SDK is a compressed file and is contained within the Open Java and Sun Java development environments. Adding these files to your path will allow you to run the Android Debug Bridge and other command line tools. If you’re still unsure about how to find the SDK for your computer, you can read more about these files at the Open Java website.
To find the Android SDK for macOS, open up the Android Studio application and click the Preferences menu. From there, click the Android SDK menu item, and use the search box to find the Android SDK folder. When you select the Android SDK folder, the path will be displayed in the “Android SDK Location” directory. On macOS, you can find the SDK folder in /Users/your-username/Library/Android/sdk folder.
Where is My Android SDK Installed?#
The first step is to open the File Explorer application and navigate to the menu item called “Android SDK.” In the “Android SDK Location” text box, type the location of the SDK. You can also copy the location from your address bar and paste it in the field. Then, you need to select the folder and click “Apply”.
You can also use the F4 keyboard shortcut to find the Android SDK folder. The folder will be located inside the SDK folder. Alternatively, you can open the Android SDK folder by clicking on “Android Studio” and typing in the path. Once the file path is located, click on “Apply” and “OK” to save the changes. Once you’ve found the Android SDK folder, you can use the F4 keyboard shortcut to navigate to it.
If you’re using a Mac, you should already have Java installed on your machine. If you don’t, visit the Oracle website to download the Java version. You can choose the 32-bit or 64-bit version of Java, depending on your system. It’s important to know your computer model before downloading and installing the appropriate version of Java. If you’re using a Mac, you should first download the Java application from the Oracle website. If you’re having trouble with the installation, learn more about your computer’s compatibility and the Java version you’re using.
SDK Manager
The Android SDK separates tools, platforms, and other components into packages you can download using the SDK Manager.
You can launch the SDK Manager in one of the following ways:
- From Eclipse (with ADT), select Window > Android SDK Manager.
- From Android Studio, select Tools > Android > SDK Manager.
- On Windows, double-click the SDK Manager.exe file at the root of the Android SDK directory.
- On Mac or Linux, open a terminal and navigate to the tools/ directory in the Android SDK, then execute android sdk .
You can select which packages you want to download by toggling the checkboxes on the left, then click Install to install the selected packages.
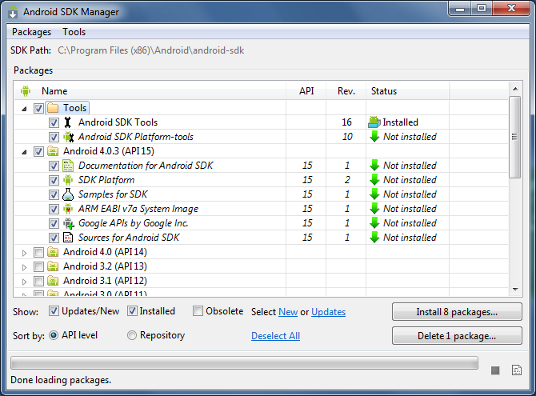
Figure 1. The Android SDK Manager shows the SDK packages that are available, already installed, or for which an update is available.
Recommended Packages
Here’s an outline of the packages required and those we recommend you use:
SDK Tools Required. Your new SDK installation already has the latest version. Make sure you keep this up to date. SDK Platform-tools Required. You must install this package when you install the SDK for the first time. SDK Platform Required.You must download at least one platform into your environment so you’re able to compile your application. In order to provide the best user experience on the latest devices, we recommend that you use the latest platform version as your build target. You’ll still be able to run your app on older versions, but you must build against the latest version in order to use new features when running on devices with the latest version of Android.
To get started, download the latest Android version, plus the lowest version you plan to support (we recommend Android 2.2 for your lowest version).
System Image Recommended. Although you might have one or more Android-powered devices on which to test your app, it’s unlikely you have a device for every version of Android your app supports. It’s a good practice to download system images for all versions of Android your app supports and test your app running on them with the Android emulator. Android Support Recommended. Includes a static library that allows you to use some of the latest Android APIs (such as fragments, plus others not included in the framework at all) on devices running a platform version as old as Android 1.6. All of the activity templates available when creating a new project with the ADT Plugin require this. For more information, read Support Library. SDK Samples Recommended. The samples give you source code that you can use to learn about Android, load as a project and run, or reuse in your own app. Note that multiple samples packages are available — one for each Android platform version. When you are choosing a samples package to download, select the one whose API Level matches the API Level of the Android platform that you plan to use.
Tip: For easy access to the SDK tools from a command line, add the location of the SDK’s tools/ and platform-tools to your PATH environment variable.
Установка platform-tools (adb и fastboot)
Инструменты "platform-tools", "adb" и "fastboot" необходимы для установки кастомного рекавери, рутирования телефонов на Android и т.п.
В данной статье речь пойдет об установке инструментов командной строки "Android SDK" на Windows 10 (также доступно для MacOS и Linux) для последующей установки кастомного рекавери и рутирования телефона Xiaomi Redmi 4A.
Сначала скачайте "sdk-tools" на компьютер и распакуйте в любую удобную для Вас папку. В папке "sdk-tools-windows-xxxxxxx" (xxxxxxx — цифры) перейдите в подпапку "tools\bin", затем удерживая клавишу "Shift" нажмите в свободном месте проводника Windows правой кнопкой мыши и выберите пункт контекстного меню "Открыть окно команд".
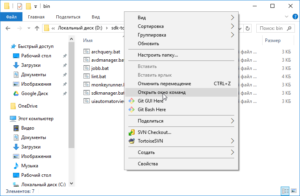
Чтобы скачать необходимые файлы, введите команду:
Число 23 означает версию SDK и соответствует Android 6, так как на телефоне Xiaomi Redmi 4A установлена именно эта версия системы. Вы же укажите версию SDK, соответствующую версии Android на Вашем телефоне.
Если получите warning (предупреждение), что файл "repositories.cfg" не может быть загружен, создайте файл с таким же именем в папке, путь на которую указывает предупреждение.
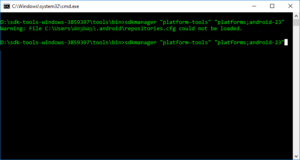
Если все правильно сделано, будет отображено пользовательское соглашение. Согласитесь с ним, напечатав "y" и нажав "Enter". Подождите несколько минут, по окончании установки средств разработки Вы увидите сообщение об успехе "done".
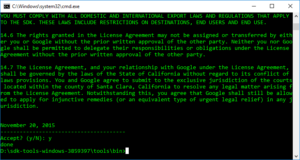
Закройте командную строку и поднимитесь на два уровня выше в родительскую папку "sdk-tools-windows-xxxxxxx" (xxxxxxx — цифры), там Вы увидите, что добавлено две папки "platform-tools" и "platforms". Войдите в папку "platform-tools" и посмотрите, среди файлов должны быть "adb.exe" и "fastboot.exe".
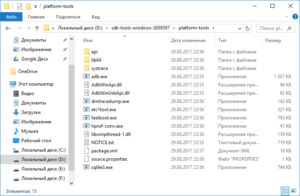
Все, на этом установка "platform-tools" завершена. Откройте окно команд в данной папке (см. выше) и приступайте к прошивке кастомного рекавери или других задач.