3 способа загрузки macOS, которые пригодятся при обновлении системы
 В закладки
Если после презентации WWDC 21 и нашего рассказа о первых впечатлениях от новой macOS Monterey вы решили лично проверить все 50 фишек системы, рекомендуем вспомнить полезные режимы загрузки компьютера Mac.
Если что-то пойдет не по плану и придется переустанавливать macOS, вам пригодятся такие режимы.
�� Спасибо re:Store за полезную информацию. ��
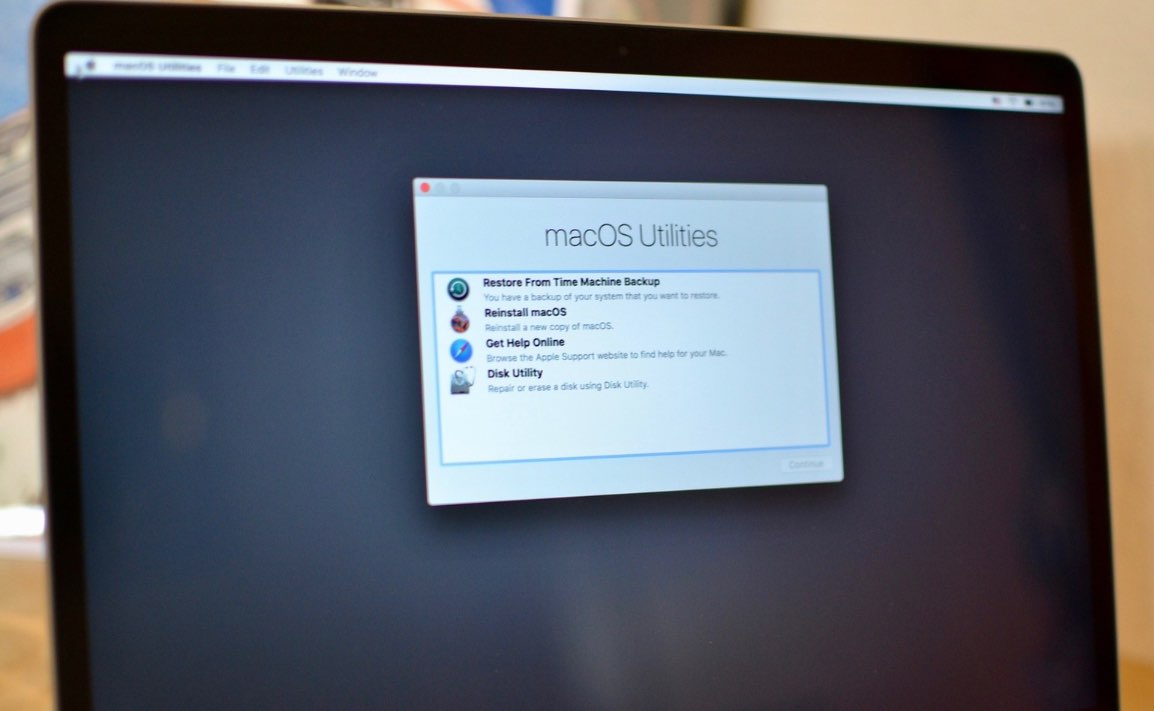
1. Режим восстановления
Самый простой и действенный способ восстановить компьютер Mac в случае неудачной установки системы.
Mac загрузится из защищенной от перезаписи области и предложит на выбор несколько доступных действий. В таком режиме получится:
запустить дисковую утилиту для форматирования или разбивки диска на разделы;
установить/переустановить текущую версию macOS;
восстановить компьютер из резервной копии Time Machine;
получить доступ к сайту поддержки Apple.
Для того, чтобы загрузиться в данном режиме, в момент запуска Mac зажмите сочетание клавиш Command (⌘) + R.
2. Режим восстановления по сети
Данный режим является практически полной копией предыдущего и предоставляет аналогичные возможности. Разница лишь в том, что в этом режиме все недостающие данные будут загружены с серверов Apple.
Так восстановление будет происходить дольше, но получится оживить Mac даже с “затертой” загрузочной областью. На выбор будут доступны те же действия: восстановление из копии, переустановка системы и дисковая утилита.
Еще в таком режиме получится установить только самую актуальную версию системы для вашего Mac. Например, при загрузке после установки beta-версии macOS Monterey или со старой версии macOS Mojave будет предложена установка последней версии macOS Big Sur.
Для загрузки в режиме сетевого восстановления при запуске Mac зажмите Command (⌘) + Option (⌥) + R.
3. Режим восстановления по сети до “родной” версии macOS
Этот режим работает так же, как предыдущий, но после загрузки всех необходимых данных будет предложена переустановка системы на ту, с которой продавался данный компьютер.
Если, например, используете Mac mini 2018 года, в таком режиме восстановления будет предложено установить macOS Mojave.
Это отличный способ привести Mac к состоянию из коробки перед продажей или передачей другому человеку. А еще так можно быстро сделать даунгрейд системы и буквально оживить старый Mac.
Для загрузки в таком режиме используйте сочетание клавиш: Command (⌘) + Option (⌥) + Shift (⇧) + R.
Безусловно, это не все способы загрузки macOS. Есть и другие полезные варианты запуска компьютера, о которых мы рассказывали в отдельной статье. А на новых Mac с процессорами M1 работают немного другие комбинации клавиш.
В закладки
The ultimate Mac recovery mode guide

Having spent some years coding applications for macOS, we’ve created a tool that everybody can use. The all-round problem fixer for Mac.
So here’s a tip for you: Download CleanMyMac to quickly solve some of the issues mentioned in this article. But to help you do it all by yourself, we’ve gathered our best ideas and solutions below.
Features described in this article refer to the MacPaw site version of CleanMyMac X.
Not so long ago, if the boot drive on your Mac ran into problems that needed to be fixed by Disk Utility or third-party software, or you needed to reinstall macOS, you would have to boot your Mac from an external drive or even a DVD. That’s unnecessary now, thanks to the Recovery partition created on every Mac that runs macOS Lion or later. But what is the Recovery partition, what does it do, and how do you use it? We’ll answer these questions and more in our ultimate guide to Mac recovery mode.
What is recovery mode on the Mac?
Recovery mode is the name given to the mode of operation your Mac enters when you boot into its Recovery partition. The Recovery partition is a hidden section of the boot drive that houses a bootable installation of the latest version of macOS installed on your Mac.
In addition to a Recovery partition on your boot drive, Apple also hosts one on its servers, so if you can’t boot into the local partition, you can use Internet Recovery mode and boot into that one.
When do you need Mac recovery mode?
The most likely reason you will need recovery mode is if your Mac won’t boot normally or if it is frequently crashing and you can’t find any other reason. You would then use recovery mode to reinstall macOS. You may also need it if you want to restore your entire Mac from a Time Machine backup.
One of the less common reasons for using recovery mode is to perform an operation in Terminal —such as disabling security integrity protection (SIP) — that you can’t perform on the partition you have booted from.
What does recovery mode on the Mac do?
The recovery mode can be used to repair your boot disk, reinstall macOS, restore your Mac from a Time Machine backup or perform other operations on your boot drive. It has a pared-down user interface that provides access to its functions through a tool called macOS Utilities that appears on the startup in the macOS Recovery. You can also access additional tools like Startup Security Utility and Terminal through the Utilities menu bar.
How to boot your Mac in recovery mode
The process to start your Mac into recovery mode differs slightly between Apple silicon and Intel-based Mac computers. We’ll describe them separately below.
Intel-based Mac
- Shut down your Mac.
- Press and hold Command-R, then press the power button.
- Release Command-R when you see the Apple logo or another image.
- Type in your admin name and password when prompted.
- You should now see the macOS Utilities window.

Mac with Apple silicon
- Shut down your Mac.
- Press and hold the power button until you see the startup options screen.
- Click Options, then Continue.
- Type in your admin name and password.
Other key commands for macOS recovery mode
In addition to using Command-R to restart an Intel-based Mac in recovery mode, there are other key commands you can use. They all start your Mac in recovery mode, but they differ in the version of macOS they install when you choose the Reinstall macOS option.
- Command-R: the current version of the most recently installed macOS.
- Command-Option-R: the latest version of macOS that is compatible with your Mac.
- Shift-Command-Option-R: the macOS that came with your Mac or the closest version still available.
When you use option 1 above, your Mac will boot from the Recovery partition. When you use options 2 or 3, it will boot in Internet recovery mode, and so you will need to be connected to the internet.
What to do when you can’t boot in recovery mode
If you try to start your Mac in recovery mode and it doesn’t work, there are a number of things you can try.
- Make sure you’re following the correct steps for the Mac you’re using. Using Command-R or any variation of it doesn’t work for a Mac with Apple silicon, for example.
- Make sure you press the keys simultaneously, not one after the other.
- Shut down your Mac. Then press the power button to restart it. Count to 3 before pressing the keys to give your Mac more time to recognize the keyboard.
- If you’re using a Bluetooth or other wireless keyboard, swap it for a plug-in keyboard if you can – your Mac will recognize that more quickly during startup.
- Make sure there isn’t a firmware password set. If someone else administers the Mac you’re trying to start up in recovery mode, they may have set up a firmware password. You will need to type this in during startup to enter recovery mode. Once macOS Utilities appears, you can switch off the firmware password by choosing the Utilities menu, then Startup Security Utility or Firmware Password Utility. From there, you can choose Turn off Firmware Password.
- If you can’t boot from the Recovery partition on your Mac, try booting into Internet recovery by pressing Command-Option-R or Command-Shift-Option-R. That should work, even if the recovery partition on your Mac is missing or corrupt.
- If you can boot normally but not in recovery mode, check to see if there is a recovery partition on your Mac. Go to Applications>Utilities and double-click Terminal to launch it. Type: diskutil list You should see a list of volumes connected to your Mac. One of them should include the words ‘Apple_Boot Recovery HD’. If it’s not there, you won’t be able to boot into recovery mode and will need to use Internet Recovery or go to the next step.
- Boot macOS from an external hard drive or USB stick. If you have a bootable installer or a clone of your boot disk, boot from that. If not, try booting from a Time Machine volume if you use Time Machine. Once you’ve booted from an external disk, you can use Disk Utility to try and repair your startup disk. You may need to reinstall macOS, so now would be a good time to back up your data.
Do you really need recovery mode?
Recovery mode is a great tool for when nothing else will fix the problems on your Mac. But it’s very rarely necessary. Most of the time you enter recovery mode, you’re going to reinstall macOS, which is a pretty drastic step to fix problems. So, it’s important to evaluate other options before you take that step. Here are some things you should try first.
- Restart your Mac. Sometimes a normal restart is all you need to get things working correctly. It gets rid of temporary files and frees up RAM.
- Check your Wi-Fi and broadband connection. If your Mac is running slowly, the problem may be your internet connection — either your Wi-Fi network or your broadband provider. So much of what we do on our Mac relies on communicating with remote servers that a bad connection can slow everything down.
- Reinstall problematic applications. If your Mac crashes or hangs while using the same application each time, it’s likely that the application is at fault. Try reinstalling it.
- Scan your Mac for malware. Yes, Mac computers do sometimes get infected with malware, and it can cause them to slow down and crash.
CleanMyMac X can help with all of the steps described above. Its menu bar item displays a dashboard showing how your network connection is performing, how much RAM and disk space you’re using. It also displays the current status of your MacBook battery and highlights any applications putting pressure on your Mac. It’s a great tool for keeping an eye on what’s going on on your Mac. And, you can free up RAM and scan your Mac for malware directly from the menu bar.
CleanMyMac X also has a Maintenance module that can repair disk permissions, free up RAM, run regular maintenance routines and reindex Spotlight (another way to improve your Mac’s performance). You can download it for free here.
Recovery mode is a tool that allows you to boot your Mac into a different partition when you can’t boot normally or when your Mac is having serious problems. Usually, that partition is on your startup disk, but it’s hidden away during normal use. While there are several things you can do in recovery mode, most of the time, you’ll use it to restore your Mac from a Time Machine backup or reinstall macOS. Before you take that step, consider using a diagnostic tool like CleanMyMac X to identify and fix problems on your Mac.
(macOS/OS X) Internet Recovery and how to be NOT scared of it…
![]()
Let’s start off with the moment where powering on your Mac did not respond in the general way it does. Maybe you were trying to dual-boot your system and something went wrong. Did you just unknowingly destroy your favourite toy? I think you are better off than the ones who are living on the edge by still rocking the 2011 MacBooks. If you are facing a booting issue with your Mac then it is either of two things : you have worn out your hard-disk (OR) you just have experienced a flesh wound.
Older systems might run into issues where the internal hard disks are no longer able to perform at an optimal rate and this is a hint from Apple to hit the Apple Store as soon as possible. Keep the cash ready for either replacing your hard-drive or getting a new machine.
Let’s assume that you are having one of the newer MacBooks (2013 and sooner) and you run into the problem of not being able to boot into macOS/OS X. This is what has happened to you. You have either corrupted the contents of the disk (OR) you have deleted the partition which contains your Operating System. Even though the latter seems to be happening seldom, believe me when I say that it is an honest mistake and a careless one too.
But you need not worry since I have gone through the same phase and this blog is to help you out through any means possible.
So what is Internet Recovery and why did you get scared when it came up?
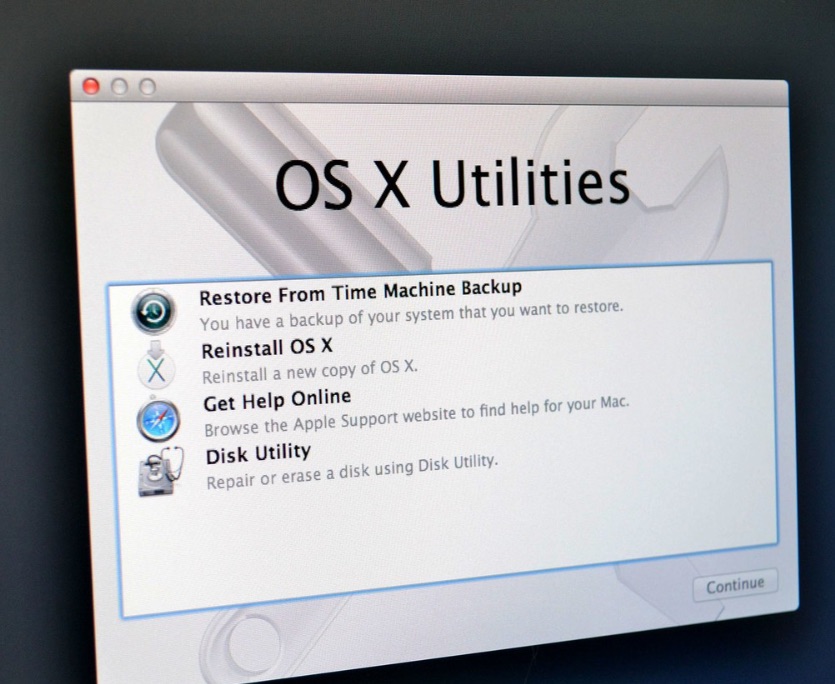
In addition to the startup volume which holds a bootable copy of the operating system along with your applications and data, your Mac’s disk contains a hidden recovery partition that you can boot from in order to reinstall OS X, perform a quick check of connected disks and more.
But what happens if you try to enter this mode by hold-pressing ⌘-R (Command-R) while your system is booting up. You should generally see the Utilities app running for you as follows.
But you are presented with a different story…
You select your choice of Network and enter the Network Password. But instead what you end up is here (either through ⌘-R or ⌘-alt-R).
NOTE : ⌘-alt-R lets you enter the Internet Recovery Mode manually.
Taking too long? Wait it out. It completely depends on the Network your system is connected to.
What your system is doing is fetching the data regarding your System and your OS at the time of purchase and downloading the Utilities application from Apple’s servers. Why is it doing so if the Utilities application is supposed to launch if we use ⌘-R? This is because, when you messed up the drive, the pointer to the OS got lost and there is no information regarding what the computer should proceed with. Most probably the macOS data got welcomed by the trash bin instead.
Once it finishes downloading, you will be presented with the Utilities application as shown earlier. Click on Disk Utility and format your drive once in GUID mapping and name it whatever you like, e.g. Macintosh HD.
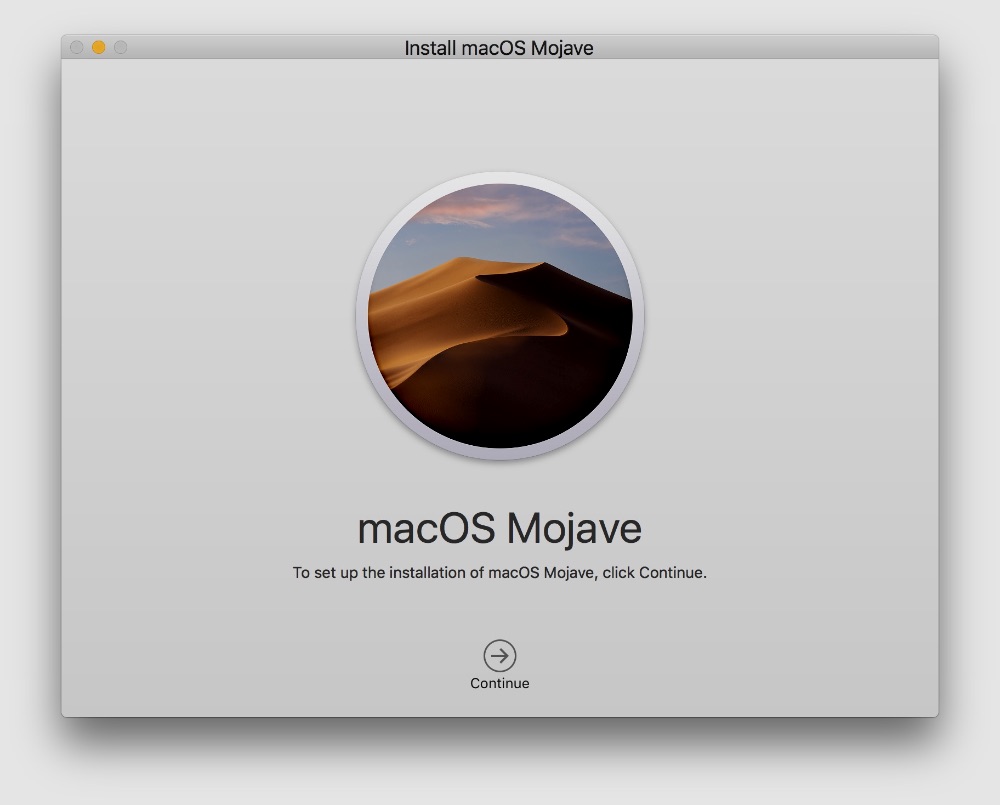
Now return back to the Utilities application and click on Reinstall macOS and proceed as suggested. You would be presented with the following..
Click on Macintosh HD and wait for the following process to end. Again, it would depend on your Network Bandwidth.
Once the process ends, your Mac with restart and you are back to where you want your device to be. Proceed with the “Formalities” and be awesome again.
But wait! All this could have been avoided if you had a simple backup! So, use TimeMachine and backup your existing state of system. Since you have practically done a fresh install of the Operating System, it is best that you grab a hard disk and use it as your backup-drive. I would recommend having a buffer of 200 GB of storage space over the existing internal-hard-disk (OR) SSD storage.
So the next time you fall into this mess, you could just use the Restore From Time Machine Backup option from the macOS Utilities and save some time.
Режимы загрузки macOS – руководство с комбинациями клавиш

На сайте уже есть пару статей, в которых мы разбирали какие действия предпринять когда не запускается MAC (ссылки ниже). В одной из них я кратко описал пару режимов загрузки MAC, которые могут помочь вернуть компьютер к жизни.
На самом деле, Apple разработала и внедрила в свои компьютеры целую серию различных режимов загрузки. Каждый из них чем-то уникален, но все они направлены на выявление возможных ошибок и неисправностей как в аппаратной части так и с программным обеспечением.
В этой статье я расскажу как запускать тот или иной режим загрузки, а также объясню зачем он может понадобиться.
- Если MacBook наглухо завис и требует перезагрузки – читай эту статью
- После обновления OS X El Capitan MAC виснет на белом экране – читай эту статью
- Если ваш MAC не запускается по другим причинам – читай эту статью
- Не знаешь что означает экран появившийся при загрузке MAC – читай эту статью
Итак! Скорее всего ваш MAC не желает загружаться “по хорошему”… Сколько бы вы его не “уговаривали”, он упорно показывает белый экран или “гоняет по кругу” процесс загрузки. В таких случаях пользователи начинают теряться и попросту опускают руки.
Бывает что и переустановка MAC OS X не спасает ситуацию. А ведь на жестком диске остались накопленные долгими годами рабочие файлы. Е-мае! Что же делать? Не волнуйтесь! На каждый хитрый случай найдется свое хитрое решение.
Разработчики OS X продумали множество вариантов стечения обстоятельств и на большинство из них припасли уникальное решение.
Ниже я привел список всех возможных режимов загрузки MAC, каждый из которых сможет помочь в зависимости от ситуации. Для того чтобы запустить один из них, перезагрузите компьютер, зажав необходимую комбинацию клавиш.
В каком режиме запустить MAC – решать вам. Ознакомьтесь с каждым из них и пробуйте… пробуйте… и еще раз пробуйте.
| Зажать во время запуска | Описание |
|---|---|
| Shift | Безопасный режим – специальный режим загрузки MAC, при котором компьютер производит проверку диска и папок на ошибки, а также предотвращает загрузку всего того, что потенциально может стать причиной сбоя и зависаний. Проще говоря, загружается облегченная версия OS X и подчищается разного рода мусор (в виде накопленных кэш файлов). |
| Option | Менеджер загрузки (Startup Manager) – позволяет выбрать с какого именно диска (носителя) произвести загрузку компьютера в данный конкретный момент. |
| C | Произведется запуск компьютера с загрузочного CD/DVD или USB флешки. |
| D | Режим Проверки Оборудования (Apple Hardware Test) или Диагностика (Apple Diagnostics) (в MacBook выпущенных после Июня 2013). В этом режиме будет произведена целая серия проверок и тестов оборудования вашего MAC компьютера, которая нацелена на выявление неисправных или проблемных модулей. |
| Option-D | Запуск режима Проверки оборудования или Диагностики через интернет. Тоже что и режим выше, но оболочка мастера диагностики будет загружена с сервера Apple. |
| Command-R | Режим Восстановления Системы (OS X Recovery) дает вам доступ ко всем инструментам, необходимым для переустановки MAC OS X, исправления ошибок диска и даже восстановления резервной копии из Time Machine. При использовании этого режима будет установлена последняя версия OS X, которая ранее устанавливалась на вашем MAC. |
| Command-Option-R | Запуск Режима Восстановления Системы через интернет. Этот вариант спасает в случаях когда ваш SSD был поврежден или стерт. Загрузка режима восстановления происходит непосредственно с серверов Apple. В этом случае будет установлена версия MAC OS X, которая изначально поставлялась с этим компьютером. |
| Command-Option-P-R | Сброс NVRAM (non-volatile random-access memory) – очистка раздела памяти MAC, которая хранит в себе определенные настройки, отвечающие за громкость динамиков, разрешение экрана, загрузочный диск, информацию о недавних сбоях системы. Так что если у вас проблема с одним из этих параметров, возможно сброс NVRAM поможет ее решить. |
| Command-V | Подробный режим (Verbose Mode) – создан для разработчиков и IT специалистов и направлен для выявления неполадок, возникающих при загрузке компьютера. Запустив Подробный Режим, на экран будет выводиться подробная информация о выполняемых процессах в момент загрузки OS X. В итоге компьютер должен загрузить привычный графический интерфейс OS X или же выдаст “камень преткновения”, по причине которого дальнейшая загрузка операционной системы не возможна. |
| Command-S | Однопользовательский режим (Singe User Mode) – брат близнец режима Verbose Mode, с отличием в том, что вместо графического пользовательского интерфейса вам “в руки дадут” командную (текстовую) строку Терминала. Дальше все управление сводится к вводу команд с клавиатуры компьютера. Используя однопользовательский режим, знающий человек может “наковырять” глубже и возможно выявить неисправность или устранить ошибки на диске. |
| T | Режим внешнего диска (Target Disk Mode) – может понадобиться для скоростной передачи файлов между двумя компьютерами MAC. Обычно этот режим используется в случаях когда экран MAC по какой-либо причине не работает, но есть необходимость сохранить (скопировать) данные с жесткого диска. Передача файлов производится посредством Thunderbolt кабеля соединяющего порты обеих компьютеров. Режим внешнего диска необходимо запускать только на компьютере с которого требуется переписать данные. |
Ну вот как-то так… Еще раз оговорюсь – каждый из режимов загрузки MAC уникален, но все они по сути созданы для того, чтобы вы могли вернуть свой MAC к жизни и не потерять данные.
Пробуйте и пишите в комментариях что у вас получилось. И не забываем, что подписавшись на нашу группу вКонтакте, ты никогда не потеряешь с нами связь и в любое время сможешь обратиться к нам за помощью.