How to Compress PDF Offline on PC and Mac

Do you have a PC Windows or Mac and are you looking for some traditional software, through which you can reduce the size of PDFs? This article will help you to find the best OFFLINE PDF Compressor suitable for your needs.
We will start with the software for Windows and then also propose Mac applications able to compress PDFs (even in batch mode).
Compress PDF (Windows)
First download Compress PDF app and then proceed to the installation wizard on your Windows PC. This program takes advantage of the capabilities of the Ghostscript component to compress PDF in batch and offline mode. The quality of the compressed PDF is very high and the program offers several compression levels to choose from.
Once you open the program, select the PDF output quality from the drop down menu on the top right:
- Screen: low resolution, screen view only quality, 72 dpi images
- eBook: medium resolution, low quality, 150 dpi images
- Printer: high quality, 300 dpi images
- Prepress: high quality, color preserving, 300 dpi images
- Default: wide variety of uses
To start the compression of your PDF documents, all you have to do is click on the button in the center or drag them directly onto the screen.
At the end of the conversion the folder will open automatically where you will find all the compressed files (with the suffix “compressed” in the file name).
With this tool you can also convert Word to PDF and compress them automatically.
ShrinkIt (Mac)
Do you use a Mac and would like to understand what tools you have on your side to reduce the size of PDFs? Then continue reading: below you will find the best tools to perform the operation in question by acting as macOS.
The app you can use to compress PDF offline on Mac is ShrinkIt — this is a small free application that allows you to compress PDF files with a simple drag-and-drop. Just start it, drag the documents of your interest into its main window and that’s it: there are no complicated settings to adjust or tedious installations to deal with.
To download ShrinkIt on your computer, connect to the software site and click on the Download ShrinkIt x.x.x button. When the download is complete, drag the program icon to the macOS Applications folder, right-click on it and select the Open item from the menu that appears, in order to start the program, however, going around the limitations imposed by Apple towards the applications from non-certified developers (this must be done only at the first start).
Now that you see the ShrinkIt window on your desktop, drag and drop the PDFs you want to optimize on it and that’s it. The application will automatically create a backup copy of the original files and replace them with their “compressed” versions.
Compress PDF with Acrobat (Windows and Mac)
Acrobat Pro DC is available for PC and macOS. It can be used to compress PDF documents in a simple way. But please note that it is NOT FREE.
To download Adobe Pro DC on your Mac or PC, visit the page of the Adobe website dedicated to the trial of the program, type the email address of your Adobe ID in the appropriate field visible in the browser window (if you do not have an Adobe account yet, you can create one one at the moment, following the instructions on the screen), click on the Continue button, enter the password and provide the data relating to the payment that you are asked for.
Then wait for the download of the installation file to be completed. Once the download is complete, open the .dmg package obtained and double-click the Acrobat Pro DC installer icon in the window you now see on your desktop. Next, type in the password of your user account on the Mac and click on the OK button. Then log into your Adobe account by clicking on the Login button and providing the required data. Afterwards, click on the Start installing button.
Once the installation procedure is complete, you can compress PDF. Select the PDF to be compressed, by clicking on the Select a file button, then click on the File menu at the top left, select the Save as other item and choose the PDF with reduced size option. Finally, set compatibility with Acrobat versions, click on the OK button and indicate the location on your computer where you want to save the final file.
Как сжать PDF на Mac без потери качества [бесплатно и быстро]

Специалист по написанию технических текстов, который создает различные типы статей, от обзоров до практических статей для Mac.
PDF или формат переносимых документов — это широко известный формат файлов, который в основном используется для обмена документами. Эти файлы используются как студентами, так и профессионалами для различных целей. Некоторые из этих файлов могут быть большими, и их трудно отправить по электронной почте или другим системам обмена файлами. В связи с этим рекомендуется найти пути на как сжать PDF без потери качества на Mac .
Когда PDF-файл сжимается, есть ли разница? Ответ — да. Существует существенная разница, когда дело доходит до размера файла. Как правило, файл PDF использует метод сжатия без потерь, который сохраняет качество и все ключевые элементы, которые необходимы для сохранения исходного формата документа в целости и сохранности. Кроме того, качество файла PDF измеряется в DPI (точек на дюйм). Если вы хотите лучшее качество, вы должны выбрать оптимальный размер.
Часть 1. Два простых способа сжатия PDF на Mac без потери качества
Многие даже не знают, что размер файла PDF можно уменьшить. Всего за несколько шагов вы можете значительно уменьшить размер громоздкого PDF-файла для удобного обмена по электронной почте.
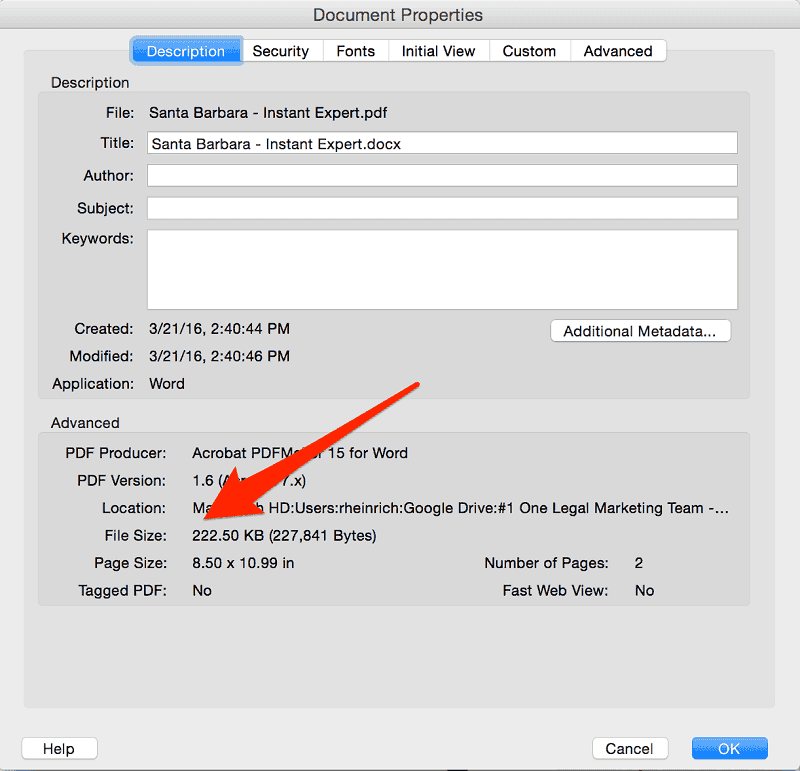
Для этой задачи вы можете загрузить файл PDF из Интернета или создать его на своем Mac. Вы даже можете использовать любой файл PDF, полученный от кого-то по электронной почте.
1. Как сжать PDF на Mac с помощью предварительного просмотра
При создании PDF-файла из Word, Spreadsheet или PowerPoint перейдите в «File menu» (Файл меню). Следующим шагом является нажатие на «Печать» из опций.
Кроме того, вы можете нажать на «Command + P. Это откроет диалоговое окно на экране. В левом нижнем углу нажмите раскрывающееся меню PDF и выберите «Сохранить как PDF». Наконец, установите путь и нажмите на кнопку Сохранить.
Теперь давайте уменьшим размер вновь созданного PDF-файла с помощью предварительного просмотра:
- Выберите файл PDF, который вы хотите сжать на своем Mac, и откройте его с помощью предварительный просмотр.
- В этот момент нажмите на Файл кнопку из меню. Появится раскрывающееся меню и нажмите на Экспортировать.
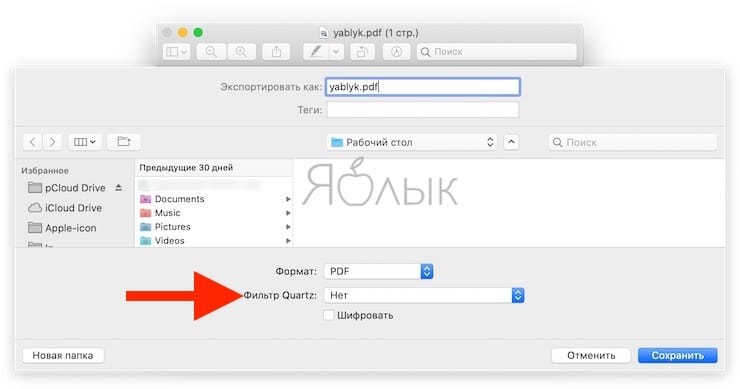
- Вы увидите диалоговое окно. Здесь вы увидите «Кварцевый фильтр«, где появится раскрывающееся меню.
- Нажмите на это меню и выберите «Уменьшить размер файла», а затем нажмите на Save. кнопку.
Перед тем, как сохранить этот уменьшенный файл PDF, вы можете указать место, где вы хотите сохранить файл.
2. Как использовать Adobe Acrobat для сжатия PDF на ПК
Adobe — ведущее программное обеспечение, предлагающее множество решений для управления PDF-файлами. Серия Adobe Acrobat — это высокоэффективный инструмент, который может работать с различными типами PDF-файлов, включая возможность сжатия PDF-файлов на Mac без потери качества.
Хотя Adobe Reader является бесплатным средством просмотра PDF, доступ к которому может получить любой пользователь из Adobe, он позволяет пользователям печатать, просматривать, выделять, заполнять, добавлять заметки и подписывать файлы PDF. Если вам нужны более продвинутые функции, такие как создание, редактирование, сжатие, экспорт и многое другое, вам необходимо подписаться на версию Acrobat.
Давайте перейдем к шагам о том, как сжимайте PDF на Mac без потери качества с помощью Adobe Acrobat .
— Для Adobe Acrobat X/XI:
- Откройте файл PDF, размер которого вы хотите уменьшить, с помощью Adobe Acrobat X / XI
- Продолжать «Файл>>Сохранить как”>”PDF уменьшенного размера. «. Вы получите файл PDF уменьшенного размера с хорошим качеством.
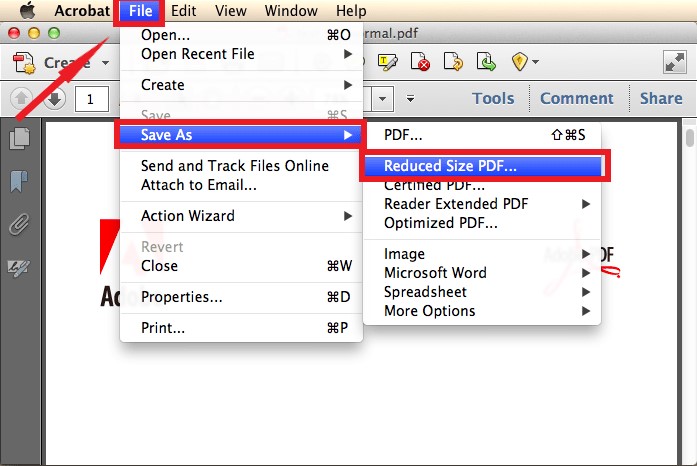
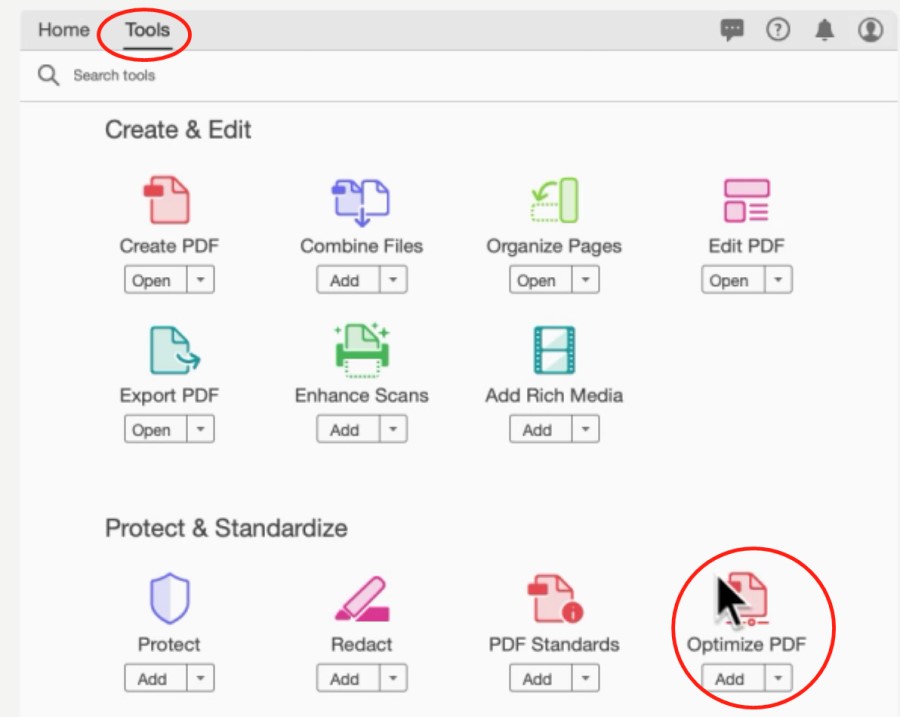
— Для Adobe Acrobat DC:
- С помощью Adobe Acrobat DC откройте файл PDF, размер которого вы хотите уменьшить
- Продолжать «Tools «>»Оптимизация PDF«. Выберите «Уменьшить размер файла», чтобы сжать файл PDF на вашем устройстве.
Однако помните, что использование Adobe Acrobat имеет свои недостатки, с которыми вам следует ознакомиться. Эти заметные недостатки включают высокую цену подписки и неспособность инструмента сокращать PDF-файлы на Mac в пакетном режиме.
Часть 2. Как быстро и бесплатно уменьшить размер файла PDF на Mac?
Рекомендуемое решение, которое вы можете использовать для сжимать PDF на Mac без потери качества с iMyMac PDF Compressor, Этот инструмент предоставляет вам множество заметных функций, которые стоит попробовать.
Давайте подробнее рассмотрим некоторые функции iMyMac PDF Compressor.
- Простой в использовании — Как только вы перейдете на главную страницу iMyMac PDF Compressor на своем Mac, просто перетащите один из ваших PDF-файлов за раз для обработки. Как правило, процесс конвертации прост даже для новичков. Всего за несколько секунд процесс сжатия завершен.
- предварительный просмотр — Вы можете просмотреть сжатые файлы и указать папку, в которой они будут сохранены.
- Безопасный и оффлайн — С помощью этого PDF-компрессора от iMyMac вы можете сжимать свои PDF-файлы, не беспокоясь о взломе, поскольку его можно использовать в автономном режиме. Нет необходимости загружать файлы, если вы собираетесь сжимать их онлайн. С этой схемой вы уверены, что ваша конфиденциальность и информация защищены.
- Без потери качества — При сжатии PDF-файлов этот инструмент от iMyMac обеспечивает пользователям простой, но очень эффективный процесс с высоким качеством. Будьте уверены, что инструмент автоматически предоставит вам идеально сжатый PDF-файл.
- САЙТ — Большинству компрессоров требуется больше времени для распознавания файлов PDF и завершения сжатия. В отличие от других компрессоров, iMyMac PDF Compressor поддерживает высокую скорость независимо от размера файлов PDF.
- Подходящий — Кроме того, это гарантирует, что пропускная способность соответствует требованиям вложений при отправке электронных писем.
- Open the Preview app.
- A pop-up window should appear if it doesn’t click File > Open.
- Select the image you want to compress.
- Then, click Tools > Adjust Size.
- Adjust the Width and/or Height by pixel. You’ll see an estimate of the new size in the Resulting Size section.
- Click OK.
- In your browser, go to Compressor.io.
- Drag and drop an image file from your computer.
- After it finishes compressing, click Download.
- Open your browser and go to TinyJPG.com.
- Drag and drop the image(s) you want to compress.
- It will automatically start compressing. Click Download to save your new file.
- Go to Optimizilla.com in your browser.
- Click Upload Files and select your images.
- You’ll be able to preview the compressed file and adjust it. If you’re happy with it, click Download.
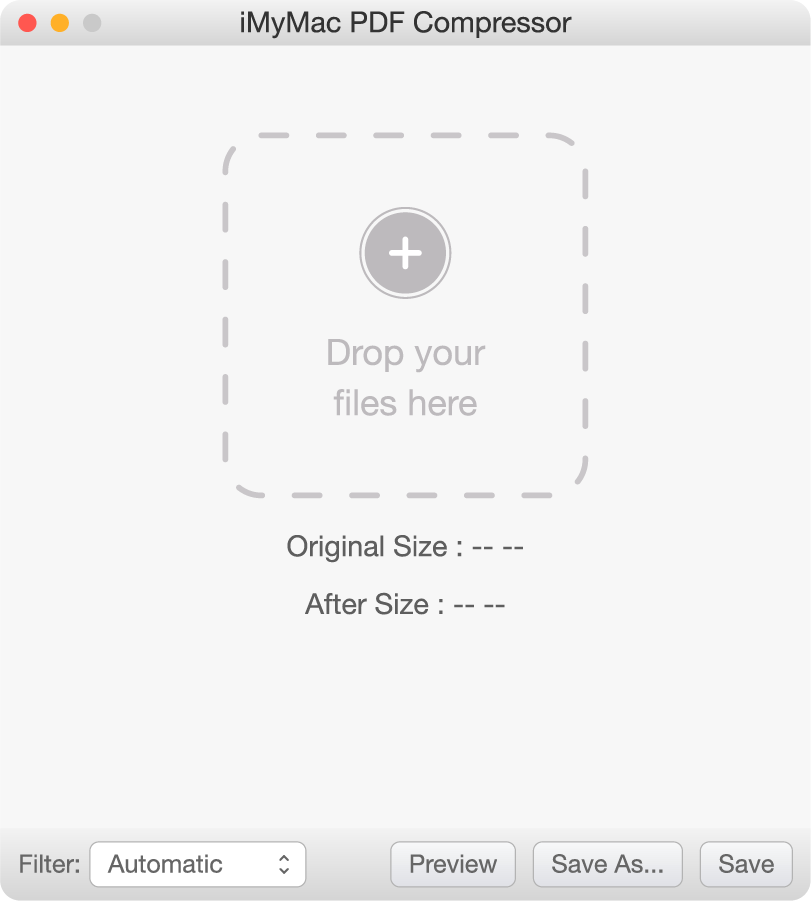
Простые шаги для быстрого и безопасного сжатия файлов PDF
При использовании этого Бесплатный PDF Compressor, ваши PDF-файлы эффективно уменьшаются в размере. Давайте перейдем к простым шагам в использовании этого инструмента.
Шаг 1. Загрузите и установите iMyMac PDF Compressor бесплатно
После того, как вы загрузили iMyMac PDF Compressor с веб-сайта, установите его на свой Mac и получите доступ к его основному интерфейсу.
Шаг 2. Перетащите PDF-файл в iMyMac PDF Compressor.
Переместите PDF-файлы, которые вы хотите сжать, и поместите их в центр интерфейса. Сжатие начнется автоматически. После завершения процесса сжатия вы можете просмотреть файлы, нажав кнопку «Предварительный просмотр».
Шаг 3. Сохраните ваш файл PDF
Нажмите кнопку «Сохранить», чтобы указать папку, в которой будет храниться файл.
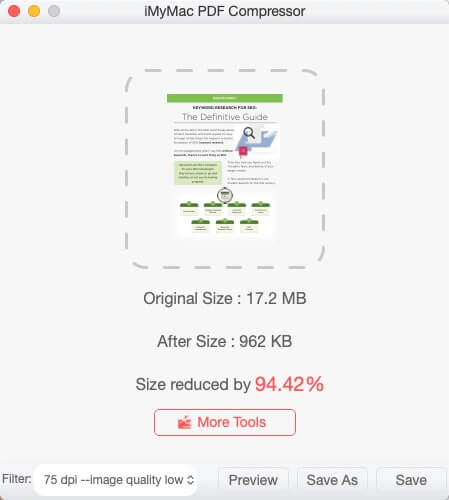
Как правило, процесс преобразования прост, и вы можете сжать PDF Mac без потери качества всего несколькими щелчками мыши.
Как сжать (уменьшить размер) PDF-файл на Mac (macOS)
Формат .pdf идеально подходит для точной передачи текстовой информации, включая форматирование и другие элементы. Еще один очевидный плюс PDF — защита документа паролем. Но есть и один минус — подчас файлы «весом» в 200 КБ при переводе в этот формат разрастаются до 1,2 МБ, и это не всегда удобно при передаче.
Решить эту проблему владельцы компьютеров Мас могут даже стандартными средствами операционной системы macOS.
Как уменьшить (сжать) размер PDF-файла в приложении Просмотр на macOS
1. Откройте PDF-файл в приложении Просмотр, размер которого вы хотите уменьшить.
2. В строке меню сверху выберите Файл → Экспортировать.
3. В открывшемся окне кликните по выпадающему меню напротив надписи Фильтр Quartz и выберите Уменьшить размер файла.
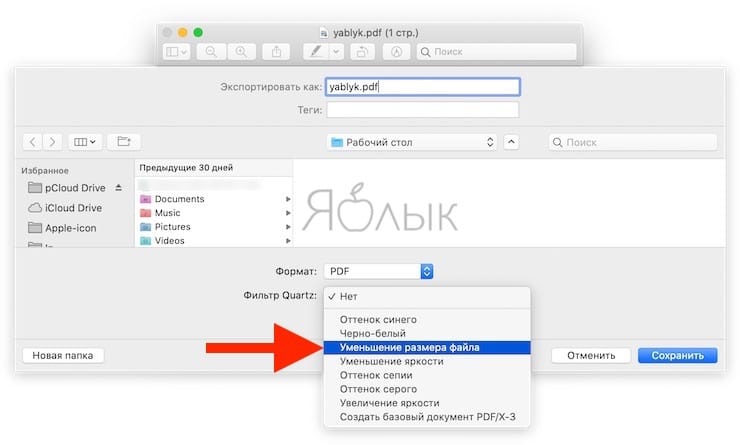
4. Нажмите Сохранить.
Далее будет создана копия выбранного файла с уменьшенным размером.
Насколько хорошо фильтр Quartz сжимает изображение? В тестовом примере файл со сканами страниц в формате А4 размером в 6 МБ был сжат до 800 кб (с неизбежными, но не фатальными потерями по качеству). В целом степень сжатия здесь зависит от источника — если это был конвертированный из Word в PDF документ, его размер уменьшится в 10 раз.
Если качество изображения, полученного после фильтрации, вас не устраивает, попробуйте, например, возможности онлайн-сервиса I Love PDF, в котором помимо всего прочего имеется инструмент для сжатия файла. Но, повторимся, в целом для большинства операций такого рода вполне достаточно и фильтра Quartz.
How to reduce photo size on Mac

Duplicate pictures can cause a huge headache, especially if you’re trying to keep your photo library organized.
But here’s a tip: download Gemini 2 to help you quickly scan for duplicates and get rid of them. With Gemini 2, you can choose which folders to scan or select your entire hard drive.
Now that every phone has an incredible camera on the back of it, it’s never been easier to take high-quality photos. And if you’re like me, that means you take pictures of everything from pets to friends. And there’s a good chance you even have a picture of what you had for brunch last weekend. So what do you do with these thousands of photos you have when you run out of storage space on your Mac? Well, you can compress them.
This article will explain how image compression works and give you step-by-step instructions to do it yourself.
What is compression and how does it work?
You might be wondering what it means to compress your pictures or why you’d want to do it in the first place. It’s no secret that pictures can get pretty large in file size. And depending on what it is, you might not need or want the highest quality of a photo. Compressing the image strips some of the picture’s data and, in turn, makes the file size smaller. Ultimately, freeing up more space on your computer.
Is it possible to compress images without visible quality loss?
When it comes to photo compression, there are two types: lossless and lossy. As its name implies, lossless compression is able to shrink the file size without losing any quality. Conversely, lossy compression will usually result in a bit of photo loss.
If your images are taking up too much space before you start compressing them, you could clean up the duplicate and similar pictures on your computer. An app like Gemini 2 will scan your computer and help you eliminate these images you don’t really want anymore.

How to compress images with Mac Preview app
Fortunately, there’s a feature in the default macOS app, Preview, that will allow you to compress your images. Follow these steps to see how to reduce photo size on Mac using Preview:

If the picture looks smaller, don’t worry, it’s probably just zoomed out. Click View > Actual Size, and it should appear bigger again.
You can also use this method if you want to compress multiple pictures at the same time. Before step 4, make sure you click on one of the thumbnails in the sidebar and then press Command+A on your keyboard to select all. Then, when you make your size adjustment, Preview will apply it to all of the images.
How to compress images with online tools
Of course, if Preview isn’t getting your pictures small enough, there are a handful of online image compressors. Below you’ll read about how to use the top three.
1. Compressor.io
The nice thing about Compressor.io is that right off the bat you can choose whether you want a lossy or lossless compression. But you only get 50 compressions per day, and each file you upload has to be under 10 MB.
Using Compressor.io couldn’t be any easier. Just follow these steps to compress your pictures.

You can also see how much your photo has been compressed by clicking the Compare button.
2. TinyJPG
Another great online compression tool is TinyJPG. You can compress up to 20 jpegs or pngs at once, as long as they’re all under 5 MB and there’s no daily limit. If you pay to upgrade to their pro tier, you can compress as many files as you’d like simultaneously, and the file size limit goes up to 75 MB.
Follow these instructions to learn how to compress a jpeg on Mac using TinyJPG:

3. Optimizilla
Like the other two tools, Optimizilla is an online image compressor. Where Optimizilla beats out the others is there is no file size or daily compression limits. But, you still can only compress 20 images at one time.
After you upload your picture to Optimizilla, it will compress the image to retain 90% of the quality by default. If you decide you want the file to be s
maller, you can adjust the quality until you get the perfect balance of image quality and file size.

To compress your pictures using Optimizilla:
Nothing beats cleaning up your photo library and removing all of your duplicate and similar pictures, just wasting precious hard drive space. But if you just can’t bring yourself to delete any of your pictures, compressing them is a great alternative to freeing up storage. Hopefully, this article has demystified the process of how to reduce an image’s file size on Mac.