Как бесплатно создать электронную почту
В этом уроке я покажу, как создать электронную почту. Сначала мы выберем почтовый сервис, а потом быстро зарегистрируемся. Сразу после этого мы получим новый ящик в интернете (email).
Где можно бесплатно сделать почту
Чтобы завести электронную почту, нужно зарегистрироваться на каком-нибудь почтовом сайте. Таких сайтов в интернете несколько и самые известные это Яндекс, Gmail.com (Гугл) и Mail.ru.

На каком же из них лучше сделать адрес? По большому счёту это не важно – они все примерно одинаковые. И по возможностям, и по удобству, и по безопасности. Какие-то чуть лучше по одним критериям, другие – по другим. Но разница несущественная. С основной своей функцией – приём и отправление писем в любую часть мира – все эти сайты справляются одинаково хорошо.
Пошаговая инструкция по регистрации нового адреса
Итак, вы определились с сайтом, на котором хотели бы создать электронную почту. Теперь на нем нужно открыть адрес, а для этого пройти регистрацию.
Регистрация — это всего лишь заполнение небольшой анкеты. Вам нужно будет ответить на несколько вопросов о себе, выбрать для ящика название и придумать пароль.
Заполнение анкеты – дело хоть и простое, но крайне важное. Ведь от этого зависит не только то, какой у вас будет адрес, но и возникнут ли в будущем с ним проблемы. Часто люди не уделяют регистрации должного внимания, а потом не могут войти в свой ящик.
Сейчас я подробно расскажу и покажу на картинках, что и куда нужно печатать, чтобы грамотно настроить электронную почту на компьютере или ноутбуке.
Открывайте инструкцию для своей почты и приступайте к регистрации!
Gmail.com
Gmail.com – это электронная почта от Google (Гугла). Чтобы ее создать, нужно зарегистрировать новый аккаунт. Сейчас я покажу, как это делается.
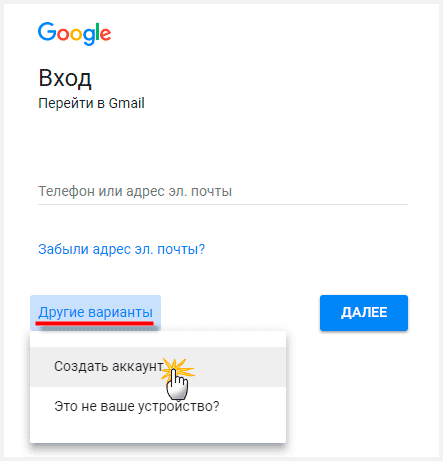
1. Переходим по ссылке gmail.com
Обычно сразу открывается страница входа в ящик. Но так как у нас его еще нет, нажимаем на «Другие варианты» и выбираем «Создать аккаунт».
2. Заполняем регистрационную анкету и нажимаем на кнопку «Далее».
Покажу, как эту анкету заполнил я. Вам же нужно напечатать туда свои данные. Подробнее о заполнении читайте дальше.
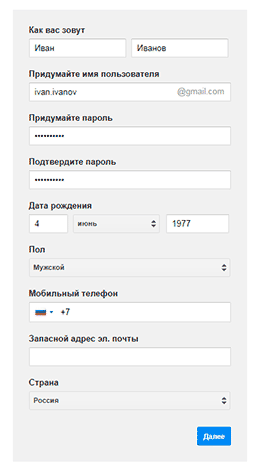
Как вас зовут. Печатаем сюда свое имя и фамилию. Лучше печатать настоящие, но можно и выдуманные.
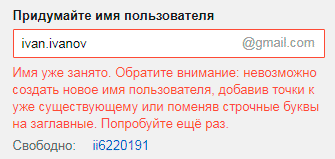
Придумайте имя пользователя. Здесь нужно указать название для своего нового ящика. К нему добавиться окончание @gmail.com. Всё целиком – это и есть адрес вашей электронной почты.
Имя пользователя должно состоять строго из английских букв. Может включать в себя цифры и точки.
Многие имена уже заняты другими людьми, но система подскажет, что в этом случае делать. Кроме того, будет предложено одно или несколько похожих имен, которые пока свободны.
Придумайте пароль. Пароль – этот тот ключ, которым вы будете открывать свой ящик. Он должен состоять минимум из восьми знаков. Это могут быть цифры, английские буквы, а также и цифры и буквы.
Пароль при вводе набирается точками. Кроме того, он чувствителен к размеру букв. Это значит, что почта не откроется, если потом вместо большой буквы набрать маленькую.
Подтвердите пароль. Сюда печатаем то же самое, что и в предыдущем поле – те же самые буквы-цифры.
Обязательно запишите в надежное место указанное имя пользователя и пароль. Без этой информации могут возникнуть проблемы с доступом к почте.
- Дата рождения. Указываем здесь день, месяц и год своего рождения.
- Пол. Выбираем свой пол. Кроме женского и мужского, можно выбрать «Другой» или «Не указан».
- Мобильный телефон. Поле для печати своего номера телефона.
- Запасной адрес эл. почты. Если у вас уже есть адрес почты (не важно, на каком она сайте), можете его сюда добавить. А можете и не добавлять.
- Страна. Обычно автоматически указывается правильная страна. Если это не так, установите свою страну.
3. Нажимаем на «Далее» и появляется окошко «Политика конфиденциальности и Условия использования». Текст в окошке нужно прокрутить вниз (а лучше еще и прочитать) и нажать «Принимаю».
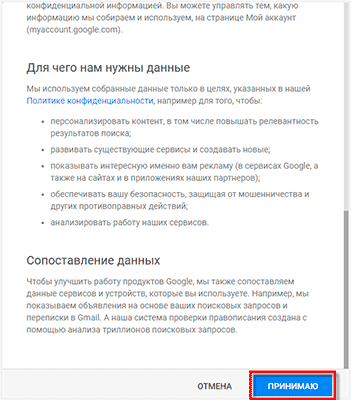
Вот и всё! Ящик зарегистрирован и Гугл с радостью сообщает его адрес. Записываем его в надежное место и нажимаем на «Перейти к сервису Gmail».
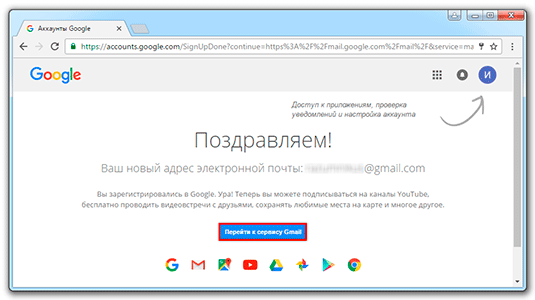
Сразу после этого откроется ваша новая почта.
Как узнать свой email и правильно его ввести
Email (емайл) – это адрес электронной почты, уникальное название личного ящика в интернете. Это то самое имя/логин, которое вы выбирали при создании электронной почты. Но кроме этого в email входит еще и приставка:
- в Mail.ru эта приставка может быть @mail.ru, @list.ru, @bk.ru или @inbox.ru. Какая-то одна из них.
- в Яндексе приставка только одна — @yandex.ru. Но каждый электронный ящик в системе доступен еще и с другими окончаниями: @ya.ru, @yandex.ua, @yandex.kz, @yandex.com, @yandex.by.
- в Gmail.com приставка только одна, без вариантов — это @gmail.com
Чтобы корректно ввести email, нужно написать логин и правильную приставку. Без пробелов и лишних точек.
Например, я хочу написать на визитке свой адрес почты, которую зарегистрировал на gmail.com. При регистрации я выбрал имя пользователя ivan.petrov35. Значит, написать нужно следующее: ivan.petrov35@gmail.com
Если бы у меня был ящик с таким же названием, но на Яндексе, надо было бы указывать такой адрес: ivan.petrov35@yandex.ru
Вместо @yandex.ru можно напечатать любую из этих приставок: @ya.ru, @yandex.ua, @yandex.kz, @yandex.com, @yandex.by. Они все принадлежат одному и тому же ящику.
А вот с адресом на Майле сложнее. На этом сайте есть несколько приставок: @mail.ru, @list.ru, @bk.ru и @inbox.ru. Поставить любую из них нельзя – нужно указывать только ту, которую выбрали при регистрации.
Значит, если я создавал почтовый ящик с приставкой @list.ru, то указывать адрес нужно именно с ней. А если вместо нее укажу другую, например, @mail.ru, то письма ко мне доходить не будут.
На заметку: адрес своей электронной почты (email) можно узнать через правый верхний угол ящика.
How to create (and use) a new email address
An email address is your portal to the internet. Without one, you can’t use most of the services available on the web. Research from the Radicati Group shows that most of us have multiple email addresses (new window) , with the number of addresses per email user increasing year-on-year. So whether you’re creating your very first email account, or just need a new one for a specific purpose, it’s important that you choose the right email service and address for your needs.
Why create a new email account?
People are increasingly likely to create multiple email addresses to individually manage their sensitive information, online shopping confirmations, and professional lives, while using yet another separate one for communicating with friends and family, and other more informal activities.
Having multiple email accounts is very useful for your security, as it reduces the risk of identity fraud, and minimizes the amount of data compromised in the event that one of your accounts is hacked (for example, if someone got the password to one of your email accounts, the data in your other accounts would still be secure).
Choose an email service provider
The first step to creating a new email address is to choose the email service that is right for your requirements. Any email service you choose should meet the same basic requirements of security and usability, but depending on what you want to use your email account for, you may need additional features. The most important things to look for in an email service are listed below.
Secure email
No matter what you want to use your email for, choosing a secure email service (new window) should be your number one priority. The most secure email services use end-to-end and zero-access encryption to protect your emails, making them much safer from hackers and data breaches (such as those experienced by all three billion Yahoo user accounts between 2012 and 2016 (new window) ).
Read our guide to find out more on the importance of end-to-end email encryption (new window) .
Easy-to-use email apps
If you are not going to use a third-party email client for your new email address, you should also ensure that the email service you choose has an easy-to-use native app (new window) for your mobile devices. This will help you avoid having to navigate your new email account within a mobile browser.
Private signup
If you are creating a new email address to keep your different online accounts unlinked, or want to be more private on the internet, then you should choose an email service that requires the least amount of personal data from you on signup. Some email services, such as Gmail, will ask for lots of your personal data in order to let you create an email account, including full name, date of birth, gender, and phone number. In contrast, Proton Mail asks for no personally identifiable information, only an email address or phone number, which is briefly held in order to prevent abuse and to verify that you are human.
Professional email domain
Unless you are going to use a custom domain (new window) for your email account, you should also consider the domain address of the email service you are using, as this will act as the suffix of your email address. Some domains, such as AOL or Hotmail (new window) are seen as informal or outdated, and can affect the way your recipients regard your email. This is particularly important if you will be using your new email address in the search for a new job, or other professional activities. Instead, you should choose an up-to-date email service that shows you take care with your communication.
The proton.me domain is the most widely used encrypted email domain in the world, making it recognizable and suitable for professional use.
Simple email domain
If you will be giving your email address to a lot of people verbally, you will also want to choose an email service that offers a domain that is easy to remember and understand. This will help prevent people from writing your contact information down incorrectly, or forgetting it altogether.
At Proton Mail, all accounts receive an email address with the domain proton.me, as well as the shorter and simpler proton.me/mail email domain.
How to create an email address
Once you have chosen a secure, easy-to-use, and appropriate email service (like Proton Mail), it’s time to create your new email address and set up your account.
Sign up for a new email account
Before you choose your new email address, you need to sign up for an account. Different email services will ask for different amounts of information, but at Proton Mail you only need to select your username and provide a method of verification (either an email address or a phone number). Sign up for a free Proton Mail account.
How to choose the right email address
During the signup process, you will be asked to choose a username. This name will become the prefix of your new email address, e.g., if your username was example, your email address would be example@proton.me.
Choosing a good email username should follow the same process as choosing a good email domain. You should choose a username that is simple and easy to understand, especially if you will be sharing it with people verbally or writing it out manually, e.g., the username examp1e could be easily mistaken for example.
You should also consider the purpose of your new email address when choosing a username. For example, if you want to use an email specifically for job applications, you should choose a formal and to-the-point username. Avoid putting too much personality or flair into your username, such as x_proton_is_cool_x, and opt for something memorable and mature, like your name.
In fact, research published in the journal Cyberpsychology, Behavior, and Social Networking (new window) found that your email username can have a direct impact on your chances of being considered for a new job, reporting that “the hireability ratings regarding the resumes with informal email addresses were significantly lower … than the hireability ratings regarding resumes that featured a formal email address”. In this study, having an informal email address was reported as having as strong an effect on hireability as the presence of spelling errors.
Choosing a good username can be difficult, as many of the simpler usernames may already be taken by others. In many cases, when you are setting up your new email address, you may have to try a few ideas or iterations before you find a unique name that you’re happy with.
Use a strong password
Once you have set up your username, you’ll need to create a strong password (new window) . This is the number one action you can take to make sure your new email account remains secure. Your password should be unique to your email account (that is, not one that you use to log in to anything else), difficult to guess, and either easy to remember or securely stored. A good way to manage your passwords and to make sure you don’t forget them is to use a reputable password manager (new window) .
How to create a new email address in an existing email account
You may want to simply set up another email address for an email account you already have, or use multiple email addresses in your new email account. With Proton Mail, you can set up multiple email addresses on the same account, and you can also use email aliases. Both of these options will give you multiple addresses that you can use for different purposes.
How to set up your new email inbox
Now that you have created your new email account, it’s a good idea to get a sense of all the features that will let you use your new account efficiently. There are also steps you can take to ensure you appear more formal — for example, if you will be using your new email account for professional reasons like applying for jobs or to email clients.
Set a display name
When you send an email, your display name is the name that shows up in the From field in your recipient’s inbox. If you do not set up a username, only your email address will show in that field. Unlike your username, your display name is not constrained by whether or not someone else is using it. Your display name can also use spaces, unlike your username.
Unless you want to use your email address to disguise your true identity, we recommend using your name as your display name, especially if you are using the account for professional or formal purposes.
For step-by-step instructions on setting up your display name, read our support article (new window) .
Set up an email signature
In Proton Mail, you can set up your email signature on the same page that you create your display name. Setting up an email signature is a good way to sign off all your emails in a uniform way, and if you are using your new email account to manage a club or organize your business, you can use the email signature field to brand your emails and look more professional.
Migrate your old emails
If you want to use your new email address as your primary email address, you may want to import your old emails into your new inbox. With Proton Mail, you can use the Import Assistant (new window) or the Import-Export app (new window) (if you have a Plus plan) to smoothly transfer emails from your old email account to your new one.
Check out the extra features
Now you have your display name and email signature, you’re ready to start sending and receiving emails. However, staying on top of your inbox can be a daunting task, especially if you want to use your account for multiple purposes. A few extra features you can find in Proton Mail that will help you organize your inbox include:
- Use custom folders and labels (new window) to organize and quickly find specific emails
- Use filters (new window) to automatically categorize emails that meet certain criteria that easily removes you from newsletters that are bothersome or no longer necessary
For more tips for organizing your inbox, check out our seven handy tips (new window) .
Why create a new email account with Proton Mail
We believe that everyone should have the right to free, private, and easy-to-use email. That’s why we have built Proton Mail so that anyone can use it, regardless of technical ability, and still benefit from full end-to-end and zero-access encryption. Today, Proton Mail is the world’s largest encrypted email service. You can sign up for a new email account with Proton Mail here.
How to Create an Email Account
Create your own personal email address! Once you have one, you’ll be able to send messages to friends and family, and to sign up for all the cool things the internet has to offer!
![]()
![]()
Introduction
In the modern world, its not just necessary to have an email address — it’s essential. People use the email as a quick and unobtrusive way to send and receive information, sign up for goods and services.
This tutorial will teach you how to create and use a basic email account.
Prerequisites
In order to understand this tutorial, you need to know how to:
- Use a keyboard/mouse
- Open a web browser
Step 1: Choose a provider
Before you can sign up for an email account, you’ll need to decide which company you would like to use. This a free service provided by hundreds of companies on the internet — there is no reason to pay for an email account. If you don’t know where to start, I recommend using one of the major companies for your email account, such as Google’s Gmail or Yahoo Mail. These are services used by billions of people, so they are a pretty safe choice!
Step 2: Sign up
In order to get started, you’ll need to click on the link that says “Sign Up”. Here’s a basic picture of each page highlighting the link that you’ll need to click. These pages may look a little different by the time that you view this tutorial, but the link will still be there somewhere, so don’t panic!
Insert image here
Now, you’ll need to enter your info. The information they ask for may vary from service to service, but they’ll generally need your first and last name, birth day, phone number, etc. You’ll also need to decide what your email address will be! This is the part of your email address that is personal to you — the part to the left of the @ symbol. All email addresses can include letters and numbers, and most also allow periods. If your first choice is taken, don’t be afraid to change up the spelling or add some numbers to the end. You do not have to use your full name, or even any part of your real name when choosing your email address.
Continue through your provider’s sign up process. Don’t be surprised if you need to confirm that you are not a robot! It’s normal for websites to text you a verification code that you’ll need to enter, or have you enter numbers from a picture or “CAPCHA” to prove you’re a real person.
Insert image here — A sample “capcha” that websites use to make sure the people signing up are humans and not programs!
Once you’ve completed the signup process and chosen an email address and password, your web browser may ask you if you would like the browser to remember these for you. This is fine if you are on your own device, but if you are on a public computer, do not do this! As a rule, always keep your password to yourself!
Step 3: Send yourself a test email!
You’re now the proud owner of your very own email address. Make sure you remember your username and password — you’ll need these to sign in every time you access your email. For ease of access, you may also want to bookmark the sign in page for email address — this will save you time whenever you want to check your email, but isn’t strictly required.
Once you’ve signed in to your email account, you’ll likely already have a few emails in your inbox from your provider. These emails are meant to walk you through the process of using their email service. Don’t be afraid to take the time to read them if you’re unsure about anything!
To test that our email account works (and to get familiarize ourselves with the process of sending an email), lets send ourselves a message. On the side of the page, there is a button that says “Compose”. Click that button to begin writing your first email.
Insert image here — Examples of the “compose” button for yahoo(left) and gmail(right).
Type your own email address into the bar that says “To”. Just like writing an address on a package, the email address you put in this box will determine who this email gets sent to. Since we’re just creating a test message, go ahead and enter your own email. *Be sure to include the entire email address, including the @[something].com at the end!*
Now, you’ll need give your message a subject line, and some actual text in the body. Anything will do.
Once you’re done typing your email, hit the “send” button at the bottom and off it goes! — insert image here
Finally, we click the “Send” button at the bottom of the page. You should see the message appear in your own inbox very quickly after you send it.
Как создать электронную почту
Рассказываем, как создать свой email и отправлять электронные письма.
Электронная почта – один из распространенных способов обмена сообщениями и файлами. Ее можно использовать как в повседневной жизни, так и для решения рабочих вопросов.
Электронная почта понадобится вам при регистрации на большинстве сайтов и приложений. На нее отправляется информация по онлайн-заказам, электронные билеты, письма-подтверждения и многое другое. С ее помощью легко отправлять и получать любые файлы: фото, видео, документы, архивы.
Человеку, который регулярно пользуется интернетом, электронная почта просто необходима. Давайте разберемся, как ее создать и использовать.
Как создать электронную почту на Яндексе
Существует несколько платформ, на которых создаются электронные почты. Яндекс – одна из них. Чтобы создать почту:
- откройте мобильное приложение Яндекса или перейдите на yandex.ru в браузере;
- нажмите «Войти» на главной странице;
- укажите свои данные и кликните «Зарегистрироваться».
Обязательно придумайте сложный пароль. Советуем где-нибудь его записать, чтобы не забыть.
Как пользоваться электронной почтой Яндекса
Все интуитивно просто: даже если вы раньше не пользовались электронной почтой, разобраться не составит труда. Чтобы написать письмо, просто нажмите соответствующую кнопку в самом верху страницы. Появятся поля для заполнения. Введите текст, при необходимости добавьте файлы, впишите адрес электронной почты человека, которому вы хотите написать, и отправьте письмо.
Письма, которые написали вам, отображаются в разделе «Входящие». Если у вас есть новые письма, название раздела будет выделено жирным. Чтобы дать ответ на письмо, нажмите «Ответить». Откроется форма для заполнения.
Пользуйтесь электронной почтой, чтобы регистрироваться на полезных сайтах и в соцсетях, делиться интересными онлайн-находками с родными и друзьями.
Хотите узнать больше о мобильном интернете? У нас есть подробный путеводитель, который можно бесплатно изучить и скачать. Вы также можете прийти в один из салонов Tele2 с 10 до 11 утра и получить личную консультацию от специалистов.