Split View, или как разделить экран Mac для работы с двумя приложениями одновременно
Режим Split View позволяет разделить экран Mac на две половинки в разных пропорциях для работы с двумя приложениями одновременно. Это позволяет максимально эффективно использовать рабочее пространство и выполнять несколько дел одновременно. В этом материале мы расскажем, что нужно для того чтобы Mac работал в режиме Split View, как его активировать и деактивировать.
Начиная с OS X El Capitan появилась возможность использования разделенного вида. В нем два приложения на Mac можно расположить бок о бок в полноэкранном режиме. И хотя пользователи часто работают в этом режиме, сама такая функция практически не используется. Причина этого кроется, в основном, в сложной активации такой возможности.
Однако с выходом macOS Catalina Apple решила эту проблему, дав вторую жизнь функции Split View. Начиная с macOS 10.15 сложное перетаскивание уже не требуется, вы можете расположить рядом два приложения с помощью пары щелчков по заголовкам окон.
Как расположить два приложения рядом друг с другом в режиме Split View на Mac
1. Откройте два приложения, которые вы хотите в будущем расположить рядом друг с другом.
2. Наведите указатель мыши на зеленую точку в левой части строки заголовка приложения.
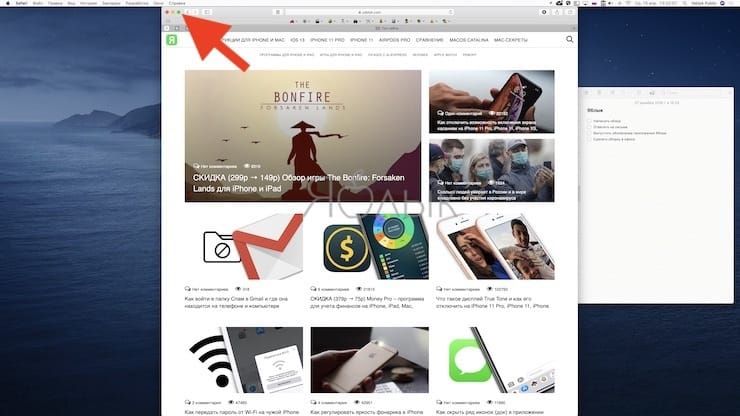
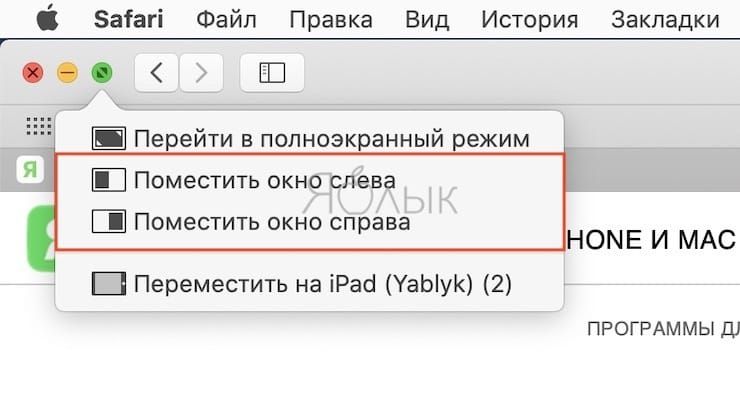
3. Откроется всплывающее меню.
4. Выберите пункт «Поместить окно слева» или «Поместить окно справа».
После этого окно с приложением займет одну из половин экрана. А на другой половине расположатся другие активные окна.
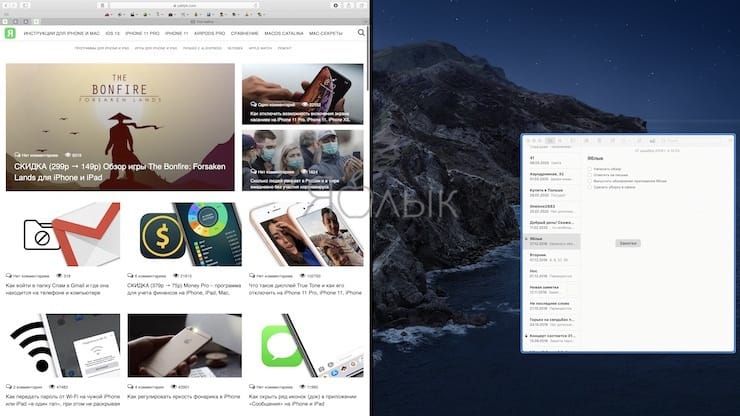
Теперь просто кликните на окно другого приложения, которое вы хотите поместить на вторую половину экрана. Так два приложения окажутся рядом в полноэкранном режиме.
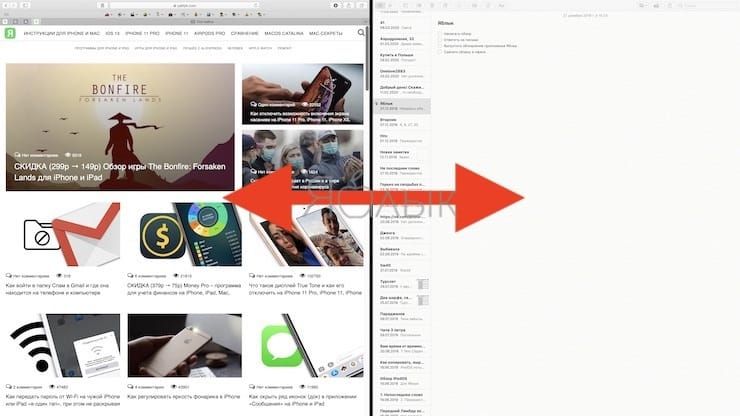
Mission Control позволяет легко просматривать все рабочие столы и полноэкранные приложения. Проведя влево или вправо четырьмя пальцами по сенсорной панели или двумя пальцами на Magic Mouse, вы можете переключаться между полноэкранными приложениями.
Не работает Split View на Mac?
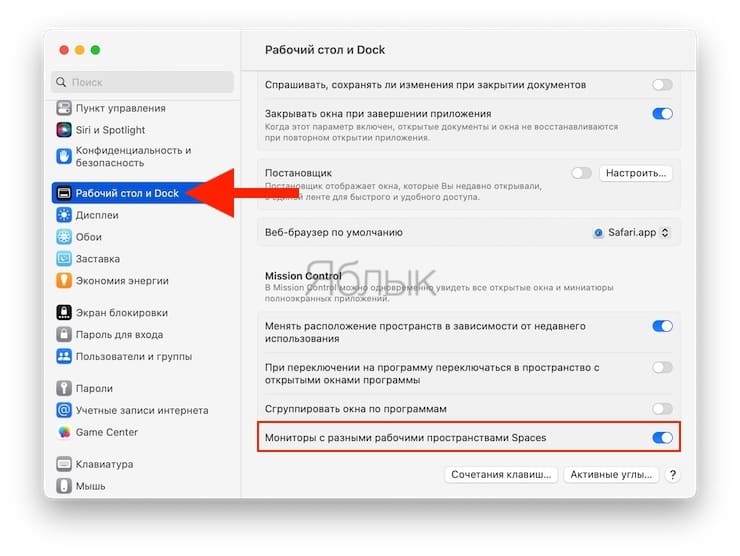
Если при активации режима Split View ничего не происходит, откройте «Системные настройки», выберите раздел Рабочий стол и Dock и убедитесь, что напротив опции «Мониторы с разными рабочими пространствами Spaces» установлена галочка.
Как настроить или выйти из режима Split View на Mac
Разделительная линия между приложениями позволяет вам изменять размер приложений, чтобы вы могли дать одному из них больше места на экране, чем другому.
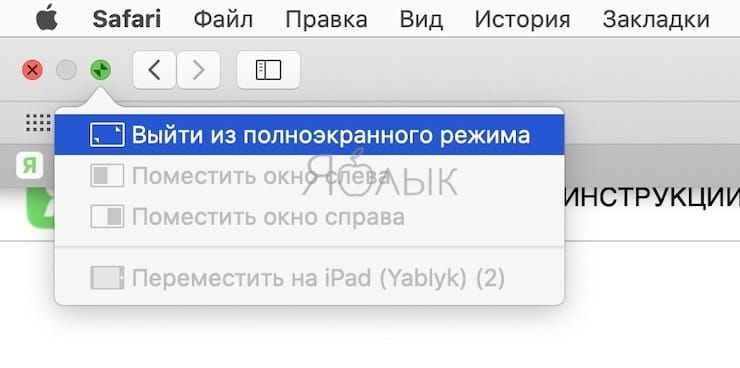
Но одновременный запуск более чем двух приложений в таком режиме невозможен. Однако вы можете создать несколько разделенных экранов, всегда объединяя на них по два приложения. А чтобы завершить режим разделенного просмотра, закройте одно из приложений или отключите полноэкранный режим для любого из двух участвующих в нем окон. Для этого подведите указатель к верхнему краю экрана (чтобы появились кнопку управления окном), а затем наведите указатель мыши на зеленую кнопку и выберите «Выйти из полноэкранного режима».
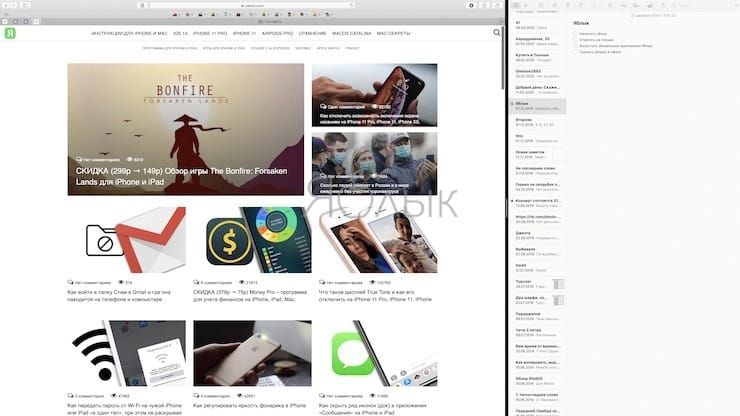
Преимущество режима Split View перед простым разворачиванием программ на половину экрана как в Windows заключается в том, что взяв за слайдер в середине разделительной черты вы можете быстро изменять соотношение половинок на дисплее. К примеру, это очень удобно когда у вас запущен браузер на 3/4 экрана и программа «Заметки» на оставшуюся 1/4 часть дисплея. И посёрфить можно и пометить важные моменты без лишних переключений.
Также вы можете быстро менять местами расположение программ, для чего просто потяните за шапку окна любого приложения, а затем перетяните его на другую половину дисплея.
How to Do Split Screen on Mac & Boost Your Productivity

Sometimes, one view is not enough to present information a user needs.
For example, it’s more efficient if a Mac user can simultaneously see where the data is coming from and where they have to input that data. Multi-taskers also benefit from having two or more screen views to quickly finish their workload.
People also use different views to play media content while working at the same time. Each person has his or her way of managing productivity. This productivity is significantly boosted with the right tools at hand.
What is a split screen?
Utilizing split screens on Mac makes it possible to run and view two different apps or windows. Users get to see, hear, and absorb various information simultaneously.
This can be pretty overwhelming for non-split screen users at first, but it’s a cool and convenient method to segregate work and eliminate app switching and a lot of trackpad gestures.
But how does it help with productivity? Being productive demands focus on the work being done at the moment.
Depending on the work users take on, they can open and run one or two applications at the same time by splitting screens. Some even have dual monitors that can run multiple applications.
Editors, for example, greatly benefit from split screens. With drag and drop features being common nowadays, it’s easier to import files when having two screens. This feature is also a great alternative to buying monitors which eats up the workspace.
How to do a split screen on a Mac
Apple calls this Split View. It requires OS X El Capitan or later versions. The instructions vary depending on the operating system. For those who have macOS Catalina, there are two ways to do a split screen.
First, open a window and place your cursor over the green, full-screen button found on the upper left corner. Hold the button and wait for a menu to show up. Choose “Tile Window to Left of Screen” or “Tile Window to Right of Screen.”
Whichever you choose, a window will fill up that side of the screen. Open another window and repeat the same actions to fill up the other side.
If a window is in full-screen mode, click “Exit Full Screen” first then hold the full-screen button again to tile it on the left or right side.
Another way to make a split screen is by swiping up with three or four fingers and entering Mission Control. At the very top, windows per desktop will appear in small rectangular boxes.
Hold and drag a desktop over another desktop. Wait for a plus sign to appear on the overlaid desktop then release the hold. Combining two different windows in this method reduces the number of currently used desktops.
Improving the split screen feature
But Split View does have one flaw: it creates just two views in a static vertical position. Once split, a black divider will show up in the middle. This divider can only minimize either view horizontally.
What if users have more than two applications to run? What if a vertical position is not the most optimal view for a specific website or app?
Although convenient, Split View is functionally limited. But tools like Split Screen Ultimate greatly improve this feature to provide more flexibility in how split screens are displayed. The Split Screen Ultimate tool has 10 different ways to split a screen depending on the user’s preference.
Split Screen Ultimate features
Once installed, the tool can be found in the menu bar at the top of the screen. Users can then choose from the window management options on how they want their split screen display to look like.
Windows can now be shrunk up and down, enabling horizontal view positions. Playing around with the shrink options also allows window resizing (which are not found in Split View).
The app also adds another window to be split, granting a total of three windows to utilize. This is the perfect set up for users who have one or more websites or apps used as a reference. No more back and forth from multiple desktops and no more clogged windows from having too many tabs.
Aside from that, all opened applications are just a gesture away from each other.
The drag & snap feature found in Windows 10, which is non-existent in macOS, is also accessible for Split Screen Ultimate users.
To drag & snap windows, just press and hold the Command key and drag the window to any corner. This window will then snap in half. Holding the Command key and dragging the window to the top can trigger a full screen.
Finally, the Split Screen Ultimate tool has dual monitor support. If three windows are not enough on one screen, then why not have six windows in two screens?
Just plug in a monitor and click the Dual Monitor Support under the window management options. Windows can now be resized on either screen.
Whatever the outcome, users will get to enjoy all the resources, sites, and apps they need to make relevant output.
Investing in better tools
There’s a steady rise of applications and software being created to ease manual work and improve work efficiency.
Like the Split Screen Ultimate, it’s a tool that can maximize the potential of one or two screens. It’s a cheaper and more economical alternative to purchasing multiple monitors. It has a small price to pay for the wealth of benefits it can add to a person’s daily workflow.
There are a lot of tools on the App Store which targets productivity. Most are free, others are paid. It’s okay to depend on free tools for now, but paid tools or upgrades will always yield better results.
How To Split Screen On A Mac In 2022
Multitasking is a great way to be able to work with multiple applications and windows at the same time. This can be frustrating if you need to switch between them, or if you need to view two windows at the same time. For example, if you are copying information from a document to a spreadsheet, it can be helpful to have these two windows side by side.
If you’re using macOS Catalina or later, you can use this feature. This way, if you have a dual monitor setup, you can have two apps on one screen and still have the split-screen view.
How to Split screen on a Mac#
In order to use Split View mode on your Mac, you’ll need to make sure that the Views setting in System Preferences is checked.
Split View mode is supported by all operating systems starting from OS X El Capitan. The latest macOS — macOS Catalina — differs in the sequence of actions required to launch the mode. In the following sections, we describe the steps for macOS Catalina and other operating system versions.
macOS Catalina#
- Open System Preferences and select the “Display” tab.
- Scroll down to the “Split Screen” section and select the checkbox next to “Catalina.”
- Click on the “Apply” button to change the setting.
You will now see a menu that looks like this: -Select “Close Window” to close the window. -Click on “OK” to close the window.
In the menu that appears, select the option Tile Window to the Right of Screen or Tile Window to Left of Screen. The window will fill the chosen area
To open a second window on your computer screen, you first need to select the window you want to open. To do this, open the empty half of the screen and select the second window you would like to open. ..
Other versions of macOS#
To launch split-screen in earlier versions of Mac OS X:#
In the upper left corner of your screen, click and hold the green circle with the arrows facing out.
The window will shrink and you can simply drag it to one side of the screen.
Fix the window on the left or right side to release it from its frame. ..
To use the other half of the screen, select another window.
How to Use Mission Control on a Mac#
You can use Mission Control to quickly switch between all active windows on your Mac. This makes accessing any of the open windows on your Mac simple and more productive.
To start Mission Control, use one of the following methods:#
Press F3, the button for Mission Control on your MacBook keyboard to access the computer’s main menu. This will open a window that allows you to select which application you want to launch from the list.
To increase the magnification of an image, hold down the Control key and press the Up Arrow key. ..
Touch the screen with your four or three fingers to slide up or down.
To use the Magic Mouse, first double-click with two fingers to open the main menu. Then, click on the icon that looks like a mouse pointer. ..
Open Mission Control and navigate to the Open Launchpad app
If you’re running OS X El Capitan, you can drag the window to the top of the screen to make it easier to see. ..
When you open a new window, it is placed in the top Spaces pane in the Mission Control view. ..
By navigating to the top panel in Mission Control, you can access the following locations on your Mac:#
The desktops on the primary and secondary computers are different. The primary desktop is the one that is used most often, and it is where the user’s programs and documents are stored. The secondary desktop is used for tasks that are less important or when the user wants to access files that are not on the primary desktop.
Open Split View in your program to see multiple programs at the same time. This is useful for viewing multiple files at the same time, or for viewing a large image in one window and smaller images in another window.
Applications are opening in normal mode, but there is a message that says “Please enter your name.”
How to adjust split-screen view on a Mac#
If you have a Split View app that takes up more than half of the screen, you can adjust how much space it takes up by holding down the black screen separator and moving it to the left or right. Some apps need a certain amount of screen space, so be sure to keep that in mind when adjusting the tab. ..
In Catalina, regulating the width of the window space is a little different. You can use the Zoom function to adjust the size of the windows.
If you need to switch the positions of the windows with each other, you can hold the gray top of one of the windows and drag it to the opposite side of the screen. The part of the window you click on will be active, while the other part will be in Preview mode.
If your computer’s display looks too small when you’re using it in Split View mode, you can change the resolution settings. To do this, go to Apple menu → System Preferences → Displays → Display → Scaled. Then select one of the options from the list and make sure you are happy with how it looks in Split View mode. ..
To zoom in on an object or text in one of the windows, spread your thumb and index finger apart on the trackpad and use an expansion gesture you would use to zoom in on an image on your Mac.
In Split View mode, the Dock and the menu bar at the top of the screen are not visible. To view the top menu bar, simply move the cursor to the top of the screen.
To change an app, open it in split-screen mode, exit the mode, and open Mission Control. Drag one of the program windows to another application from the Space menu bar. Alternatively, just repeat launching Split View with a different app. ..
How to exit split-screen view on Mac#
To exit Split View mode on a MacBook, press the Escape key to return windows to normal mode. However, this method may not work if the Escape key has a different function in one of the apps. In that case, you can click on the green circle at the top of the window to exit one of the applications. To exit the other app, open it (it will be in fullscreen mode) and click on the green circle as well. Alternatively, you can exit Split View through Mission Control by simply clicking on the button with inward-facing arrows in the Split View window on the Space menu bar. Both windows will return to their normal size. ..
Final note#
This guide will show you how to split screen on a Mac, so that you can work on multiple documents at the same time. ..
Как использовать Split view на MacBook
На Mac есть одна особенность, позволяющая разделять экран ноутбука и одновременно работать с двумя приложениями в полноэкранном режиме, располагая их рядом друг с другом. Таким образом удобно контролировать выполнение различных действий и не отвлекаться на переключение между окон. Возможно, вы уже сталкивались с Split view на MacBook, но не знали как его включить. И тут я вам помогу, потому как это не сложно.
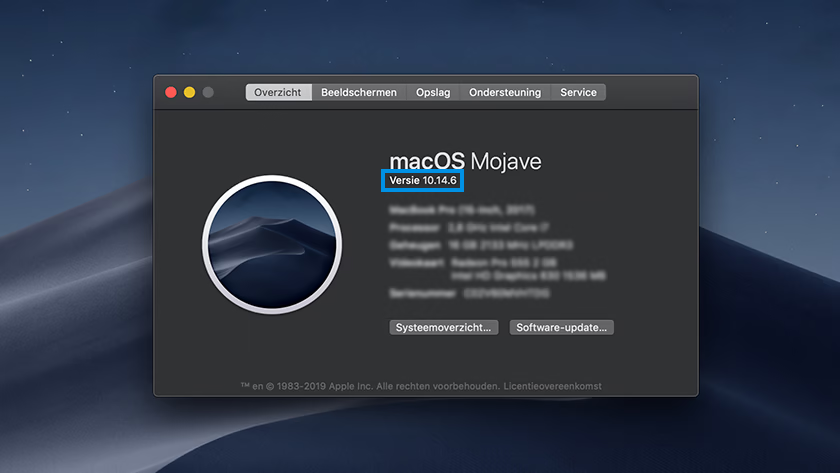
Чтобы настроить разделенный экран Split View, вам понадобится правильная версия macOS. Это должна быть как минимум OS X El Capitan. Чтобы проверить, какая версия ОС у вас установлена нужно щелкнуть значок Apple в левом верхнем углу экрана. Нажать просмотреть информацию «об Mac.» В появившемся окне можно увидеть версию macOS. Она должна начинаться с 10.11 или выше.
Активация режима Split View происходит в верхнем левом углу. И для этого, нужно лишь нажать на зеленый кружок или кнопку, как вам будет удобнее. В момент, когда требуется активация Split View, открываем два приложения, которые будут показываться на экране. Удерживаем зеленую кнопку и указываем какое размещение окон будет наиболее удобным. Кроме того, можно будет выбрать, какое приложение будет размещаться в левой части экрана, а какое в правой.
Настройка Split View через Mission Control отчасти аналогична, но придется задействовать трекпад. Открываем приложения, которые нам нужны для размещения на экране. Нажимаем зеленые кнопки в каждом окне приложения и лишь после этого проводим двумя пальцами вверх по трекпаду для вызова приложения Mission Control. Перетаскиваем одно из окон открытой программы в первое положение и второе, для отображения его слева или справа.
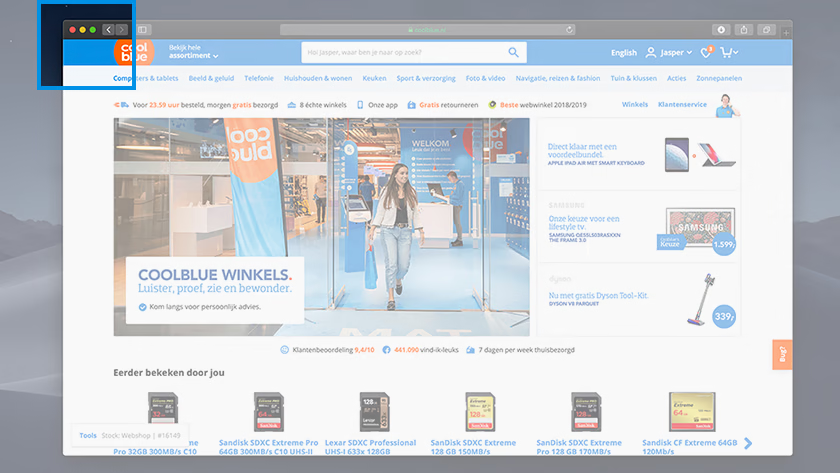
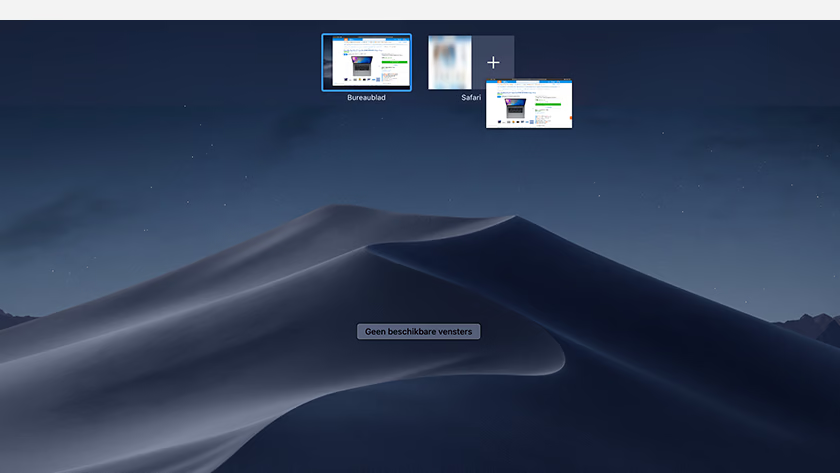
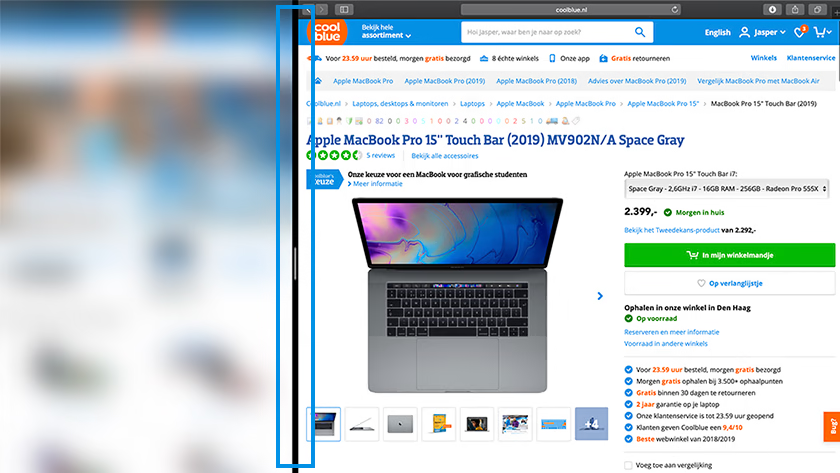
Настройка разделенного экрана Split View после выбора программ. Здесь, ничего сложно нет, поэтому всегда можно будет изменить компоновку изображения с помощью полосы в центре экрана. Разделение экрана всегда можно сдвинуть в сторону, тем самым расширить изображение. При этом во время работы будет удобно обмениваться изображением или текстом между экранами, простым перетаскиванием выделенного объекта.
Для деактивации режима Split View, достаточно будет лишь «кликнуть» на зеленую кнопку в верхнем левом углу экрана. Сделать это придется в каждом окне приложения для возврата в полноэкранный режим работы.