Calling your other iOS app with parameters, even if it’s not yet installed; Without a website, or 3rd party services.
![]()
You have 2 apps, A and B. App A needs to launch App B with a username, and maybe some other more complex data structure. And we can’t assume App B is even installed.
There are various ways to do this.
Possible solution #1: A simple Deep-Linking with parameters should do the trick; And for when App B is not yet installed, we can use a 3rd party service like Branch. But, can you really trust them to connect the dots and be able to communicate the data reliably after the user installs App B?
Due to the hacky nature of such 3rd party services, while they work most of the time, occasionally they do fail to pass the data to the target app.
Also, don’t forget that Apple is all about privacy these days, and services like Branch are no different than tracking tools.
Speaking of privacy, the data you want to send to App B might be sensitive, so you need to trust Branch with your users’ data.
Possible solution #2: Universal Linking, is Apple’s alternative to Deep-Linking, and it does allow you to pass parameters to App B, even if it’s not yet installed. But, then you need a website and network availability. It might not be for everyone.
If only App A could communicate complex (preferably Codable) data to App B, without all the hassle and disadvantages of the above orthodox solutions.
Introducing App Groups
App Groups was designed to share data between the main app and it’s extensions, but it can also be used to share data between two apps under the same publisher.
From the code perspective, App Groups is basically a UserDefaults in a shared container.
A quick example
Here is what needs to be done to communicate a username string, from App A (sender) to App B (receiver), even if App B is not yet installed.
App Group for Sharing Between Apps and Extensions
App Group is a feature that is seldom mentioned, until you try to share data between apps, or to extensions.
Another type of group for sharing is Keychain Access Group, specially for keychains.
3 Types of Access Group
- Private Group
- Automatically created for each app
- Only 1
- Application Group
- Optional
- Multiple groups
- 1 app can be in multiple groups
- Keychain Access Group
- Optional
- Multiple groups
- 1 keychain item can be in only 1 group
1. Private Group
We don’t often talk about private group, because it simply the default, automatically created, aka the sandbox for an app.
Every app has a unique App ID, each representing a private group. Let’s get the IDs right with examples:
Bundle ID = “com.just2us.app1”, “com.just2us.app2”, etc
Team ID, aka App Prefix ID = “ABCDE12345”
App ID = Team ID + Bundle “ABCDE12345.com.just2us.app2”, etc
App IDs are unique as you can see, and they represent the private group (container).
By default, all frameworks such as UserDefaults , Keychain , FileManager use the private group.
2. Application Group
Application groups are like private group, but custom. You can create them by enabling the capability for your app. You can create multiple groups, and use in multiple apps.
App Group ID = “group.com.just2us.app1”, “com.just2us.family”
An app group is like an app Bundle ID, usually the convention is to prefix a “group” to the app bundle ID, thus sharing between a host app with it’s extensions. But you can use any string, like I use “com.just2us.family” which share among ALL apps.
When an app have access to an app group, the app can access the container. For example:
3. Keychain Access Groups
When you want multiple apps to share a keychain, then you need to create a common Keychain Access Group. Again, enable the feature under capability.
Keychain Access Group ID = “ABCDE12345.com.just2us.family”, “ABCDE12345.com.just2us.another”, etc
If you did NOT create any custom keychain access group, by default, you still have one using the App ID eg. “ABCDE12345.com.just2us.app1”.
Note that keychain access group ID has the Team/App Prefix ID. In an app, you have only 1 Team/App Prefix ID. This is important to know because a keychain is tied to this Team/App Prefix ID. If you change the prefix ID (legacy reason), then you will lose data in the previous keychain.
Keychain contain items, and each item must be in exactly 1 Keychain Access Group.
So when you create keychain item, you must specify the group it is in, via the kSecAttrAccessGroup key.
Communicating and persisting data between apps with App Groups
iOS 8 revealed a new API yesterday concerning App Groups. It was kind of messy before to share data and communicate between apps and I believe that’s precisely what App Groups is intended to correct.
In my app I have enabled App Groups and added a new group but I just can’t find any documentation on how to use it. Documentation and API references only state how to add a group.
So what is App Groups really intended to do? Is there any documentation somewhere on how to use it?
![]()
6 Answers 6
Another benefit to App Groups is the ability to share a NSUserDefaults database. This also works for App Extensions (notification center widgets, custom keyboards, etc).
Initialize your NSUserDefaults object like this in all applications in the app group and they will share the database:
Keep in mind everything from the [NSUserDefaults standardUserDefaults] database for each application will not carry over into this database.
The documentation gives a correct example as well (As of Beta 3).
And don’t forget to synchronize the database:
Sharing NSUserDefaults data between multiple apps
In order to have shared defaults between an app and an extension or between 2 apps you have to add an App Group in your settings using the following steps:
- In the Project Navigator click on the *.xcodeproj file (should be at the top).
- To the right of the Project Navigator look for Project and Targets. Under targets click on your primary target (should be the first thing under Targets).
- Towards the top, click on the Capabilities tab.
- In the App Groups section click the switch to the right to turn App Groups ON.
- Click on the + button and add an App Group named group.com.company.myApp.
- Go to the same place in your other apps and this group should now be available to select. Turn this group on for each app that will be using this shared data.
Note: If you go to the Apple Developer Portal (the Apple website that shows all of your Certificates, Identifiers, Devices and Provisioning Profiles) and go to Identifiers > App Groups you should see this new App Group.
To store data:
To retrieve data:
Application groups, according to my interpretation of the existing documentation, are primarily targeted for extensions, more specifically, for widgets. Widgets are their own application bundle that coexist with your app. Since they are a separate application and therefore have their own sandbox, you will need to use App Groups to share files.
After some header grep’ing, I think I found the API needed, but was actually put in as part of iOS 7.
NSFileManager has a method on it containerURLForSecurityApplicationGroupIdentifier: where you can pass in the identifier you created when turning on App Groups for your apps:
![]()
One important trap I tapped into today is the following:
In many projects I saw a single app target and with different bundle identifiers set for each configuration of that target. Here things get messy. What the developers intended was to create a debug app for the debug config and a production app for the release target.
If you do so both apps will share the same NSUserDefaults when they are set up like so
iOS: SDK App Groups setup
��
Required for certain features
Setting up an App Group in Xcode is required to allow badge incrementing and Confirmed Deliveries.
If you have not already done so, follow our Mobile SDK Setup Guides for iOS to step up the Notification Service Extension.
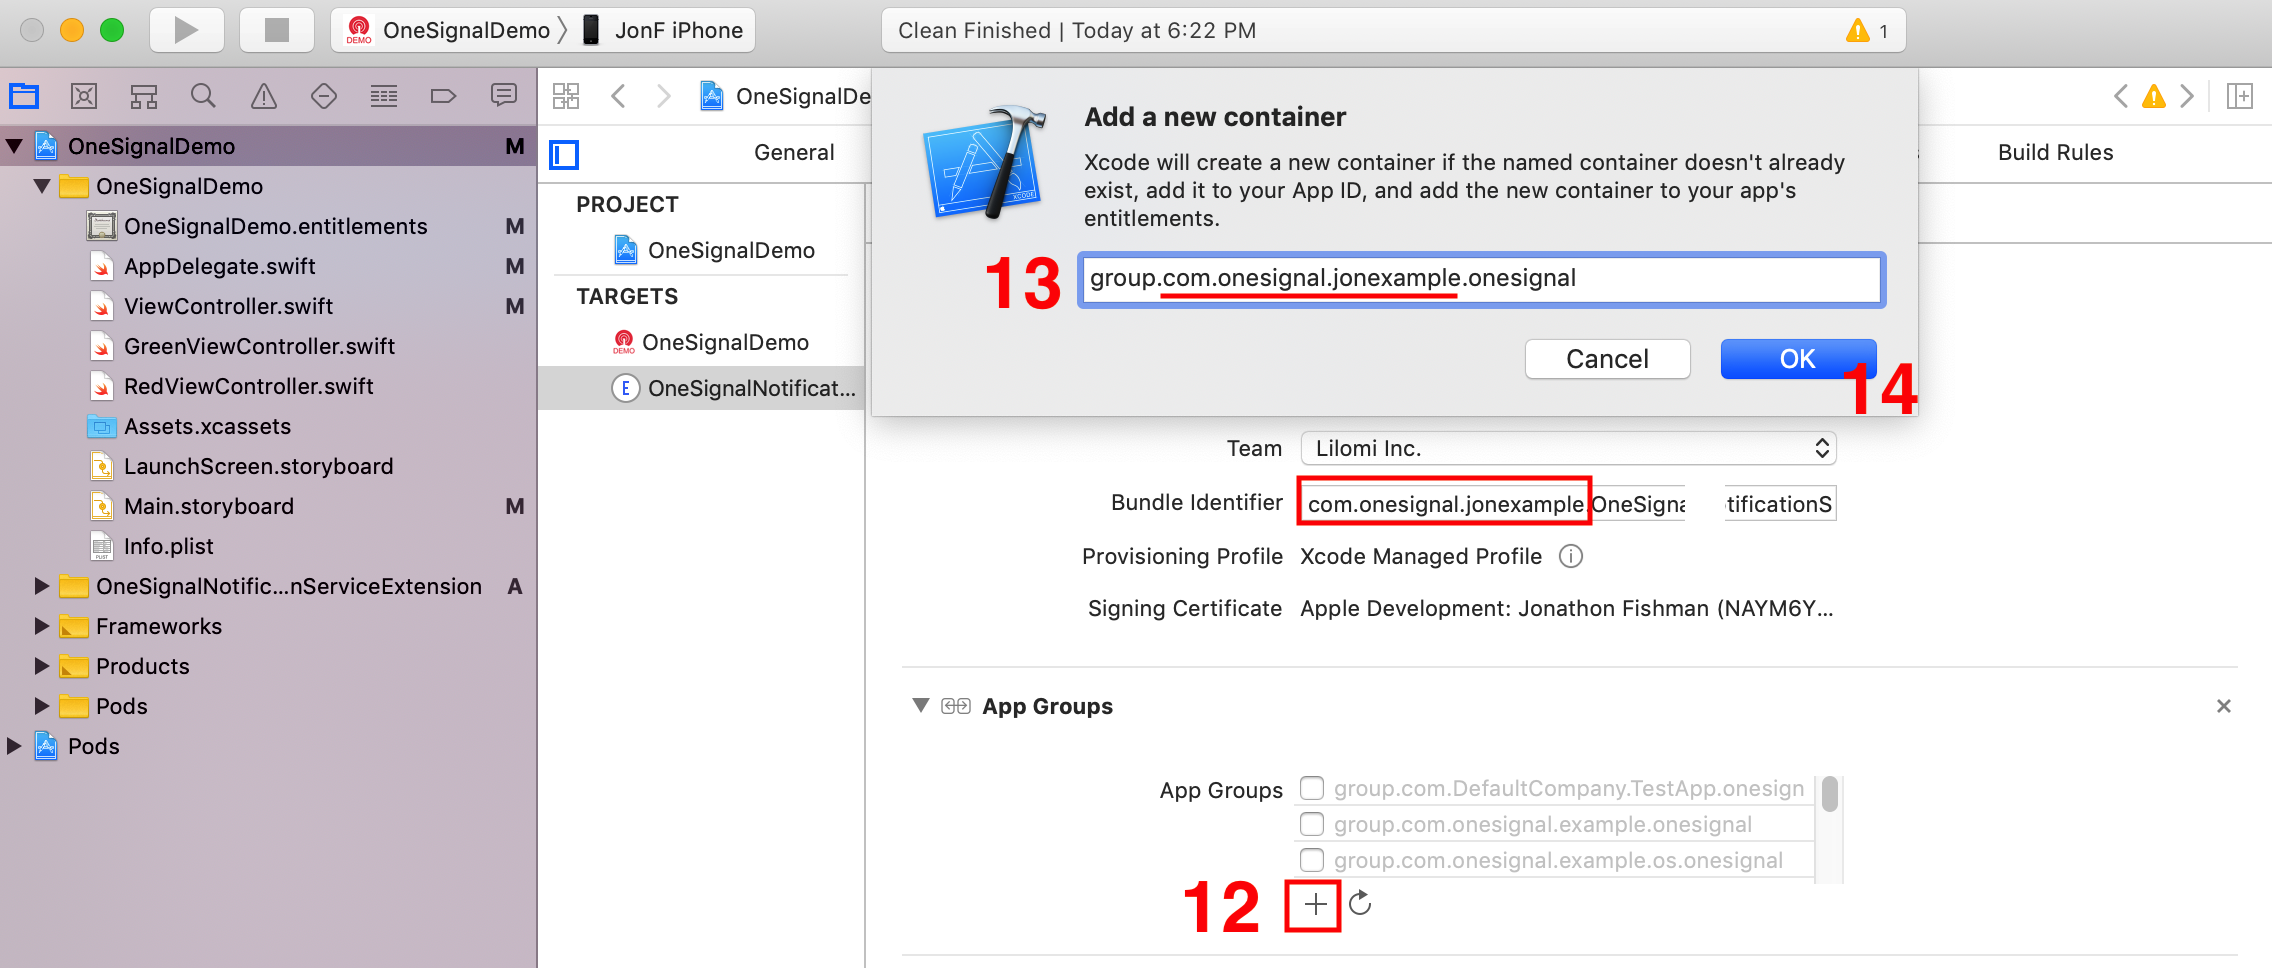
- In your Main App Target
- Go to "Signing & Capabilities" > "All"
- Click "+ Capability" if you do not have App Groups in your app yet.
- Select App Groups

- Under App Groups click the "+" button
- Set the "App Groups" container to be group.YOUR_BUNDLE_IDENTIFIER.onesignal where YOUR_BUNDLE_IDENTIFIER is the same as set in "Bundle Identifier"
- Press OK

- In the OneSignalNotificationServiceExtension Target
- Go to "Signing & Capabilities" > "All"
- Click "+ Capability" if you do not have App Groups in your app yet.
- Select App Groups

- Under App Groups click the "+" button
- Set the "App Groups" container to be group.YOUR_BUNDLE_IDENTIFIER.onesignal where YOUR_BUNDLE_IDENTIFIER is the same as your Main App Target "Bundle Identifier". Do Not Include OneSignalNotificationServiceExtension .
- Press OK
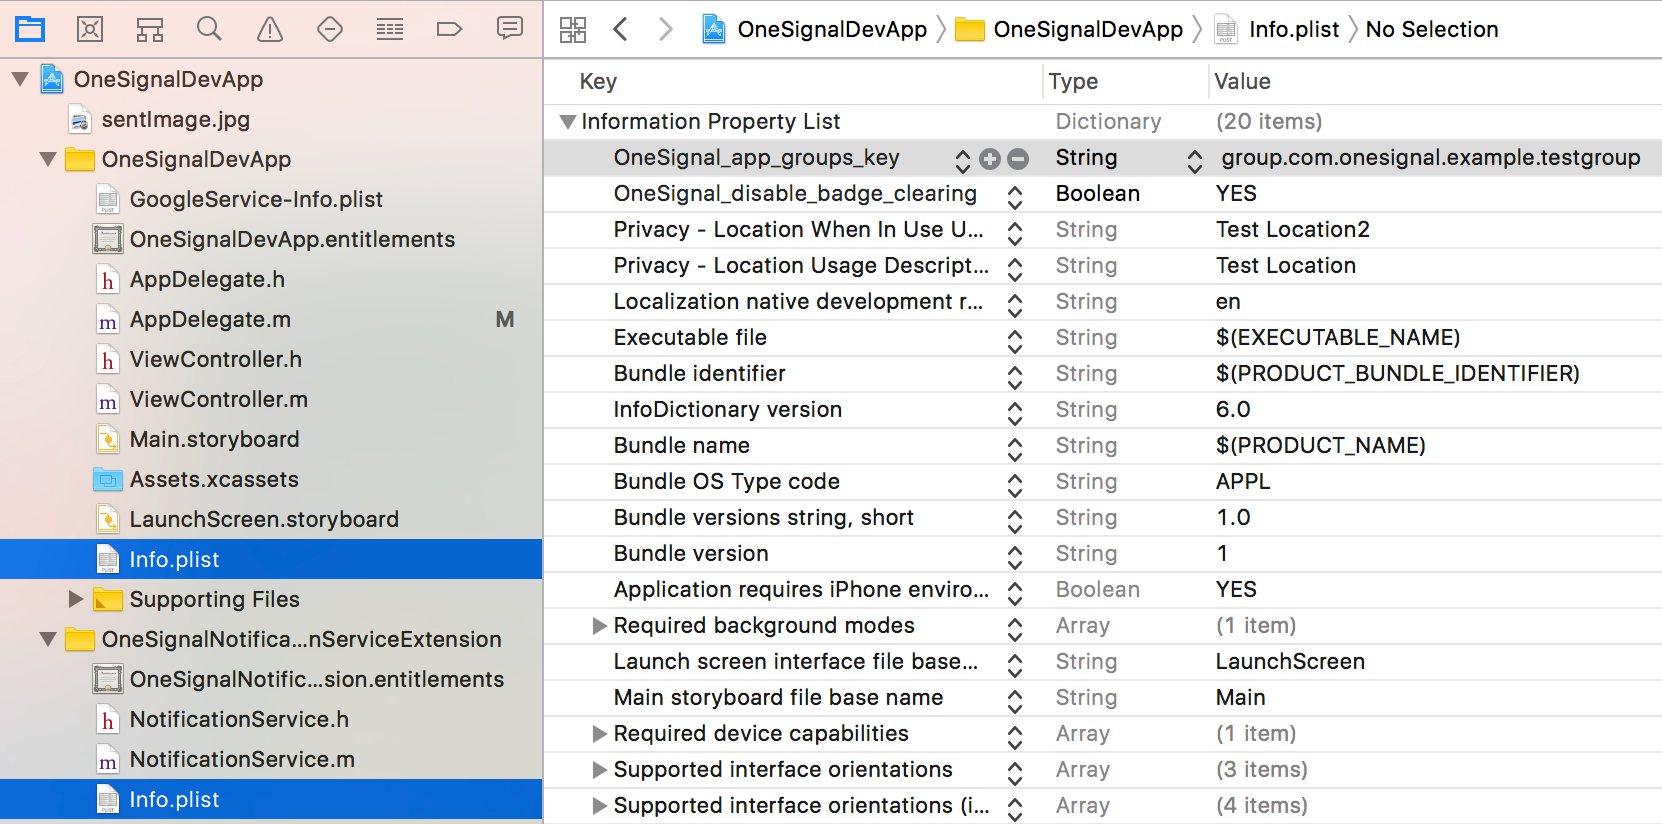
This step is only required if you don't want to use the default app group name (which is group.
1. Open your Info.plist file and add a new OneSignal_app_groups_key as a String type.
2. Enter the group name you checked in the last step as it's value.
3. Make sure to do the same for the Info.plist under the OneSignalNotificationServiceExtension folder.
��
Done!
That is all you should need to send iOS Push Notifications with Badges.
If you are sending push and notice the badge count is not incrementing correctly then continue below.
Make sure your OneSignalNotificationServiceExtension has a Deployment Target of 10 or higher. iOS 10 is when the Notification Service Extension was created for adding Rich Media to your iOS Push Notifications.
Your Entitlements file may not match your Capabilities selected in Xcode. Check your .entitlements files: Entitlements-Release.plist file and Entitlements-debug.plist file to make sure you have App Groups enabled for each.
You can find entitlements file location from Xcode > Your Targets > Build Settings > then search Entitlements.
For example, if your .entitlements file or Entitlements-Release.plist and Entitlements-debug.plist do not contain App Groups, make sure to add them to both targets:

Make sure these files are setup the same for the Main App Target and OneSignalNotificationServiceExtension Target.

You may need to setup 2 Provisioning Profiles: for your main app target and for the OneSignal Notification Service Extension target.
Make sure the App Groups in both Provisioning Profiles (your main app target and Notification Service Extension Target) match in Apple Developer Account. You may need to download these files and import into Xcode.
For example, in your Xamarin iOS project, click on the main app target project and go to Options to see if the new provisioning profile appeared. Do the same for the NSE project and the provisioning profile of the NSE should appear. Both, in the Custom Entitlements should be filled with “Entitlements.plist”.
For publishing the app to the App Store, some needed to create two provisioning profiles (associated with the Distribution certificates); one for the main app and the other one for the NSE project.
Badge Counts are saved within the UserDefaults for your App Group. To verify data is being saved correctly, follow these instructions:
In your AppDelegate or first ViewController add the following code replacing the App Group Name ( "group.YOUR_BUNDLE_ID.onesignal" ) with your own:
In your NotificationService file for the NSE, add the following within the bestAttemptContent if-let statement:
You can now select the OneSignalNotificationServiceExtension Schema and then run the app.

If you don't change the Schema that is ok, you should see the push data change as well.
Send your device a push notification.
If you changed the Scheme, view the log Debug Area, you should see:
And the Push Notification should show test 1 for the title and test 2 for the message body.
If you do not see these values set, the App Group in step 1 is not valid and needs to be setup again.