How to Factory Reset a Mac
![]()
Mac computers are generally reliable. But as with any computer, sometimes things go wrong. Before you spend big on a new Mac, though, try a factory reset, which wipes your computer and reinstalls a clean version of macOS.
A factory reset is also the best way to prepare your old computer for a new owner to make sure no leftover data falls into the wrong hands. Whatever the reason, here’s how to wipe everything and start from scratch with a factory reset.
Restart Your Mac
First, restart your computer. The most straightforward way is to hold down the power button until a dialog box appears, then choose the Restart option. Otherwise, you can select the Apple icon in the top-left corner of the screen and choose Restart.
You can also use the keyboard shortcut Control + Command + Eject (or power button) if your computer is frozen and you can’t rely on macOS to get the job done.
Open in Recovery Mode
Once the computer turns off, hold Command + R until the Apple logo appears. Release the keys and allow the Mac to boot up. This may take some time to load, so be patient.
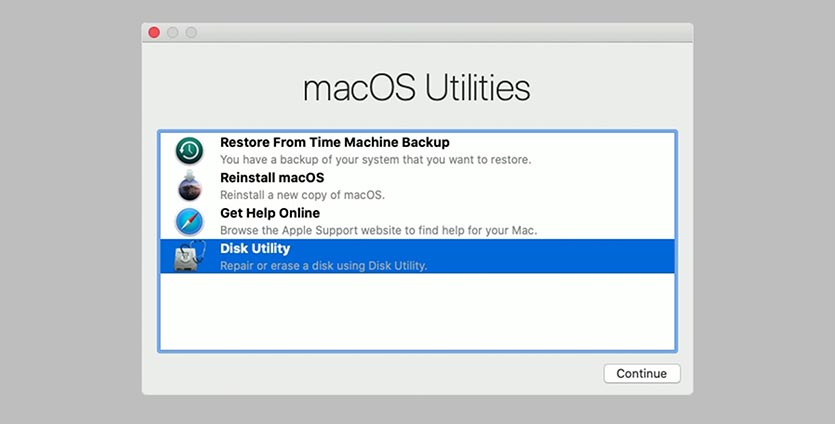
Instead of opening to your desktop as normal, your Mac will boot into Recovery Mode. You will need to choose the appropriate user profile and enter the password before gaining full control. In the macOS Utilities windows, you now have the option to restore from a Time Machine backup, install a new copy of macOS, access help documentation, repair a damaged disk, or erase all data.
If you’re looking to erase everything and start from scratch, choose Disk Utility.
Как сбросить Mac до заводских настроек
 В закладки
Разработчики Apple предусмотрели быстрый и удобный способ очистить iPhone от пользовательских данных, настроек и приложений. Это может пригодиться, например, при подготовке устройства к продаже или передаче другому человеку.
На Mac нет такого быстрого способа привести компьютер к заводскому состоянию. Нужно проделать определенные действия вручную.
? Спасибо re:Store за полезную информацию. ?
Как сбросить Mac быстрее всего
Самый простой способ привести компьютер Apple к заводскому состоянию – удалить данные с системного диска и переустановить macOS.
1. Создаем резервную копию всех необходимых данных в iCloud либо на внешнем диске через Time Machine или сторонние приложения.
2. Переходим в Системные настройки – Apple ID, отключаем функцию Найти Mac и выходим из учетной записи Apple ID.
3. Перезагружаем Mac.
4. Во время загрузки компьютера зажимаем клавиши Command + R для запуска компьютера из режима восстановления.
5. После загрузки в меню выбираем Дисковую утилиту и нажимаем кнопку Продолжить.
6. В боковом меню выбираем системный диск и удаляем один или несколько имеющихся на нем томов.
7. Нажимаем кнопку Стереть и указываем тип новой файловой системы Mac OS Extended (для macOS Sierra или более старых версий ОС) или APFS (для macOS High Sierra или более новых версий ОС).
8. Система может запросить логин и пароль от используемой учетной записи Apple ID.
9. После окончания форматирования завершаем работу Дисковой утилиты и возвращаемся к главному меню.
10. Выбираем пункт Переустановить macOS.
11. Производим чистую установку операционной системы и первоначальную настройку Mac.
Все! Вы получили чистый компьютер с переустановленной ОС, без личных данных и приложений.
В закладки
How to factory reset your Macbook (Macbook Pro, Macbook Air, iMac)

Having spent some years coding applications for macOS, we’ve created a tool that everybody can use. The all-round problem fixer for Mac.
So here’s a tip for you: Download CleanMyMac to quickly solve some of the issues mentioned in this article. But to help you do it all by yourself, we’ve gathered our best ideas and solutions below.
Features described in this article refer to the MacPaw site version of CleanMyMac X.
Everything in life has an expiration date, and your Mac device is no exception. No matter what you want to do next — sell it, give it away, or try to extend its shelf life — resetting Mac to factory settings should be your starting point. But why is that?
Because you want to keep your data secured, don’t you? Not only it’s an effective precautionary measure to protect your privacy, but it is also the right way to prep your Mac for a new owner. Or, in case that’s you who want to start fresh with your device, resetting Mac to factory settings will do a complete Mac reset, making it almost as good as new.
So how to factory reset MacBook, MacBook Pro, MacBook Air, or iMac on your own? It’s easily done, but the process varies for different macOS versions and chips. Don’t worry, we’ll provide you with everything you need to know, and you’ll be able to restore MacBook to factory settings. Just take one step at a time.

The ultimate guideline to factory reset MacBook Pro
Before you start, take your time to prepare MacBook for the factory reset. It includes backing up data and finding out what Mac you have and what macOS version it runs.
1. Back up your data
When you factory reset MacBook, all the information on your hard drive is wiped off. That’s why to save valuable files and data, you need to create a backup. This is like cloning your hard drive so you can keep having access to needed files.
You can of course back up files and apps manually by copying everything to an external drive or iCloud. However, a much faster and more secure way to back up is with Mac’s built-in software — Time Machine. It allows you to recover individual files and restore an entire hard drive in case of a catastrophe.
But here’s the thing, prior to using Time Machine, make sure to clean up your Mac. You don’t want to back up all the junk it contains, do you? Plus, a backup will go faster and more smoothly if your Mac is not cluttered.
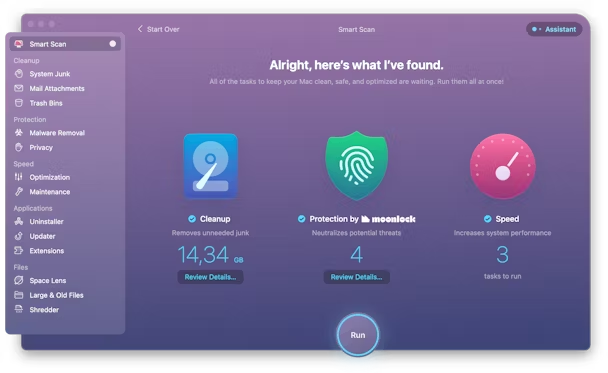
For a quick cleanup, we personally like using specialized applications. The app that works for us is CleanMyMac X. It removes large and old files, useless apps, caches, and system junk in a few clicks.
Here’s how to use it:
-
and open it.
- Click Scan.
- Click Run.
Once you’ve cleaned up your Mac, enable Time Machine backup:
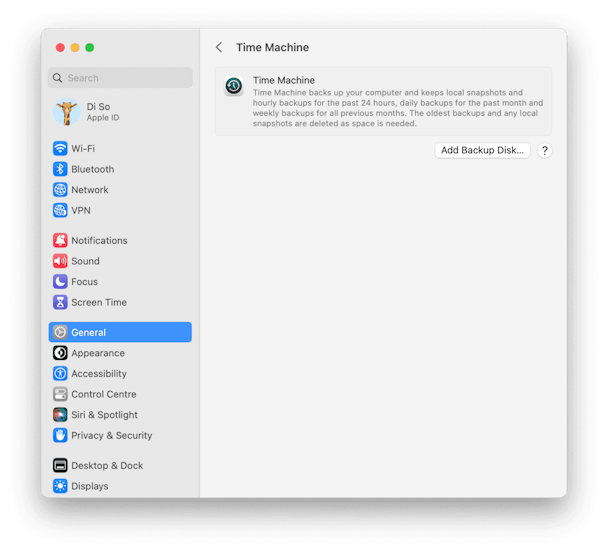
- Go to the Apple menu in the top left corner of your screen and choose System Preferences or System Settings > General.
- Select Time Machine.
- Click the Select Disk button. Or click Add Backup Disk and follow the on-screen instructions to set up the fisk if you haven’t done it before.
- Choose the disk you’d like to use as a Time Machine backup, then click Use Disk.
Now, your first backup may take a while, depending on how many files you have. But don’t skip this step — the backup will allow you to restore all your data in case something goes wrong when you restore MacBook to factory settings.
2. Check your Mac’s main info
Now that you’ve backed up your Mac, it’s time to check what Mac you have. The easiest way to do it is to go to About This Mac from the main Apple menu. There, look at the year and macOS version.

If you have a Mac newer than 2018 and running a macOS version later than Monterey, you’ll run Erase Assistant to restore Mac to factory settings. Otherwise, you’ll follow instructions from a 6-step guideline we also provide below.
How to wipe a MacBook with Erase Assistant
If you have a newer Mac with macOS Monterey and later, resetting it to factory settings is easy, thanks to Erase Assistant. Opening it, however, varies across different macOS versions.
For macOS Ventura:
- Open System Settings.
- Go to General > Transfer or Reset > Erase All Contents and Settings.

For macOS Monterey:
- Open System Preferences.
- From the menu bar, click System Preferences > Erase All Contents and Settings.
Now, all you have to do is enter your admin credentials and follow the on-screen instructions. Erase Assistant will do the following:
- Sign you out of all Apple services.
- Turn off Activation Lock and Find My.
- Erase all contents and settings.
- Uninstall any apps you have installed.
- Erase all volumes.
- Erase all user accounts along with their data.
- Unpair all Bluetooth devices (in macOS Ventura).
How to reset Mac without Erase Assistant
If you have a MacBook older than 2018 or running Big Sur or an older macOS version, follow the steps below one by one.
Step 1: Sign out from iCloud
Sign out of iCloud to make sure that any remnants of the cloud data, such as bookmarks, notes, reminders, etc., are not visible to a new user.
Follow the 3-step formula to turn off iCloud:
- Choose Apple menu > System Preferences.
- Select Apple ID, then select Overview in the sidebar.
- Click Sign Out.

If you’re running macOS Mojave or earlier, go to the Apple menu > System Preferences and choose iCloud. Then click Sign Out.
Step 2: Sign out from iMessage
Before you restore MacBook to factory settings, remember to sign out of iMessage.
This time, an easy 4-step formula to help you do that:
- Open up Messages.
- Click Messages in the menu bar in the top left corner of your screen.
- From the drop-down menu, choose Preferences.
- Click iMessage, then click Sign Out.

As simple as that!
Step 3. Reset NVRAM
NVRAM (non-volatile random-access memory) is a type of memory your Mac uses to store certain settings, such as your selected startup disk, sound volume, screen resolution, and the last kernel panic. Resetting NVRAM will restore certain features you might have changed previously:
- Shut down your Mac.
- Start up Mac and press and hold Option-Command-P-R for 20 seconds, then release.

Step 4: Boot into recovery mode
Steps for booting into recovery mode vary for Intel-based and Apple silicon Macs.
For an Intel-based Mac:
- Go to Apple menu > Restart.
- Immediately press and hold Command+R.
- Don’t release the keys until you hear Mac’s startup sound or until the Apple logo appears.

For a Mac with Apple silicon:
- When turning on your Mac, press and hold the Power button.
- Keep it pressed until you see startup options.
- Click the Gears icon (Options) and hit Continue.
- You may be asked to select a user and enter their administrator password. Follow on-screen instructions and press Next after any action you take.
Step 5: Wipe Mac hard drive
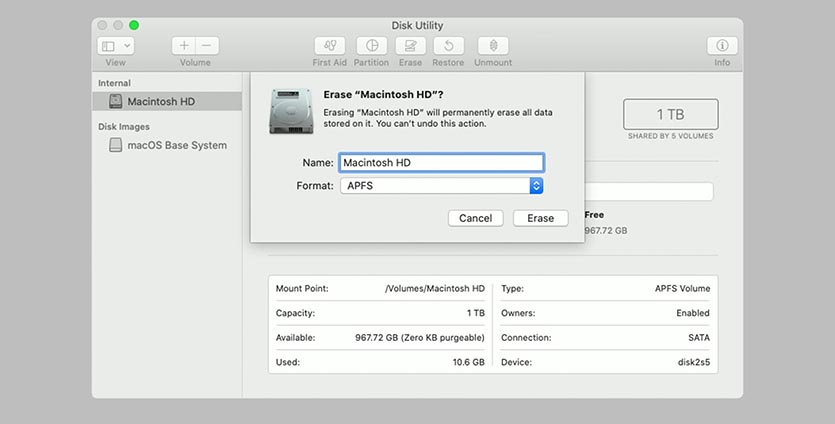
If you plan to sell or give away your Mac, you need to erase your Mac’s startup disk. The startup disk is built into your MacBook. Its default name is Macintosh HD.
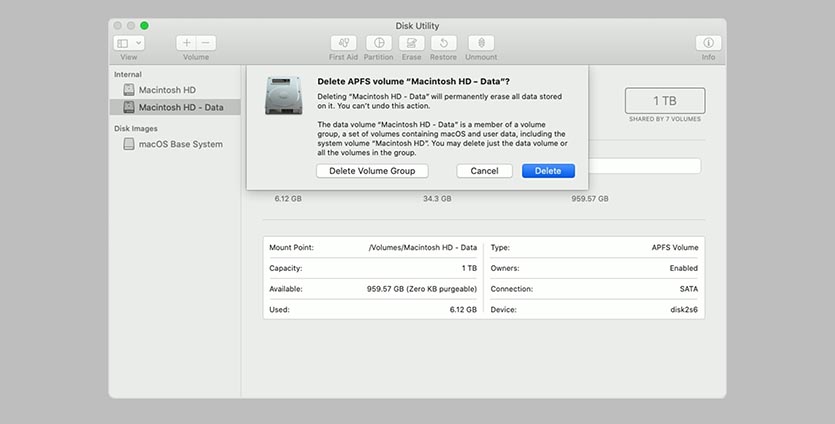
- After booting into recovery mode, choose Disk Utility in the Utilities window.
- Select your built-in startup disk, “Macintosh HD.”
- Click Erase at the top of the Disk Utility window and enter the next details:
Name: Macintosh HD
Format: APFS or Mac OS Extended (Journaled)
5. Click Erase Volume Group. You may need to enter your Apple ID for confirmation.

When the process is complete, select other internal volumes in the sidebar and press the “—” button to delete them. Then, quit Disk Utility.
Now, your Mac will restore to factory settings and reboot. You can now reinstall macOS.
Step 6: Reinstall macOS
Mission accomplished! You’ve reformatted your hard drive and reset your Mac to factory settings. Now you can reinstall your operating system. Simply click Reinstall macOS from the Utilities menu. Confirm that you really want to do it and follow the instructions you’ll see on the screen.
Once the macOS is installed, a setup assistant will appear. However, if you are not going to keep your Mac, it would be better to quit the setup process and let the new owner enter all the necessary information. Hold down the Command-Q keys and then choose Shut Down to turn off your Mac but leave it waiting for a new user.
That’s all. Now you know how to wipe a MacBook. It is clean and ready for a fresh start. So, you can proceed with restoring it from Time Machine if you will continue using it.
Frequently asked questions
Why do I need to reset a Mac to factory settings?
The most common reason for wiping a MacBook is to prepare it for selling or giving away so that no personal data or files are shared with a new owner.
How to perform a factory reset?
There are two ways to restore Mac to factory settings: either run Erase Assistant for newer Macs and macOS versions or follow the steps outlined in this article for older Mac computers and macOS versions. The only difference between the two is that Erase Assistant does all the prep steps for you, so you only have to reinstall macOS as the final step.
Do you need to turn off FileVault to do a factory reset?
Complete factory reset covers erasing your startup disk (described in Steps 5 and 6), which will make the recovery of your data impossible. Therefore, there is no need to turn off FileVault, as your data can’t be accessible in any readable form after you erase the drive.
Как сбросить MacBook Air до заводских настроек: инструкция
Прежде чем приступить к сбросу своего устройства до заводских настроек, создайте резервную копию, чтобы не потерять важные личные данные. Это особенно важно в тех случаях, когда вы не планируете продавать свой MacBook Air, а собираетесь и дальше им пользоваться.
Проще всего создать резервную копию своего MacBook через специальную программу Time Machine, которая является предустановленным приложением Apple. С его помощью можно скопировать на внешний диск любые ваши файлы, включая музыку, фотографии и приложения.
Вот как создать резервную копию с помощью Time Machine:
- Подключите внешнее запоминающее устройство к своему MacBook Air;
- Нажмите на значок Apple в левом верхнем углу экрана;
- Нажмите «Системные настройки»;
- Нажмите Time Machine;
- Нажмите «Выбрать резервный диск»;
- Выберите внешний диск и нажмите «Шифровать резервные копии и использовать диск»;
- Нажмите кнопку ON в левой колонке окна Time Machine, если она не находится в положении ON;
- После нажатия кнопки «Использовать диск» или ВКЛ, Time Machine запускает резервное копирование MacBook Air. Позже, после сброса заводских настроек MacBook Air, вы можете восстановить эту резервную копию, повторно подключив внешний жесткий диск к Mac и следуя инструкциям на экране.
Функционал Time Machine обычно устраивает большинство пользователей MacBook Air, однако некоторые операции приложение не поддерживает. Например, оно не может создать полный дубликат вашего устройства, так что если вы хотите, чтобы новый макбук работал абсолютно так же, как и старый, есть смысл обратиться к другим программам. Например, хорошей альтернативой могут стать приложения для резервного копирования SuperDuper или Carbon Copy Cleaner.
Шаг 2. Выйдите из своих аккаунтов
Если вы собираетесь продавать свой MacBook Air или передаете его в пользование другому человеку, то не забудьте выйти из своих личных аккаунтов в системе Apple, таких как iTunes, iCloud и iMessage.
Как выйти из iCloud
1. Нажмите на значок Apple в левом верхнем углу экрана MacBook Air;
2. Нажмите «Системные настройки»;
3. Нажмите Apple ID в macOS Catalina (10.15) и более поздних версиях (в более ранних версиях вместо этого нажмите iCloud);
4. Нажмите «Обзор» и выйдите в macOS Catalina (в версии 10.15 и более поздних). В более ранних версиях macOS выберите «Выйти».
Как выйти из iTunes
1. Откройте приложение Music в macOS Catalina (в версии 10.15 и более поздних) или iTunes в macOS Mojave (в версии 10.14 и более ранних версиях).
2. Прокрутите до строки меню в верхней части экрана MacBook Air и нажмите «Учетная запись».
3. В появившемся раскрывающемся меню выберите пункт «Авторизация».
4. Нажмите «Отключить авторизацию» этого компьютера.
5. Введите свой Apple ID и пароль.
6. Нажмите «Деавторизовать».
Как выйти из iMessage
1. Откройте приложение.
2. Нажмите кнопку «Сообщения» (в строке меню в верхней части экрана Mac).
3. Нажмите кнопку «Настройки».
4. Перейдите на вкладку iMessage.
5. Нажмите кнопку «Выход», которая находится справа от вашего Apple ID.
Шаг 3. Как сбросить MacBook Air до заводских настроек
Чтобы сбросить MacBook Air до заводских настроек, ваше устройство должно быть подключено к Интернету. Сначала нужно запустить режим восстановления. Для этого нажмите и удерживайте Command+R при перезагрузке MacBook Air или включении его, удерживая обе клавиши, пока не увидите логотип Apple.
После того как появится логотип Apple, и запуск будет завершен, вы увидите окно «Утилиты». Именно здесь вы можете стереть данные с жесткого диска и выполнить сброс до заводских настроек. Вот как это сделать:
1. Нажмите Disk Utility.
2. Нажмите «Продолжить».
3. Нажмите «Вид»> > «Показать все устройства».
4. Выберите жесткий диск и нажмите «Стереть».
5. В поле «Формат» выберите опцию «APFS» на macOS High Sierra или более поздней версии. На macOS Sierra или более ранних версиях выберите опцию Mac OS Extended (Journaled).
6. Нажмите «Стереть».
После завершения очистки памяти жесткого диска вы можете больше ничего не делать, если собираетесь передать устройство новому пользователю — он уже самостоятельно переустановить macOS. Однако если вы все же хотите сделать за нового хозяина всю грязную работу, следуйте этим шагам: