Все о функции Thunderbolt Bridge в MacBook
Что, если бы был способ легко подключить несколько устройств одним кабелем? Wi-Fi и Bluetooth — отличные варианты, но мы все знаем, что они могут быть мучительно медленными, особенно при работе с большими объемами данных. Вот где в игру вступает Thunderbolt Bridge MacBook.
Thunderbolt Bridge (ранее Light Peak) — это революционный интерфейс передачи данных со скоростью света, разработанный Intel. Он позволяет пользователям последовательно подключать до шести устройств с помощью одного кабеля Thunderbolt. Скорость передачи данных намного выше, чем у технологии USB 3.0 (до 40 Гбит/с).
Как раз тогда, когда мы думали, что технологии не могут стать еще быстрее, появился Thunderbolt Bridge, который превзошел все ожидания. Эта технология существует уже несколько лет и до сих пор остается одним из самых быстрых доступных решений для передачи данных. Давайте рассмотрим все, что вам нужно знать о Thunderbolt Bridge.
Что такое мост Apple Thunderbolt?

Функция Thunderbolt Bridge на MacBook — это невероятно полезный инструмент, который позволяет пользователям подключать два или более внешних монитора, накопители или другие периферийные устройства к своему компьютеру без использования Ethernet, AirDrop или WiFi.
Эта функция особенно полезна для тех, кто работает в нескольких местах или нуждается в доступе к различным устройствам в одной системе.
С помощью Thunderbolt пользователи могут одновременно подключать до шести устройств и легко передавать данные с помощью кабелей Thunderbolt. Это значительно упрощает переключение между задачами или работу над несколькими проектами одновременно.
Думайте об этом как о мосте между MacBook и всеми подключенными к нему устройствами. Вместо подключения к розетке или использования WiFi, Thunderbolt позволяет пользователям легко передавать данные и даже запускать несколько приложений одновременно.
Зачем вам нужно использовать Thunderbolt Bridge?
Благодаря своей невероятно высокой скорости Thunderbolt — отличный способ повысить производительность вашего MacBook. Он обеспечивает скорость до 10 гигабит в секунду, что позволяет быстро передавать большие файлы или использовать несколько мониторов с минимальной задержкой.
Обычно передача огромных объемов данных с использованием Wi-Fi или Ethernet происходит очень медленно, не говоря уже о ненадежности. Thunderbolt Bridge обеспечивает более безопасный и эффективный способ выполнения работы.
Еще одна замечательная особенность Thunderbolt заключается в том, что он работает в двух направлениях, то есть вы можете использовать один порт для приема и передачи данных. Это идеально подходит для подключения внешних дисков или устройств, таких как принтеры.
Как работает мост Thunderbolt?
Короче говоря, Thunderbolt работает, обеспечивая мост между устройствами, позволяя им быстро подключаться и передавать данные. Это соединение устанавливается с помощью кабелей Thunderbolt (USB-C). Эти кабели подключаются к порту Thunderbolt 3 на одном конце, а другой конец подключается к совместимому устройству.
Мост обеспечивает прямое соединение между двумя устройствами и позволяет им быстро обмениваться данными на небольшом расстоянии. Скорость определяется протоколом Thunderbolt 3, который поддерживает скорость передачи данных до 40 гигабит в секунду.
Каковы плюсы и минусы Thunderbolt?

Как и у любой технологии, у Thunderbolt есть свои недостатки. Вот несколько плюсов и минусов, о которых вы должны знать:
Плюсы Тандерболта
- Одним из основных преимуществ Thunderbolt является его надежная работа и невероятно высокая пропускная способность. Он может передавать данные со скоростью до 10 Гбит/с (40 Гбит/с для Thunderbolt 3), что делает его невероятно быстрым по сравнению с AirDrop или WiFi.
- Thunderbolt может соединять два компьютера и передавать данные между ними, создавая своего рода «локальную сеть».
- Thunderbolt 3 и более поздние версии технологии поддерживают четыре дисплея 4K или один дисплей 5K, а также могут работать с Microsoft Windows.
Минусы Тандерболта
- Thunderbolt 1 и 2 были совместимы только с устройствами Apple. Однако с тех пор Apple исправила это с помощью Thunderbolt 3 и более поздних версий.
- Порты Thunderbolt и USB-C легко спутать, поскольку они очень похожи, но совершенно разные.
- Эта технология дорогая, и многие ноутбуки и ПК не оснащены портами Thunderbolt. Если вы хотите использовать Thunderbolt, вам, вероятно, придется приобрести адаптер или ключ.
Можно ли подключить Thunderbolt к USB-C?
Изначально версии Thunderbolt 1 и 2 нельзя было подключить напрямую к порту USB-C. Но Apple улучшила это с помощью Thunderbolt 3 и более поздних версий. Thunderbolt 3 теперь совместим с USB-C и может использоваться взаимозаменяемо.
Однако ваш кабель USB-C должен быть хорошего качества, если он будет работать как кабель Thunderbolt. Обычно кабель должен быть помечен как «Сертифицированный Thunderbolt», чтобы он работал.
Можно ли подключить несколько мониторов через Thunderbolt?
Да, вы можете подключить несколько мониторов к вашему MacBook через Thunderbolt. К компьютерам Mac с портами Thunderbolt 2 можно подключить до двух дисплеев. К компьютерам Mac с портами Thunderbolt 4 можно подключить до четырех дисплеев.
Вам понадобится кабель Mini DisplayPort или Thunderbolt для каждого монитора. Вы можете инвестировать в Mini DisplayPort или Кабель Thunderbolt (на Amazon) который поддерживает разрешение 4K или 5K, чтобы получить наилучшую производительность и самое высокое разрешение.
Важно отметить, что вы можете подключить до 6 устройств к каждому порту Thunderbolt, если соедините их в цепочку. Цепочка позволяет подключить два или более устройств Thunderbolt, используя несколько портов.
Вот как это сделать:
- Подключите первое устройство к MacBook с помощью кабеля Thunderbolt или Mini DisplayPort.
- Подключите второе устройство Thunderbolt к другому концу порта и так далее.
Откуда взялись Thunderbolt (и USB-C)?
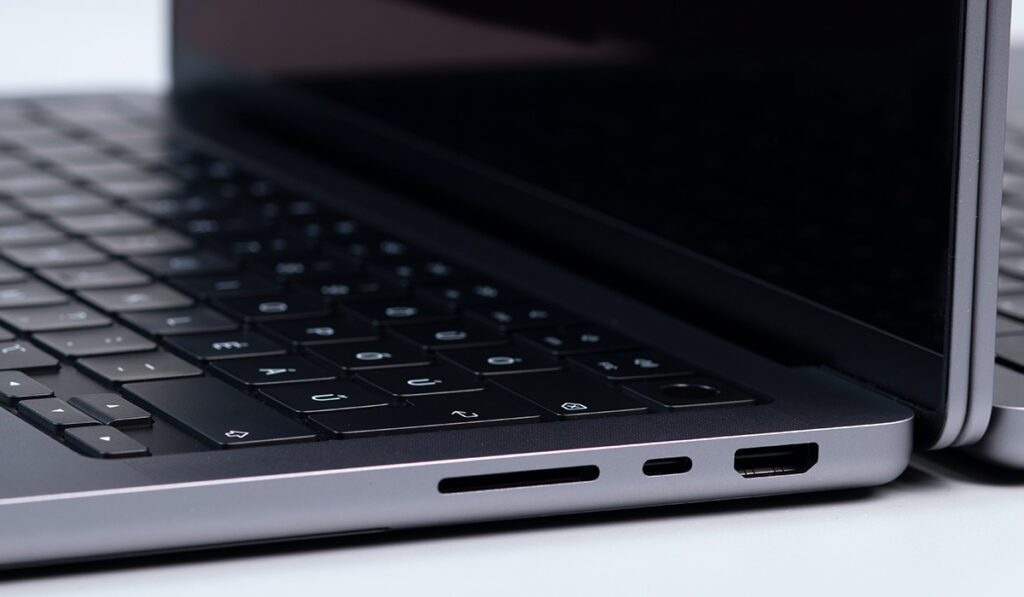
Если вы перейдете с MacBook на MacBook Pro, вы, возможно, заметили, что подключение новых аксессуаров может сбивать с толку. Это связано с тем, что Apple заменила старые порты MagSafe новыми портами USB-C.
Это очень расстроило многих пользователей. Наличие портов USB-C означает, что вам нужно приобрести много новых кабелей при обновлении вашего ноутбука.
Во времена, когда технологии развиваются, последнее, чего многие из нас хотят, — это увязнуть в кабелях. Не говоря уже о том, что эти кабели дорогие и иногда недоступны в магазинах. Итак, было ли внедрение портов USB-C в MacBook неправильным шагом Apple?
Этот сценарий звучит знакомо спорам о клавиатурах-бабочках — помните все эти коллективные иски? Это было настолько плохо, что многие пользователи предпочли придерживаться или покупать старые модели Mac вместо того, чтобы инвестировать в новые.
USB-C и MagSafe
Новые утечки из надежных источников показывают, что Apple повторно представляет порты MagSafe на новых MacBook M1X. Казалось бы, Apple наконец-то уступает требованиям своих клиентов и возвращает то, что всем так нравилось. А может все это было частью плана?
Один довольно неизвестный факт заключается в том, что Apple стояла за дизайном кабелей USB-C. Да, Apple создала технологию, но потом не захотела присвоить себе все заслуги. Вместо этого они были указаны только как участники.
Если вам интересно, почему они это сделали, то это потому, что, если бы кабели назывались кабелями Apple USB-C, большинство компаний не захотели бы их использовать и выставлять Apple в выгодном свете. Разумнее было бы позволить индустрии принять и овладеть ею.
Несмотря на то, что спустя 5 лет порты MagSafe вернулись на свои прежние места, порты USB-C проложили путь для большинства современных устройств. Почти все компьютеры, даже не разработанные Apple, имеют как минимум один порт USB-C.
Порты USB также позволили сделать MacBook максимально тонким. Мы все знаем, насколько Apple одержима худобой. Например, 24-дюймовый iMac настолько тонкий, что USB-C — единственный порт, который можно разместить сбоку.
Кабели и порты USB-C позволили Apple достичь этой цели, сделав дизайн гладким и современным. Теперь Apple может делать свои продукты тонкими и гладкими, не заставляя никого покупать порты USB-C. Довольно умно, если подумать.
Thunderbolt соединяет будущее
Thunderbolt — это революционная технология, которая может кардинально изменить скорость передачи данных и многое другое. Это быстро, надежно и безопасно, что делает его идеальным для таких задач, как игры, редактирование видео и потоковая передача.
По мере того как все больше устройств поставляются с портами Thunderbolt (предустановленными и продаваемыми отдельно), все больше и больше людей смогут воспользоваться преимуществами этой технологии. Будущее Thunderbolt выглядит светлым, и сейчас самое время посмотреть, какие новые возможности он может принести.
What is thunderbolt bridge on mac – Explained
Thunderbolt Bridge is a feature on Mac computers that allows users to connect two Macs and share their displays, keyboards, and mice. It is a convenient way to share resources and collaborate with others, mainly when working remotely.
Both Macs must be running macOS Big Sur or later and be equipped with Thunderbolt 3 ports to use Thunderbolt Bridge. The Macs must also be on the same network.
How Does Thunderbolt Bridge Work?
To use Thunderbolt Bridge, follow these steps:
- Connect both Macs using a Thunderbolt 3 cable.
- On one of the Macs, go to System Preferences > Sharing and select “Thunderbolt Bridge” from the list of services.
- Go to System Preferences > Displays on the other Mac and select the “Thunderbolt Bridge” option.
- The two Macs will now be connected; you can use them as if they were a single Mac.
Benefits of Thunderbolt Bridge
Thunderbolt Bridge offers several benefits for users, including:
- Improved productivity: With Thunderbolt Bridge, you can easily share resources and collaborate with others, which can help increase productivity.
- Enhanced security: Thunderbolt Bridge uses secure, encrypted connections to ensure your data remains safe and secure.
- Increased flexibility: Thunderbolt Bridge allows you to connect two Macs, regardless of their location, which can be useful for remote teams or individuals working from home.
Can I use Thunderbolt Bridge with Macs running older macOS versions?
Thunderbolt Bridge is only available on Macs running macOS Big Sur or later.
Do both Macs need Thunderbolt 3 ports to use Thunderbolt Bridge?
Both Macs must be equipped with Thunderbolt 3 ports to use Thunderbolt Bridge.
Can I use Thunderbolt Bridge to connect a Mac to a non-Mac device?
No, Thunderbolt Bridge is only designed to work with Macs. If you want to connect a Mac to a non-Mac device, you must use a different method, such as a cable or wireless connection.
Is Thunderbolt Bridge a replacement for other methods of sharing resources between Macs, such as using a network or cloud services?
Thunderbolt Bridge is an additional method for sharing resources between Macs, and it can be used in conjunction with other methods, such as using a network or cloud services. It offers a convenient and secure way to share resources and collaborate with others, particularly when working remotely.
Can I use Thunderbolt Bridge to connect a Mac to a Mac running a different operating system, such as Windows or Linux?
No, Thunderbolt Bridge is only designed to work with Macs running macOS Big Sur or later. It will not work with Macs running a different operating system.
Can I use Thunderbolt Bridge to connect a Mac to multiple other Macs simultaneously?
No, Thunderbolt Bridge allows you to connect two Macs, but it does not support connecting a single Mac to multiple other Macs simultaneously.
Is Thunderbolt Bridge the same as using a Mac in target display mode?
No, Thunderbolt Bridge and target display mode are two different features. Thunderbolt Bridge allows you to connect two Macs and share their displays, keyboards, and mice, while target display mode will enable you to use one Mac as a display for another Mac.
Can I use Thunderbolt Bridge to connect a Mac to a Mac that is using a different display resolution?
Yes, Thunderbolt Bridge supports connecting Macs with different display resolutions. The Macs will adjust their display settings to match the other Mac’s resolution.
Can I use Thunderbolt Bridge to connect a Mac to a Mac that is using a different graphics card?
Yes, Thunderbolt Bridge supports connecting Macs with different graphics cards. The Macs will automatically adjust their display settings to match the capabilities of the other Mac’s graphics card.
Is there a limit to the length of the Thunderbolt 3 cable I can use with Thunderbolt Bridge?
The maximum length of a Thunderbolt 3 cable is 2 meters (6.6 feet). However, it is recommended to use a shorter cable if possible, as longer cables can result in signal degradation and reduced performance.
Can I use Thunderbolt Bridge to connect a Mac to a Mac wirelessly?
Thunderbolt Bridge requires a physical connection between the two Macs using a Thunderbolt 3 cable. It does not support a wireless connection.
What Is Thunderbolt Bridge How It works – Detailed Guide In 2023
It is a hardware interface that allows a high-speed data transfer connection between a computer (usually a MacBook) and another external device.
Read the full article for details about Thunderbolt Bridge and its Connection methods:
Table of Contents
What is Apple Thunderbolt Bridge?
It is a feature of the MacBook that allows a high-speed back-and-forth data transfer between a computer (usually a MacBook) and another external device or without the requirement of Ethernet, AirDrop, or Wi-Fi devices.
1. Advantages Of Thunderbolt Bridge:
- It is usually used by users when they want to transfer their files or data from an older version of MacBook to the latest one or upgraded version e.g. version 10.9
- The thunderbolt cable speed is extremely fast compared to an ordinary cable, Ethernet, or even over Wi-Fi. Therefore, data can be transferred within minutes or seconds in some cases, because it is seen that it sometimes transfers the data in 8GBps.
- The biggest advantage of using Thunderbolt Bridge is performance and its speed. These are the two reasons why more people prefer it over Wi-Fi, Ethernet, or AirDrop to transfer data between MacBooks.
- A single Thunderbolt port/cable can be used to connect as many peripheral devices as the user wants, to transfer audio, video, or any other data.
2. Disadvantages Of Thunderbolt Bridge:
- It only works between two or more MacBook devices, which means it cannot be connected between windows devices (or any other operating system other than IOS). So, if the user is transferring from windows to IOS or vice versa, Thunderbolt Bridge will not work.
- If the hard disk of the device from which the user wants to transfer data to a new one is encrypted, the transfer of the data will not be possible. It happens because encryption creates an additional level of security or protection.
- If the user is connecting the devices through a chain connection (connecting more than one device) it can affect the performance if non-Thunderbolt devices are connected with the Thunderbolt device, and in turn, the whole process will be slowed down. Because other devices are slow as compared to Thunderbolt (for example USB port Or FireWire).
How Thunderbolt Bridge Works?
To use the thunderbolt bridge first the user has to connect it with a minimum of two MacBook devices. Generally, MacBook has a built-in Migration Assistant that guides users step-by-step on how to connect it but if it does not appear, it can be downloaded. The Migration Assistant transfers everything from the old to the new device/computer.
Features:
- Thunderbolt Bridge is extremely helpful when the amount of data that has to be transferred between two computers is enormous and transferring it via Ethernet or Wi-Fi would take a lot of time. Here thunderbolt cable comes as a life savior.
- It is not only helpful with Migration Assistant but can also be used for generic data transfer and Target Disk Mode as well.
- Thunderbolt can also work bi-directional which means that users can send as well as receive data at the same time.
Performance:
A typical Thunderbolt channel works very efficiently. It can provide up to 10Gb/s (Gigabits per second). This shows that the Thunderbolt is many times faster than a FireWire (which has a speed of 800) and a common USB (which has a speed of 3.0). Each of the ports of Thunderbolt contains two channels.
The number of devices That Can Be connected to a single Thunderbolt port:
At a time, the user can connect 6 devices to each Thunderbolt port by chaining them. In order to do that:
- Connect the first device to the Thunderbolt port
- Connect the second device at the other end of the first port and so on.
This means in order to connect more than one device, the devices in each chain should have two Thunderbolts ports. First, one will be used to connect to the device in front of it and the second one to make the connection to the device at the end of it.
How to Manually add Or Remove the Thunderbolt Bridge Network Interface?
Here we have discussed, how you can add or remove the network bridge in the Thunderbolt bridge. The detailed explanation is following:
1. How to add Thunderbolt Bridge Network Interface manually?
As mentioned above that the software used for working with thunderbolt is built-in. When two devices are connected via thunderbolt, the dialog box automatically popup, but if the user wants to access it manually or wants to add Thunderbolt Bridge Network Interface the following steps can be performed:
- Open the network preference panel. A dialog box of “New Interface Detected” will pop up. Click on OK.
- Now select “Thunderbolt Bridge” from the preference panel. After that click on the “Apply” button to set the new feature of the networking interface to OS.
After performing these two steps, the feature of Thunderbolt Bridge Network Interface will be added as a new networking option. It can be used right now or in the future whenever the user wants to transfer data between any two MacBooks.
2. How to remove Thunderbolt Bridge Network Interface:
If for some reason’s user wants to remove the option of Thunderbolt Bridge from an available network interface, it can also be done by following the steps below:
- Go to the Network Preference panel, the dialog box will appear showing the New Interface Detected. Click on OK.
- From the sidebar select the “Thunderbolt Bridge” and click on the [-] minus sign. It will remove the option of the Thunderbolt Bridge networking interface.
- Click on “Apply” to save the changes.
If it is removed by mistake, or the user wants to add that feature again, simply click on the [+] plus sign. It will add the option of Thunderbolt Bridge networking interface again.
- 16 MacBook Pro with Touch Bar — 96W USB-C Power Adapter — USB-C Charge Cable (2m) — Apple 1 Year Limited Warranty
How to physically connect MacBook with Thunderbolt Bridge?
The MacBook is one of those laptops that contain ports to connect different peripherals. On the previous versions of the MacBook, the “Mini DisplayPort” is available which can be used to connect to a Thunderbolt Bridge.
In the latest versions, there is no separate “Mini DisplayPort” only the Thunderbolt port. Just plug the cable into the port, at the other end of the cable that connects the other device and the device/devices will be ready to use or transfer the data.
How To Connect Multiple Monitors Through Thunderbolt Connection?
This one is pretty interesting and straightforward, however, you might have to spend a little bit of cash, but trust me it’s definitely worth it, as multiple monitors can enhance your productivity significantly.
The complete Step-by-Step method for connecting multiple monitors through Thunderbolt is following:
- The first and foremost thing you need to do is check that your laptop actually has a Thunderbolt port, it would look exactly like a USB type C port.
- Now, Buy a thunderbolt Docking station or HUB which also includes HDMI interfaces in it.
- Plug in the Docking station and connect your monitor with the help of your HDMI cable to the Thunderbolt Docking station hub.
- This method of duplicating or having multiple monitors is way more ideal as compared to any other method since Thunderbolt cables have higher transmitting speeds and also support a larger resolution and more refresh rate.
- As a final step, you’ll need to head over to the settings and click on the display option so you can tweak its position and other options.
How To Use External Graphics Card Through Thunderbolt
Did you know that you can also use an E-GPU to connect to your laptop or MacBook that doesn’t have a dedicated or discrete graphics card? Below is how you can do it, but first, check the important notes:
Now is the time to show you the step-by-step method for using external graphics cards through thunderbolt:
- First of all, make sure both the E-GPU you are buying and your laptop/Macbook model are compatible.
- After you have ensured there isn’t any sort of compatibility issue between them on your Laptop/Macbook manufacturer’s website, plug in your E-GPU with the thunderbolt Cable.
- Now Plug the other end with your laptop’s Thunderbolt interface.
- Now Install and update thunderbolt drivers as well as your E-GPU drivers, whether it belongs to Nvidia or AMD.
- Moreover, you also need to update your BIOS, in order to eliminate any sort of bugs or abnormalities.
- Try playing your games and test them for benchmarking and see how it performs.
Conclusion
Thunderbolt Bridge is the latest peripheral-connection technology developed specifically for MacBooks to transfer data (audio, video, pictures, programs, apps, etc.) from one device to another within minutes and seconds.
Because of its features and speed, it is replaced by the conventional method of Mini DisplayPort file transfer. From its installation to the transfer of data, everything is effortless therefore in the latest MacBook there is a separate port for Thunderbolt Bridge.
Although it has many advantages these advantages are available only for IOS not for windows or other operating systems.
What is Thunderbolt networking?
Instead of using an Ethernet cable, you can use thunderbolt cables to form a bridge that could connect two or more computers or MacBooks and establish network connectivity between them which is called Thunderbolt Networking.
How do I activate a Thunderbolt bridge on a Mac?
First, plug in both ends of your Thunderbolt cable to your Macbook devices, then head over to the network and options in the system preferences and click DNS in the advanced options and your Domain Address. You can activate your Thunderbolt bridge and form a connection between them.
What Is The Fastest Way To Transfer Data From One Mac To Another?
Using a thunderbolt cable is the most fastest and efficient way to transfer files since it has high-speed file transfer rates that could up to a whopping 40Gbps.
Can I plug Thunderbolt into USB-C?
Both Type C and thunderbolt have the same interface and are completely compatible with each other, however, thunderbolt seems to be a superior choice as you can benefit from great speeds which are not possible on a USB type C interface.
Can you share the internet through Thunderbolt?
Among its many features, Thunderbolt can replace Ethernet cables, enabling users to share the internet through wired connections. Using the IPV4 option in the Network preferences, be sure to set the Thunderbolt bridge as DHCP and plug in your Thunderbolt cable.
ABOUT US
TechyDIY is an independent benchmark that offers honest reviews regarding Laptops ,Cables and Mouse. It also provides features, prices, and much more.
What is ThunderBolt Bridge on Mac and How to Activate
Written by  Ujjwal Reviewed by Editorial Team
If you buy through affiliate links, we may earn a commission at no extra cost to you. Full Disclosure Here…

If you have a Mac with Thunderbolt 3 ports, you can use Thunderbolt Bridge to connect it to another Mac with Thunderbolt 3 ports. This lets you access all of the features and files on the other Mac, including the display, keyboard, and mouse. You can also connect an external drive or monitor to your Mac using Thunderbolt Bridge. In this article, we’ll discuss how to set it up.
What is ThunderBolt Bridge on Mac
Thunderbolt Bridge is a technology that allows you to connect two Macs with Thunderbolt 3 ports. Using the Thunderbolt interface, Apple’s Mac devices can connect to each other and other supported devices and experience high-speed data, audio/video, and power transfer.
This lets you access all of the features and files on the other Mac, including the display, keyboard, and mouse. You can also connect monitor or an external drive to your Mac using Thunderbolt Bridge.
Even though the ThunderBolt 4 is a relatively new addition to Mac, its trailblazing technology was first developed by Intel by the name Lightpeak and later co-developed by Apple. It was first offered as a flagship feature on the MacBook Pro laptop on the Mavericks OS X (10.9) back in 2011. Fast forward a few years, and today, it has become a core feature of all MacBooks.
The idea behind the ThunderBolt technology was to allow users to establish ultra-fast and high-fidelity connections between peripheral devices, including, but not limited to, RAID arrays, hard drives, audio-video exchanges, network interfaces, and power ports.
The ThunderBolt bridge is also designed to transmit high-definition video data utilizing the DisplayPort protocol. In addition to that, ThunderBolt ports can supply compatible connected peripheral devices with up to 100 watts of power, which is more than 20 times the standard output of a USB 3.0 port that only delivers 4.5 watts.
Different Versions Of ThunderBolt
The ThunderBolt technology has seen various upgrades over the years, with the ThunderBolt 1.0 and ThunderBolt 2.0 being based on the MiniDisplay Port. The MiniDisplay port is the miniaturized version of Apple’s Display port, which supports a digital audio-visual interface.
Since ThunderBolt 3.0 and now ThunderBolt 4.0, the technology has been using USB 3.0 as its port preference, requiring special ‘active’ cables for peak performance if the cable length is over a specified length (0.5 meters). Here’s a summary of the different versions of Thunderbolt.
- Thunderbolt 1: It was released in 2011 and uses the Mini DisplayPort connector. It supports a data transfer rate of 10 Gbps and can daisy chain up to six devices.
- Thunderbolt 2: The second version of Thunderbolt was released in 2013 and uses the same Mini DisplayPort connector as Thunderbolt 1. It supports a data transfer rate of 20 Gbps and can daisy chain up to six devices.
- Thunderbolt 3: Thunderbolt 3 was released in 2015 and uses the USB Type-C connector. It supports a data transfer rate of 40 Gbps and can daisy chain up to six devices.
- Thunderbolt 4: The latest version of Thunderbolt, known as Thunderbolt 4, was released in 2020 and uses the same USB Type-C connector as Thunderbolt 3. It supports a data transfer rate of 40 Gbps and can daisy chain up to six devices. Thunderbolt 4 is also compatible with USB 4.0 devices.
How Thunderbolt Bridge Works
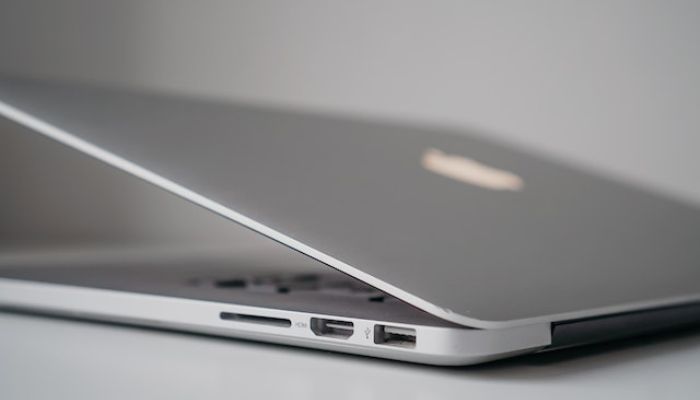
Well, now that you know that the Thunderbolt bridge is a big leap in data transfer technology, you might be wondering— How does the Thunderbolt bridge work? How is it able to transfer data so quickly?
The answer lies within the technology the Thunderbolt is built on. You see, the Thunderboth bridge we know today is actually an extension of a much old technology known as the PCI Express or Peripheral Component Interconnect Express.
Now, the more we talk about different technologies and their interconnection, the more complicated things will get. So let’s start with the basics first. Have you ever noticed that transferring data from one location to another within your own PC is actually much faster than transferring it to external storage? That’s because the internal components use much faster pathways to transfer data that speed up the entire process by a great deal.
What’s even more interesting is that the data transfer between different components of a computer, like the RAM and the Processor is even faster, and they use even faster pathways than the best-in-class mm2 SSDs. For comparision, SSDs can trasfer data upto 25.6GB/s where as processors can trasfer data over 100GB/s.
In fact, the data transfer between several components of your Mac, including the RAM and the Processor, is also extremely faster compared to generic storage drives.
So How Is Data Transferred Within A Computer, And Why is it So Fast?
There are a few different ways that data can be transferred from within a computer. One way is through the use of a bus. Yes, you can think of them as the real-life passenger bus, except they transfer data instead of people.
Just like in real life, the factors that decide the speed of the bus are the quality of the bus itself and the road it’s traveling on; data transfer speed on computers also depends on the protocol used and the pathway taken to transfer the data.
Now, this is where the foundation of Thunderboth technology— PCI Express comes in. You can think of the PCI Express as a real-life expressway that connects major locations more efficiently to allow cars or, in this case, busses to travel faster. Similarly, in the computer world, it helps in transferring data faster from one location to another. The latest version, PCI Express 4.0, can transfer data at up to 16 GT/s (gigatransfers per second).
Now, you might be wondering— how is all this relevant to the ThunderBolt Bridge?
Well, the reason why the ThunderBolt Bridge can transfer data at incredibly fast rates is that it’s based on the PCI Express and connects directly to the PCI Express bus! This allows it to use the extremely fast and efficient network of pathways to travel data from one location to another.
Naturally, the Thunderbolt Bridge has a lot of unique abilities and offers a ton of features. Here are a few of them.
Features
Unbeatable speed: The ThunderBolt 4 perfects the trifecta of offering high-speed data transfer, I/O of high-definition audio-visual signal, and up to 10 watts of power delivery to compatible devices. This makes ThunderBolt the model connectivity standard and sets a benchmark across the industry as a whole.
Versatility: This makes ThunderBolt 4 the de facto port for all your connectivity needs.
Connectivity: ThunderBolt ports are capable of supporting a variety of connection standards. These include ThunderBolt 3 and other iterations, DisplayPort, PCle, and USB connections, along with all USB 3.0 connections. Some of them include the following:
- ThunderBolt Devices: ThunderBolt can connect to and transfer data, digital audio-visual signals, and power to ThunderBolt-compatible devices. This includes not only ThunderBolt 4 and 3 but also older versions (with the use of an adapter).
- Storage Devices: ThunderBolt SSDs offer unparalleled external storage experience by leveraging ThunderBolt’s blazingly fast reading and writing speeds, as well as bi-directional data exchange feasibility. In fact, ThunderBolt SSDs are at par, if not better, than internal storage mediums.
- Multiple Secondary Monitors: One of the most useful features of the ThunderBolt bridge is that it allows users to connect multiple secondary monitors to their devices, boosting productivity substantially. A ThunderBolt 4 port is capable of connecting up to two DisplayPort or HDMI monitors at 4K 60 Hz. It’s also very easy to connect dedicated ThunderBolt monitors as they can be plugged in directly to your system via a ThunderBolt cable.
- PCle Devices: Since ThunderBolt connections are compatible with PCI Express, they are capable of supporting PCI Express devices like external graphic cards, Wi-Fi adapters, etc., via a PCIe expansion chassis.
- USB devices: USB peripheral devices like mice, headsets, keyboards, controllers, etc., can be connected to your system via the ThunderBolt connection for smoother operation.
Network Sharing: Did you know that the ThunderBolt bridge is so fast it’s capable of replacing ethernet cables? You can connect your Mac to a high-speed 10 Gigabit ethernet network via a ThunderBolt connection and an adapter, allowing for high-speed internet access. Additionally, you can interconnect two Macs and establish a peer-to-peer network using a ThunderBolt 4 connection.
Power Disbursal: The use of copper cables instead of optical fibers (as intended in the LightPeak prototype) allows ThunderBolt 4 to supply up to 100 Watts of uninterrupted power supply to compatible devices (like MacBooks) on top of ultra-fast data transfer.
Security: ThunderBolt 4 comes equipped with Intel’s state-of-the-art VT-d-based DMA protection. VT-d, or Virtualization Technology for Directed, is a hardware security protocol built into Intel processors that defends them from external DMA attacks via nascent ThunderBolt ports.
If you don’t know what DMA means, it refers to Direct Memory Access. A DMA attack is a form of side-channel attack that renders the data stored on your system vulnerable to external forces connected physically to your system via high-speed expansion system ports (here, through ThunderBolt). ThunderBolt 4 is immune to such attacks by design.
That’s because this protocol blocks outside peripherals connected to the system through ThunderBolt ports from accessing system memory without authorization and committing malicious acts. (Best of luck, hackers!)
Wake From Sleep Support: ThunderBolt ports also offer a “Wake from Sleep” feature offered through. Using this feature, peripherals can wake a system out of hibernation through an externally connected ThunderBolt 4 dock.
Performance
ThunderBolt 4 boasts an impressive spec sheet with multiple industry-leading performance numbers. These are as follows:
- 40 Gb/s throughput data transfer speeds.
- 32 Gb/s PCle data transfer speeds.
- Supports up to two 4K monitors at 60 Hz or a single monitor at either 8K 60 Hz or 4K 120 Hz.
- Capable of supplying host devices with up to 100 Watts of DC current.
- Cable length of up to 2.0 meters (6.5 feet).
- Support for USB4 specification set forth by USB Implementers Forum, making it compatible with ThunderBolt 3, ThunderBolt 4, USB4, USB 3.2, USB 3.1, USB3.0, and USB 2.0 devices. capabilities with up to 6 devices.
While ThunderBolt 4 has become the ‘superset standard’ in the periphery port industry, most devices feature the previous interpretation of it, i.e., ThunderBolt 3. The specifications for the same are as follows:
- 40 Gb/s throughput data speeds over ‘active’ cables.
- 16 Gb/s PCle data transfer speeds.
- Supports up to two 4K monitors at 60 Hz or a single monitor at 5K at 60 Hz.
- It can supply compatible peripheral devices with up to 100 Watts of DC current.
- Cable length up to 0.5 meters (1.5 feet), with the requirement of special ‘active’ cables for cable lengths over 0.5 meters.
- Allows Daisy Chaining up to 6 devices.
Multiple Docking using ThunderBolt Bridge
As mentioned above, using ThunderBolt 4, you can connect to up to six different devices. This is made possible due to the ultra-high bandwidth as well as the bi-directional wave flow of multiple different mediums of data through ThunderBolt cables.
ThunderBolt-enabled Macs now come with 2 ThunderBolt ports, meaning you can connect devices together using this technology in a Daisy Chain Accessory Architecture or a Multi-port Accessory Architecture:
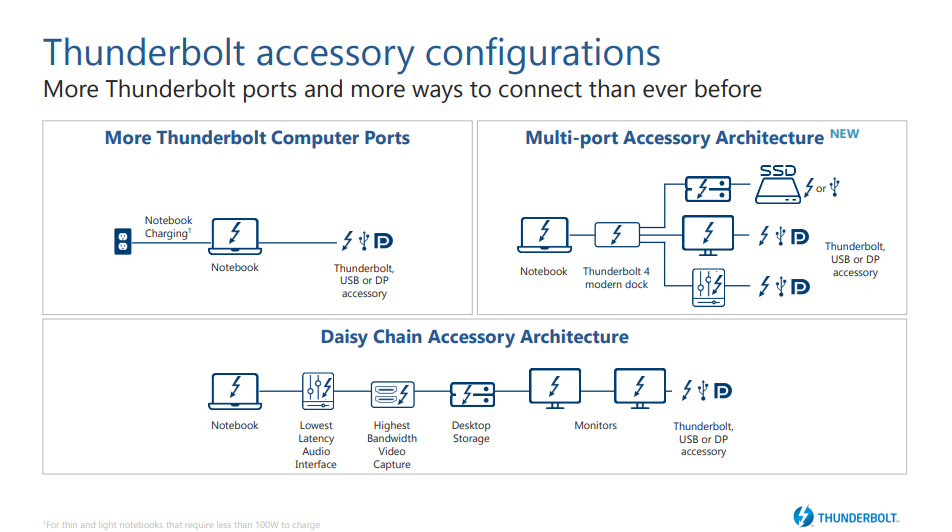
Sounds too complicated? Let me break it down for you.
Daisy Chaining: A daisy chain architecture refers to an established physical connection (via external cables) in which each device is connected to the other via a series connection, and the flow of data is enabled.
Multi-port Accessory Architecture: ThunderBolt 4 offers a completely new way of connecting accessories and peripherals to your unit system via a multi-port ThunderBolt dock. This opens new avenues in the application of ThunderBolt for different users and offers a ton of exclusive features. Here are a few of them:
- Throughput Consolidation: With the inculcation of multi-port docks in ThunderBolt 4, users can connect multiple peripherals to their device without compromising on speed, data accessibility, quality, ease of access to peripherals, and more.
This is especially useful for gamers, who can connect blazingly fast external ThunderBolt SSDs, establish high-speed ThunderBolt ethernet connection, and connect to gaming monitor(s), and peripherals like a keyboard, headset, or mouse, all without overloading the port’s data transfer cap of 40 Gb/s. (Playing Valorant on a Macbook is going to be fun now!)
- Port Expansion: You can now connect a wide range of accessories, devices, and peripherals to a single port, expanding the capabilities and usage range of each port many-fold.
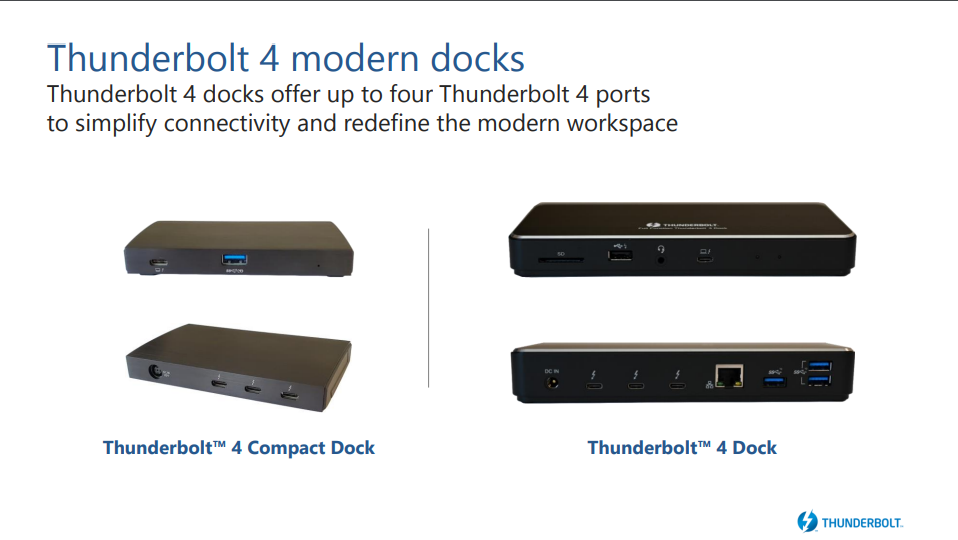
A single port, connected to a ThunderBolt 4 compact dock or a ThunderBolt 4 dock, is capable of supplying up to 8 channels of audio, up to two 4K monitors at 60 Hz, ethernet network, peripheral connectivity, and up to 100 Watts of DC power, all through a single ThunderBolt port. Basically, you can turn your Mac into a complete DJ setup. All you need is good DJ software for Mac, and you’re ready to rock!
- Cable Management: Docking enables users to maintain a clean, minimalist, and uncluttered work profile setup without compromising on accessibility, speed, functionality, or throughput.
For laptop users, docking is also very convenient as they only need to unplug a single physical connection instead of multiple different physical cables every time they wish to relocate.
How to set up ThunderBolt Bridge Network Interface on Mac
Unlike the complicated technology behind the ThunderBolt Bridge Network, setting it up on a Mac is very easy. Just follow these easy steps to set up a ThunderBolt Bridge Network on your Mac.
Mac devices have a dedicated ThunderBolt bridge configuration that can be used to transfer large swathes of data from one device to another. This is typically used to transfer files from one Mac device to another. Here’s how to set it up:
- First, connect the two Mac devices you want to establish a ThunderBolt connection using a ThunderBolt cable. If one of the devices is using an older version of ThunderBolt (1 or 2), using an adapter will work with the condition that the bandwidth will default to the slowest component.
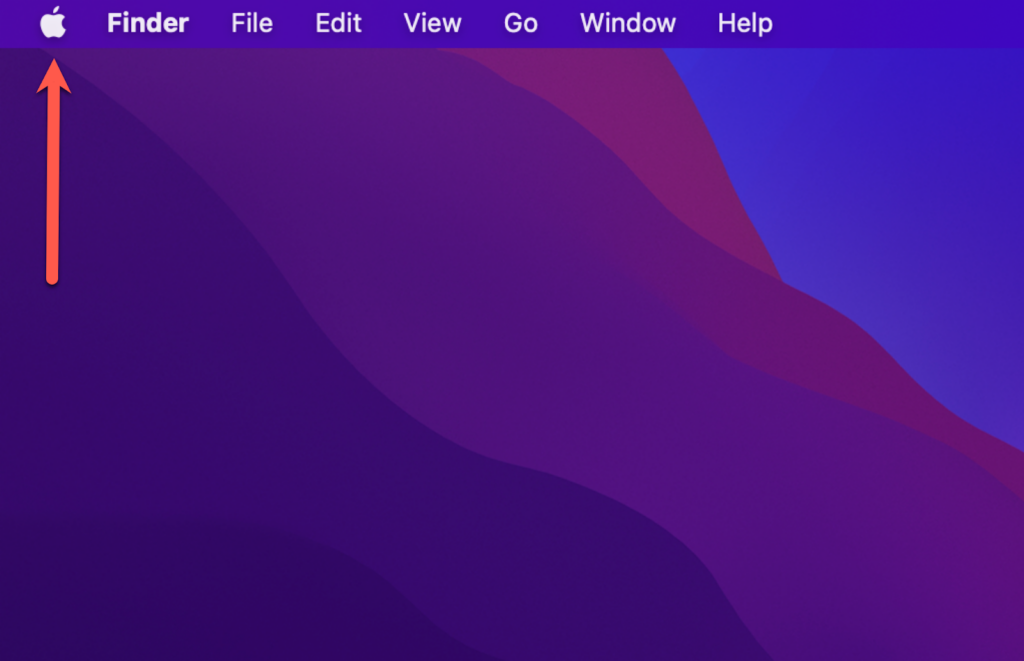
- On the server or host device (the one you wish to transfer data from), click the Apple Menu.
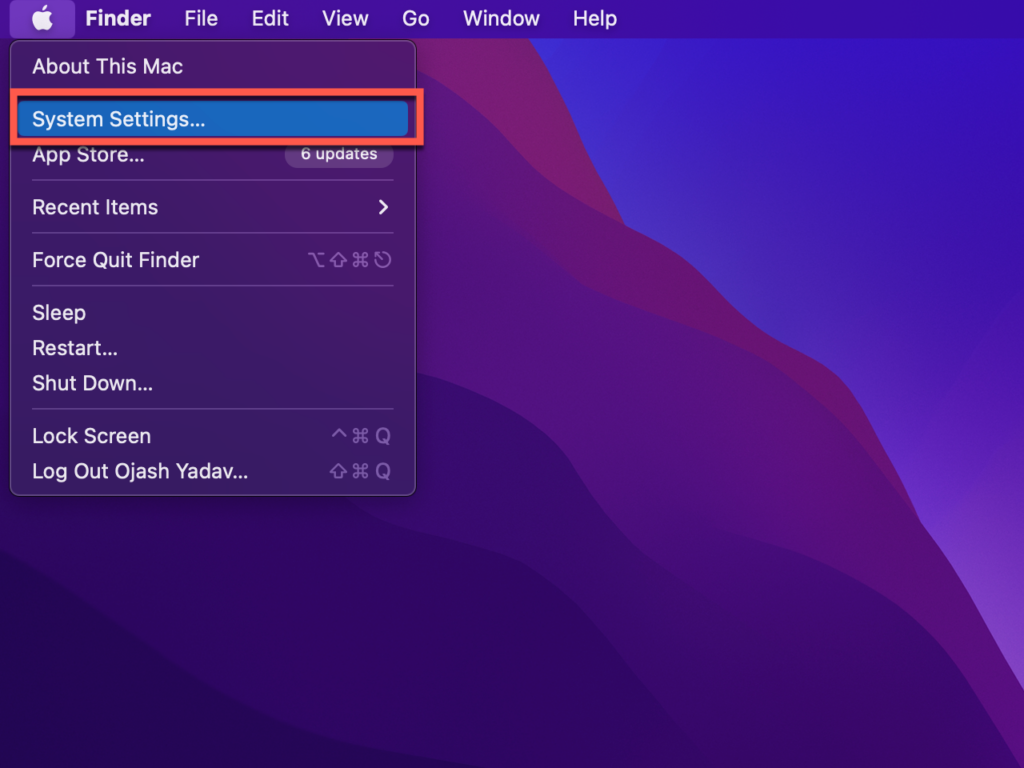
3. On the drop-down menu that appears, click System Settings.
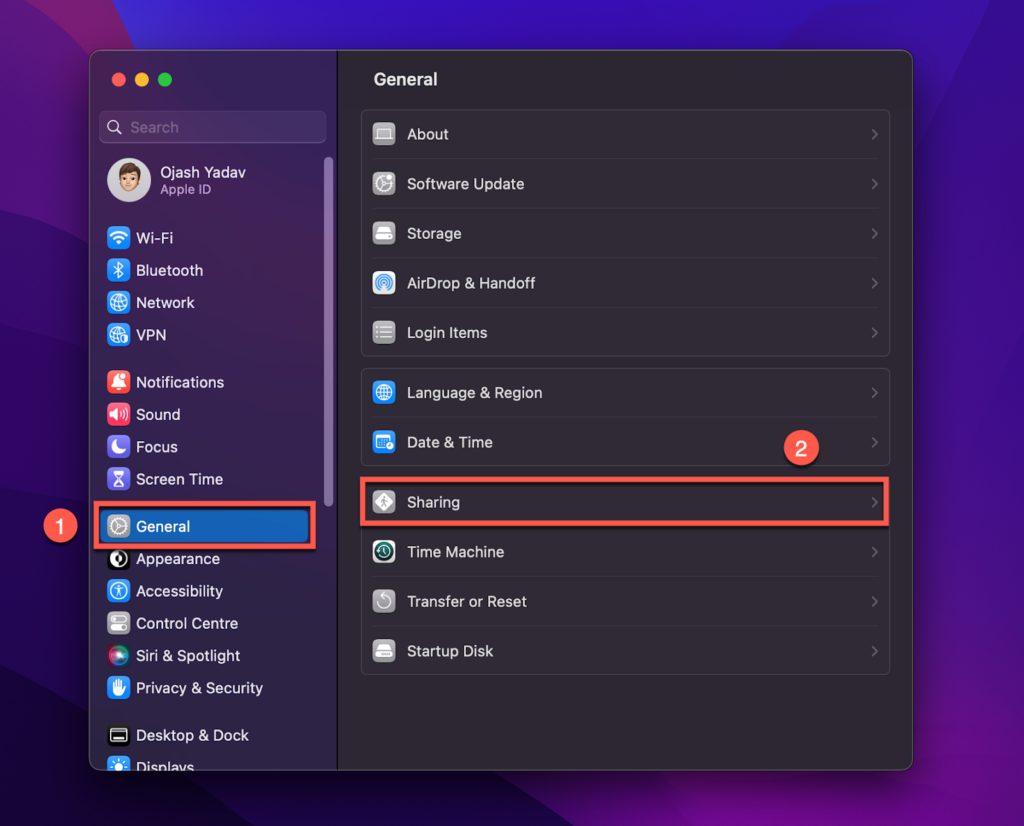
4. Now navigate to General > Sharing.
5. Toggle on the switch next to the File Sharing option to allow your Mac to share files.
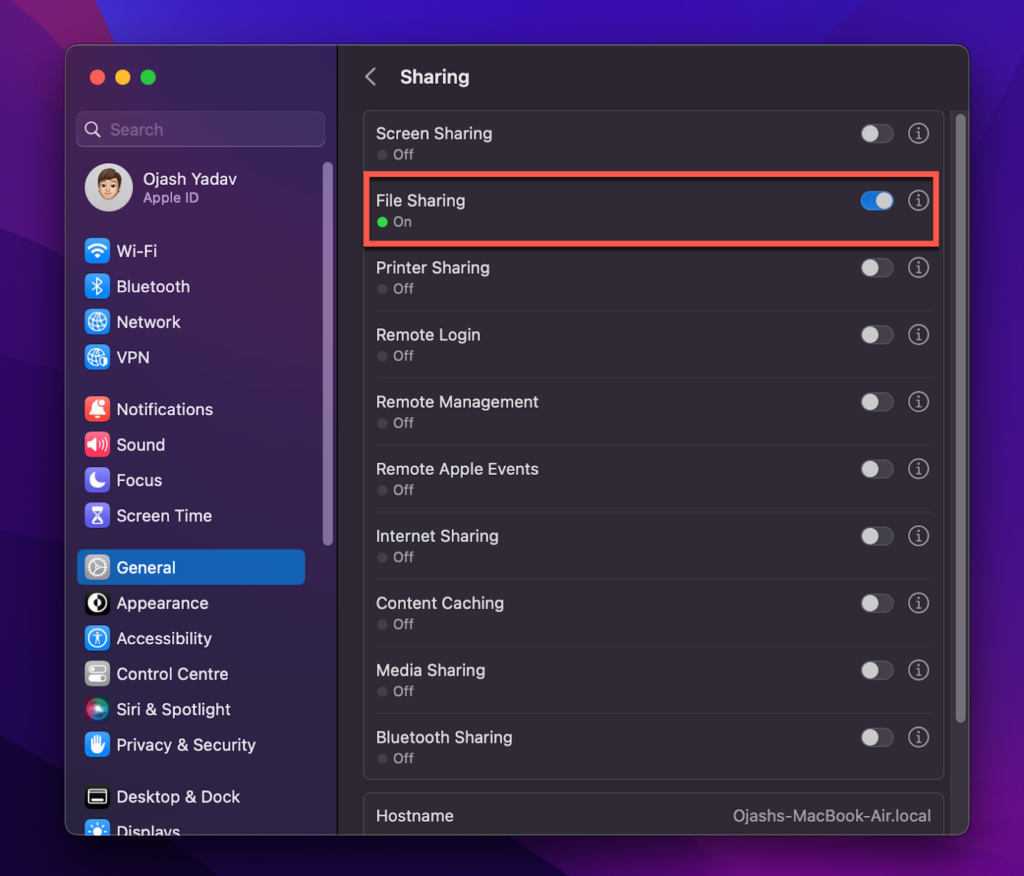
6. Now that your Mac is ready to share files go back to System Preferences and click Network.
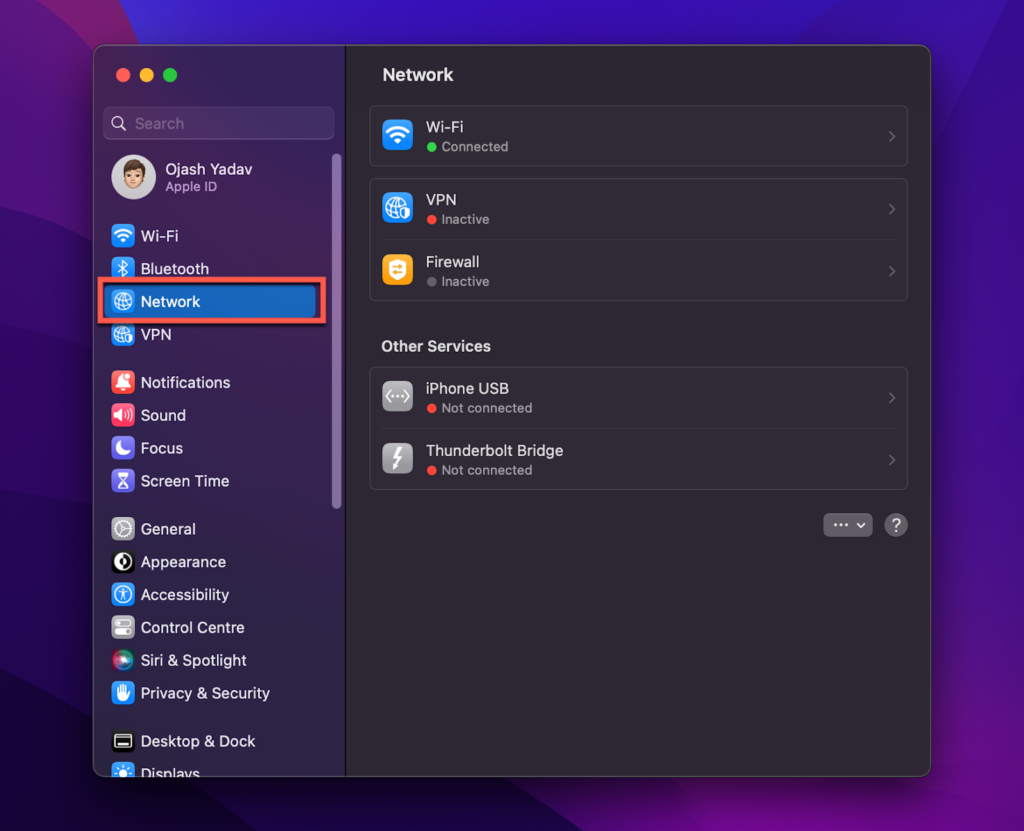
7. Click the three dots and the arrow at the bottom right side of the window and click Add Service…
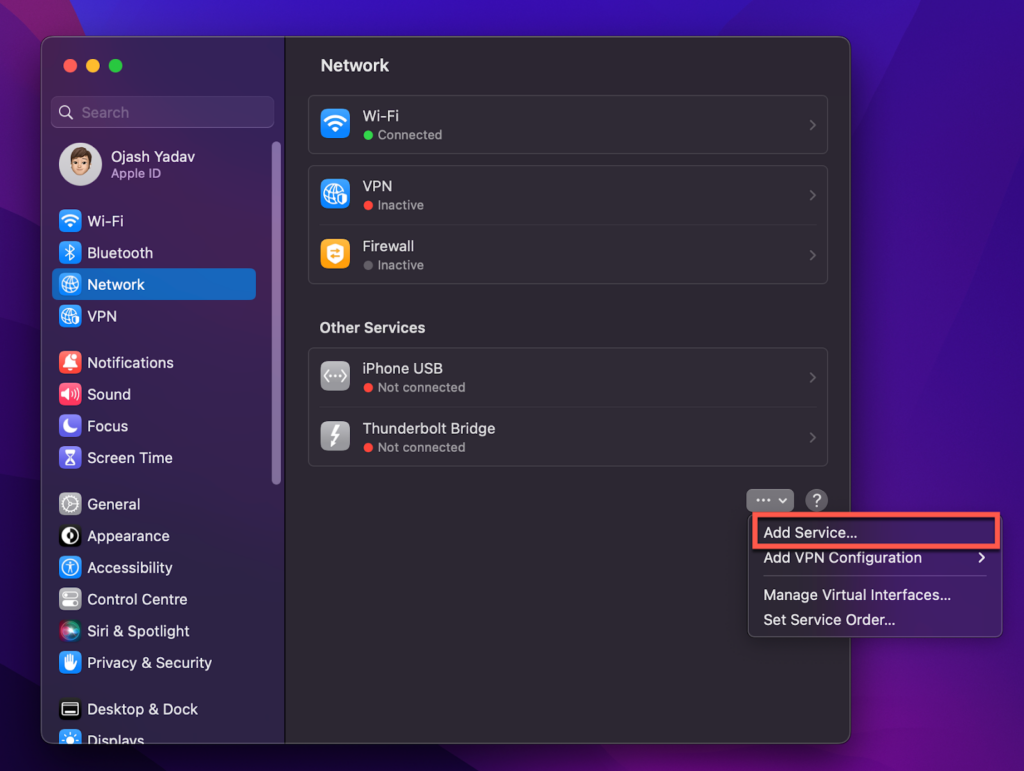
8. On the prompt that appears on your screen, select ThunderBolt bridge from the drop-down menu and click Create.
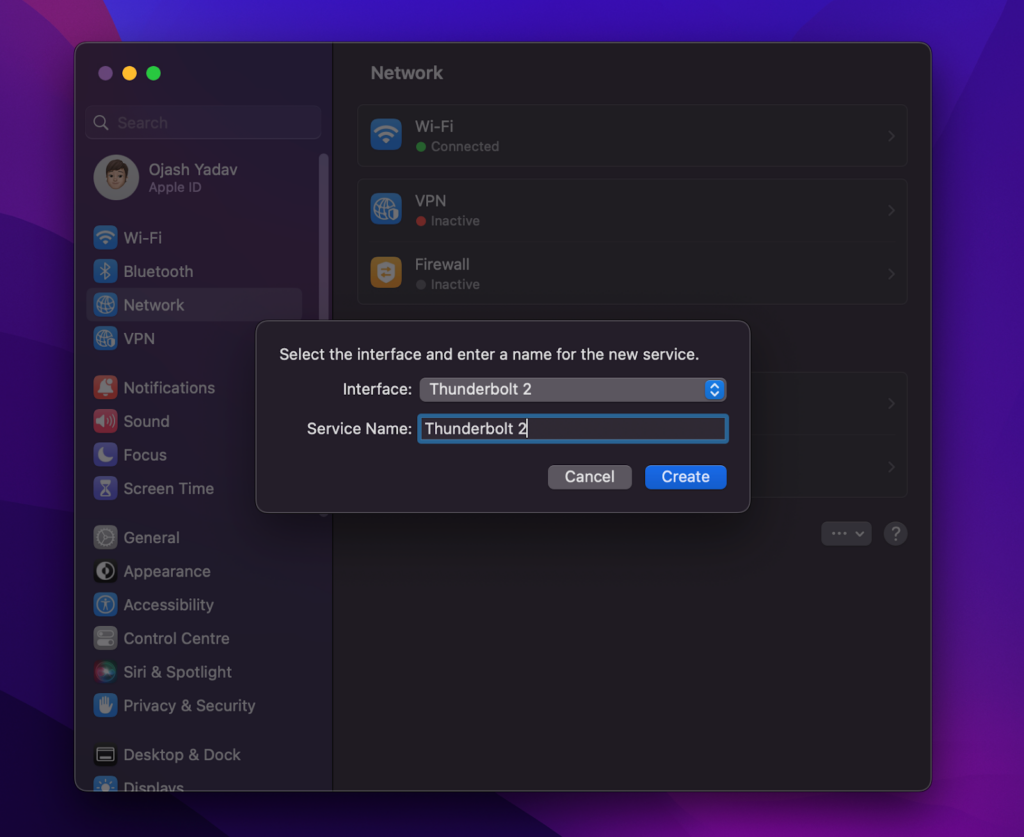
9. This will create a ThunderBolt bridge on your host Mac device. Click Apply to save changes and repeat the same steps on your receiver mac device to create a two-way connection.
Now you can establish an automatic connection with both Macs and share files in a blink of an eye. Keep in mind that to use Thunderbolt Bridge, you should use an original Thunderbolt cable to connect to the Thunderbolt ports on each Mac. Once the connection is made, you’ll see a new icon in the menu bar on both Macs that looks like two interlocking arrows.
Click this icon and then select the “Create Bridge” option. Your two Macs will now be treated as a single computer, and you can use them as such. For example, you can drag and drop files between the two Macs or use one Mac’s display as an extended desktop for the other Mac.
When you’re done using Thunderbolt Bridge, you can disconnect the cable, and each Mac will revert back to functioning independently. However, you’ll still have to remove the ThunderBolt Bridge Network Interface manually from your Mac’s System Preferences. Here’s how to do so:
How to Remove the ThunderBolt Bridge Network Interface
Removing a ThunderBolt Bridge interface is even easier than establishing one.
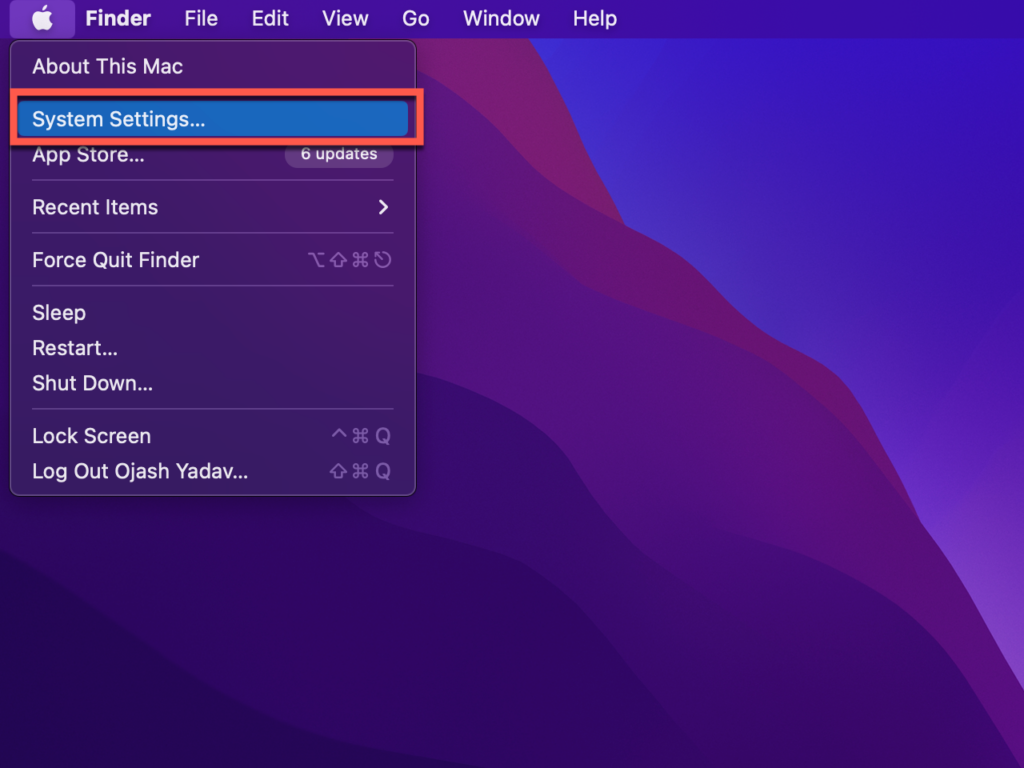
1. Click on the Apple Menu.
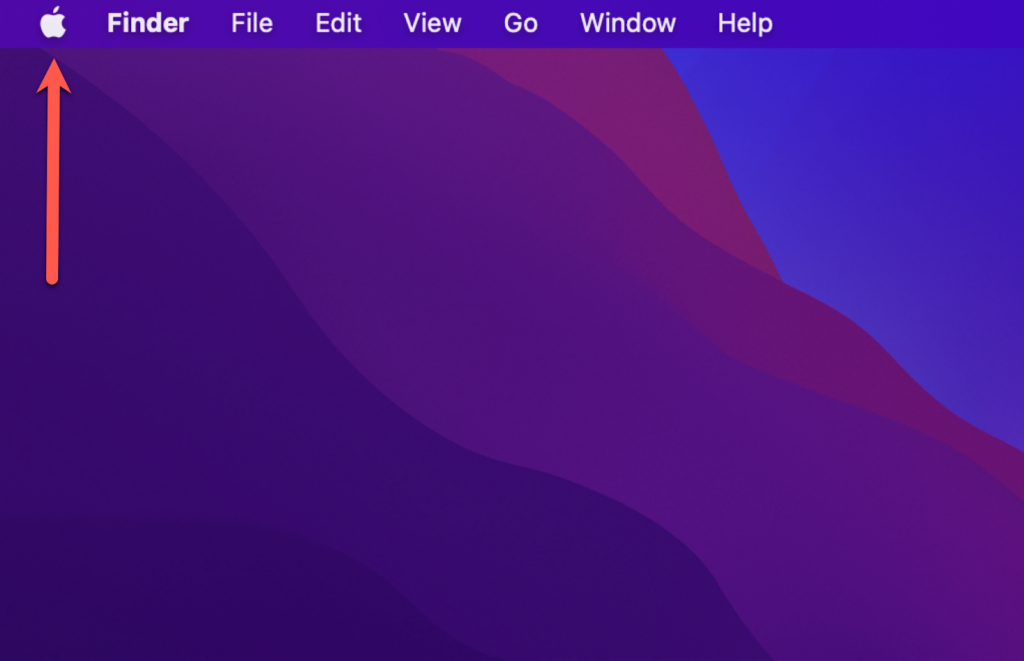
2. On the drop-down menu that appears, click System Preferences.
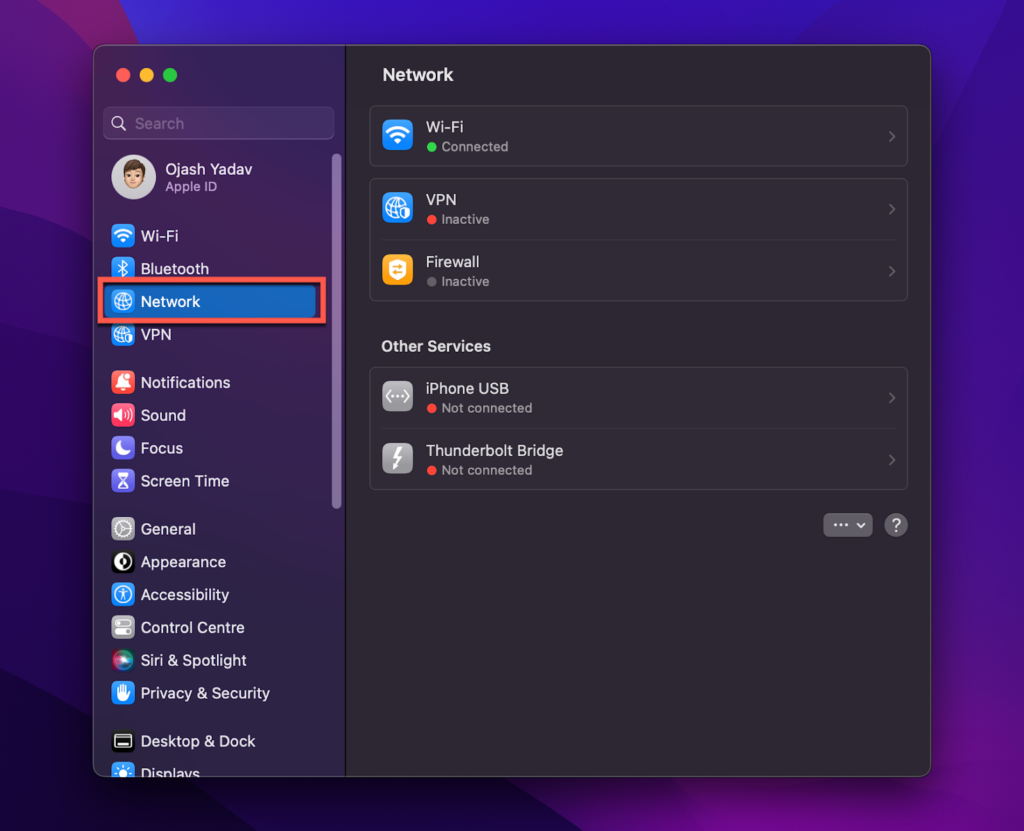
3. Here, click Network.
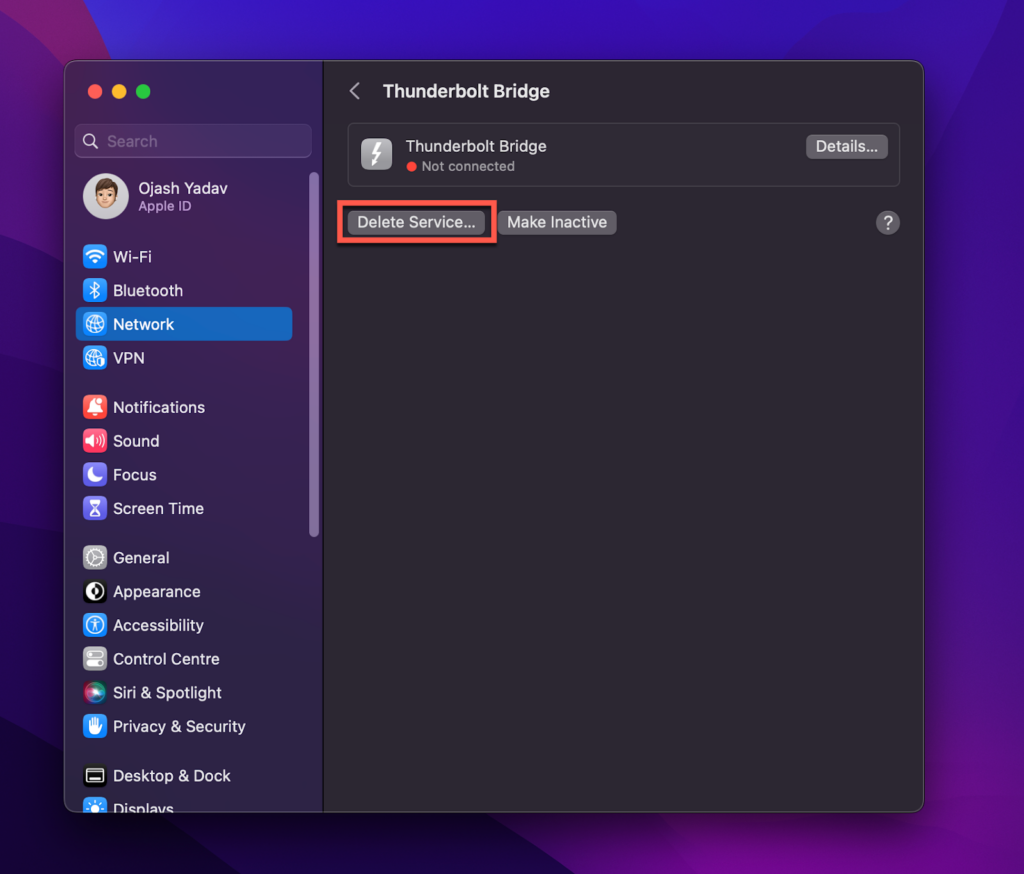
4. Here, select the ThunderBolt Bridge connection you wish to disable and click Delete Service. Now your ThunderBolt Bridge connection will be removed.
Frequently Asked Questions
Here are some frequently asked questions about the Thunderbolt Bridge network and their answer.
Thunderbolt’s main advantage over other connections is its speed. Thunderbolt can transfer data at up to 40 Gbps, which is eight as fast as USB 3.0 and sixteen times faster than the FireWire 800. Thunderbolt also supports DisplayPort 1.2, which means it can be used to connect an external display with a resolution of up to 4K.
Thunderbolt’s other advantage is that it uses the same connector as Mini DisplayPort, so you can use existing cables and adapters with Thunderbolt devices. Thunderbolt 3 uses the USB Type-C connector, which is the same connector used by USB 3.1 devices.
Here’s an additional run down of the most commonly used data transfer technologies and how they compete with each other and the all-mighty Thunderbolt bridge:
7. Ethernet, the slowest on this list, provides a maximum rated bandwidth of 100 Mb/s and is mainly used for networking.
6. USB 2.0 has been one of the most universally accepted connection standards, with connection speeds ranging in the neighborhood of 480Mb/s.
5. Gigabit Ethernet, a faster variant of the Ethernet connection standard, is capable of transmission speeds of up to 1 Gb/s.
4. FireWire, or IEEE 1394, is an Apple connection standard that was a mainstay on all Apple devices until USB took over. Firewire 800, the fastest version of this connection standard, was rated at about 6 Gb/s.
3. eSATA or external Serial Advanced Technology Attachment is an interface that is used to transmit data to and from external storage devices (external SSDs) and the computing circuit boards. eSATA comes in next in this list at 6 Gb/s.
2. USB 3.1 and USB 3.0 is the next advancement in USB connectivity technology, with transmission speeds of 10 Gb/s and 5 Gb/s, respectively.
1. ThunderBolt (4) tops bandwidth capabilities with a consolidated bi-directional data flow rating of up to 40 Gb/s. That’s about 4x as fast as any other connection standard.
Yes, ThunderBolt offers backward compatibility between versions. While ThunderBolt 3 and 4 use the same USB C port and can therefore establish connections across versions, the bandwidth speeds will revert to the lower version (ThunderBolt 3). The same is true for ThunderBolt versions 1 and 2. Additionally, ThunderBolt versions 3 and 4 are backward compatible with versions 1 and 2, with the establishment of port connections via the aid of an adapter.
Since ThunderBolt 3 and 4 use USB C port connections (with ThunderBolt 4 compliant with USB 4 guidelines), these versions of ThunderBolt are cross-compatible with most USB C port connections, with the obvious trade away that the connection will default to the bandwidth configuration of the slowest component involved.
One thing to note about promoted bandwidth speeds in cable connection standards is that almost always, a system will never be able to achieve promoted speeds in real-world conditions. In the best-case scenario, the Network will operate between 70% to 80% of the promoted bandwidth speeds. If it is any lesser than that, you might be experiencing hardware compatibility issues.
There could be several reasons this is the case. To fix this, you need to first figure out what version of ThunderBolt your system is running. If it is a USB C port, voila, you are already halfway to recognizing what version your system sports. MacBooks and other Apple products don’t display a ThunderBolt signal next to the input port, so you will need to pull up the detailed specs of your device in order to ascertain the specifics.
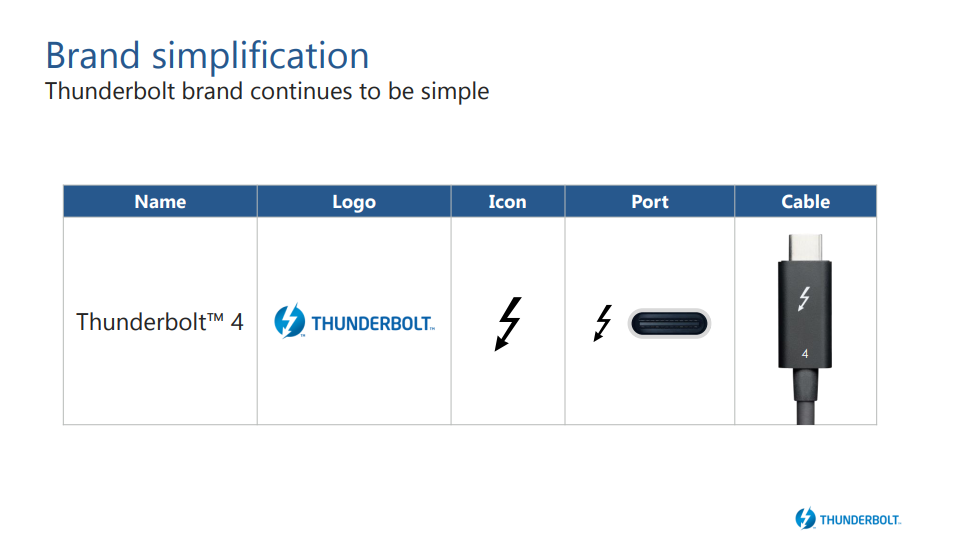
For ThunderBolt version 4, there may be a probability that you are using regular USB C cables instead of dedicated ThunderBolt cables. This will make the established connection and, therefore, the broadband speeds default to the system capability of the slowest component involved, yielding low transfer speeds. Dedicated ThunderBolt cables are marked with a lightning symbol, as shown alongside.
Source: Thunderbolt™ 4
For ThunderBolt version 3, you may be using passive ThunderBolt cables for data transfer. Even though ThunderBolt 3 is enabled up to 40 Gb/s, those speeds are only available to ThunderBolt cables under 0.5 m (1.6 ft.). For cables longer than that (up to 2 m or 6.6 ft.), special ‘active’ cables are required in order to achieve the maximum promoted ThunderBolt speeds.
Wrap Up
If you’ve read this far, congratulations, you know more about the Thunderbolt Bridge network than most people. Now you can start using the Thunderbolt Bridge’s high-speed architecture to connect to peripheral devices and enjoy the blazing-fast speed and functionality.
Ujjwal is a tech enthusiast with a special interest in everything Apple! He manages and writes on MacMyths.com where sharing anything and everything related to Apple devices and services is his daily thing to do.
Recent Posts
Mirroring your iPhone to a MacBook Pro is a handy task you might find essential for presentations, media sharing, or simply managing your content. Thankfully, this connection isn’t elusive; it can be.
We’ve all been there – a slip of the finger, an unintended deletion, and suddenly you need to revert a mistake on your Mac. Thankfully, using Command + Z to undo and Command + Shift + Z to redo is.
About the Author
 Ujjwal is a tech enthusiast with a special interest in everything Apple! He manages and writes on MacMyths.com where sharing anything and everything related to Apple devices and services is his daily thing to do.