Как установить публичную бета-версию macOS Sonoma и не потерять данные
 В закладки

Вчера купертиновцы выпустили первую публичную бета-версию новой десктопной операционной системы macOS Sonoma, которую презентовали на WWDC 2023.
Сейчас расскажем как правильно подготовиться и установить тестовую систему на свой mac, чтобы не потерять данные и иметь возможность работать на актуальной macOS Ventura.
На какие Mac можно установить macOS Sonoma
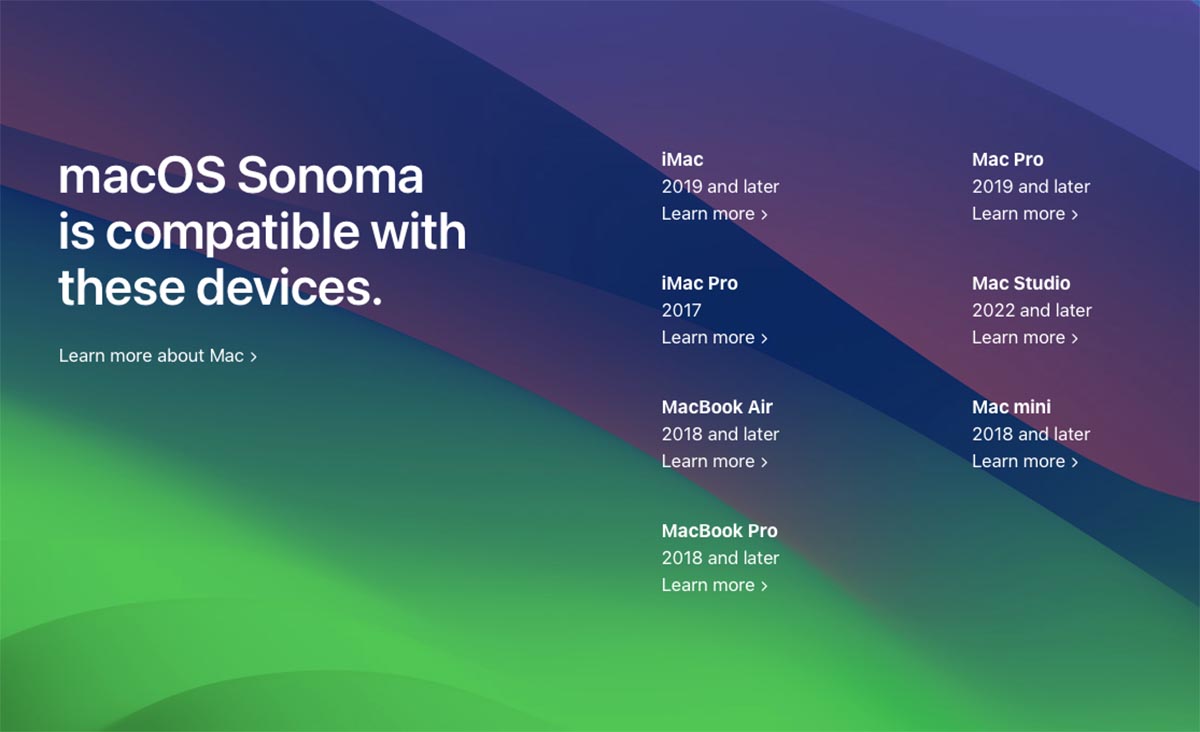
Установку новой операционной системы Apple поддерживают такие компьютеры:
▶ MacBook Air 2018 года и новее;
▶ MacBook Pro 2018 года и новее;
▶ iMac 2019 года и новее;
▶ iMac Pro 2017 года;
▶ Mac mini 2018 года и новее;
▶ Mac Studio 2022 года и новее;
▶ Mac Pro 2019 года и новее.
На эти же модели компьютеров Apple сможете установить финальную версию системы нынешней осенью.
Как подготовиться к установке macOS Sonoma
Внимание! Настоятельно не рекомендуем устанавливать тестовую версию macOS в качестве основной системы на ваш Mac. Первая тестовая версия еще работает нестабильно, вы можете столкнуться с неработоспособностью компьютера или потерять важные данные.
Для начала определитесь, куда будете устанавливать тестову систему. macOS можно поставить на отдельный раздел встроенного накопителя или на внешний накопитель.
▣ Если захотите сделать это на встроенный накопитель, тогда вам потребуется инструкция по очистке места на диске и мануал по созданию нового логического раздела.
▣ Если же будете устанавливать на внешний диск, предварительно подготовьте его по этой инструкции.
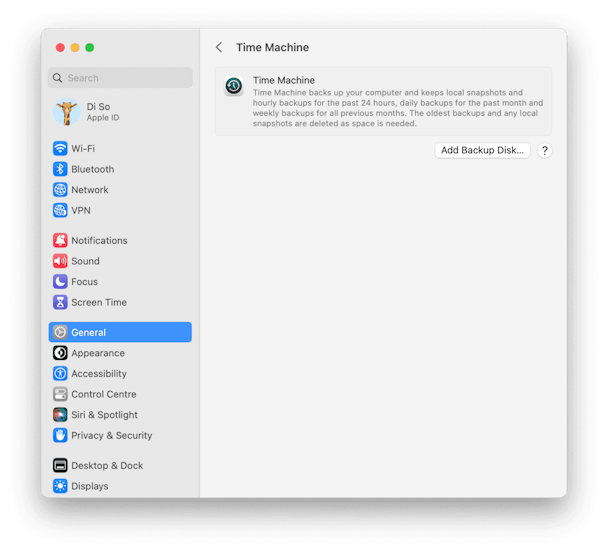
В любом случае обязательно сделайте актуальную резервную копию данных через Time Machine перед установкой.
Как установить публичную бета-версию macOS Sonoma
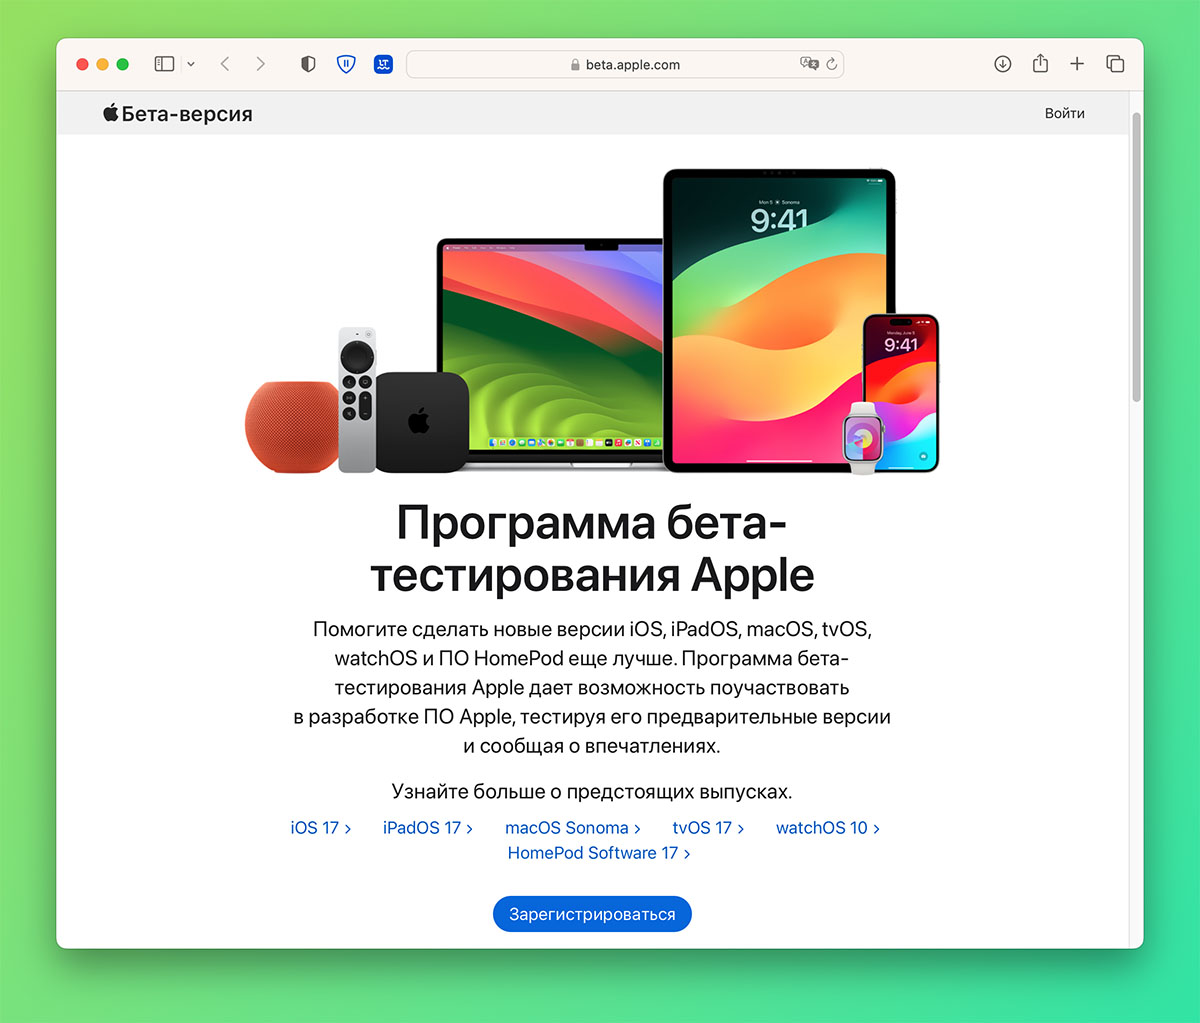
1. Перейдите на сайт программы бета-тестирования Apple, зарегистрируйтесь через свою учетную запись Apple ID и примите пользовательское соглашение.
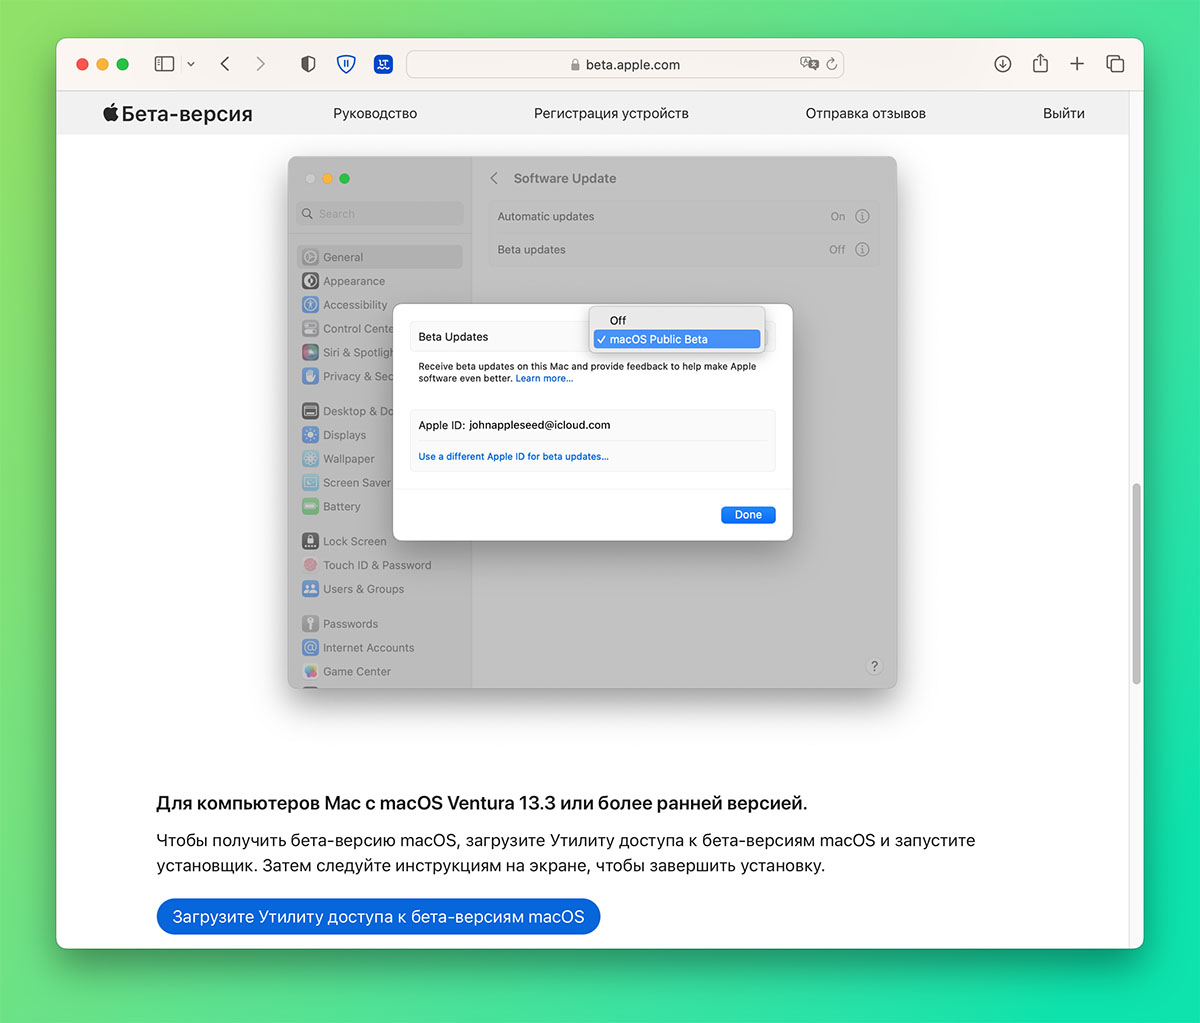
2. Если у вас установлена macOS Ventura 13.3 или более старая система, загрузите и установите утилиту для доступа к бета-версиям отсюда.
Если на вашем Mac установлена macOS Ventura 13.4 и новее, переходите к следующему шагу.
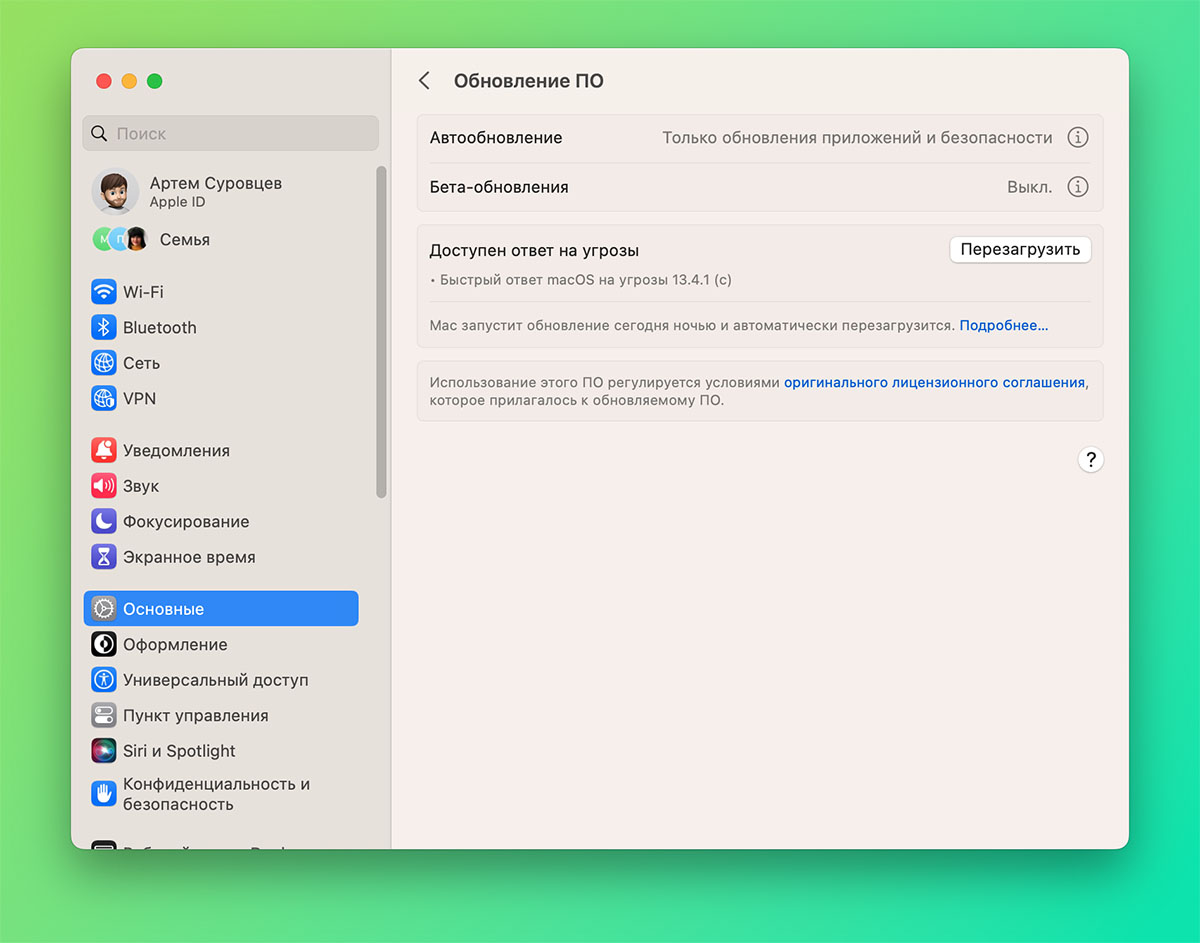
3. Откройте Системные настройки — Основные — Обновление ПО и нажмите кнопку “i” возле индикатора Бета-обновления.
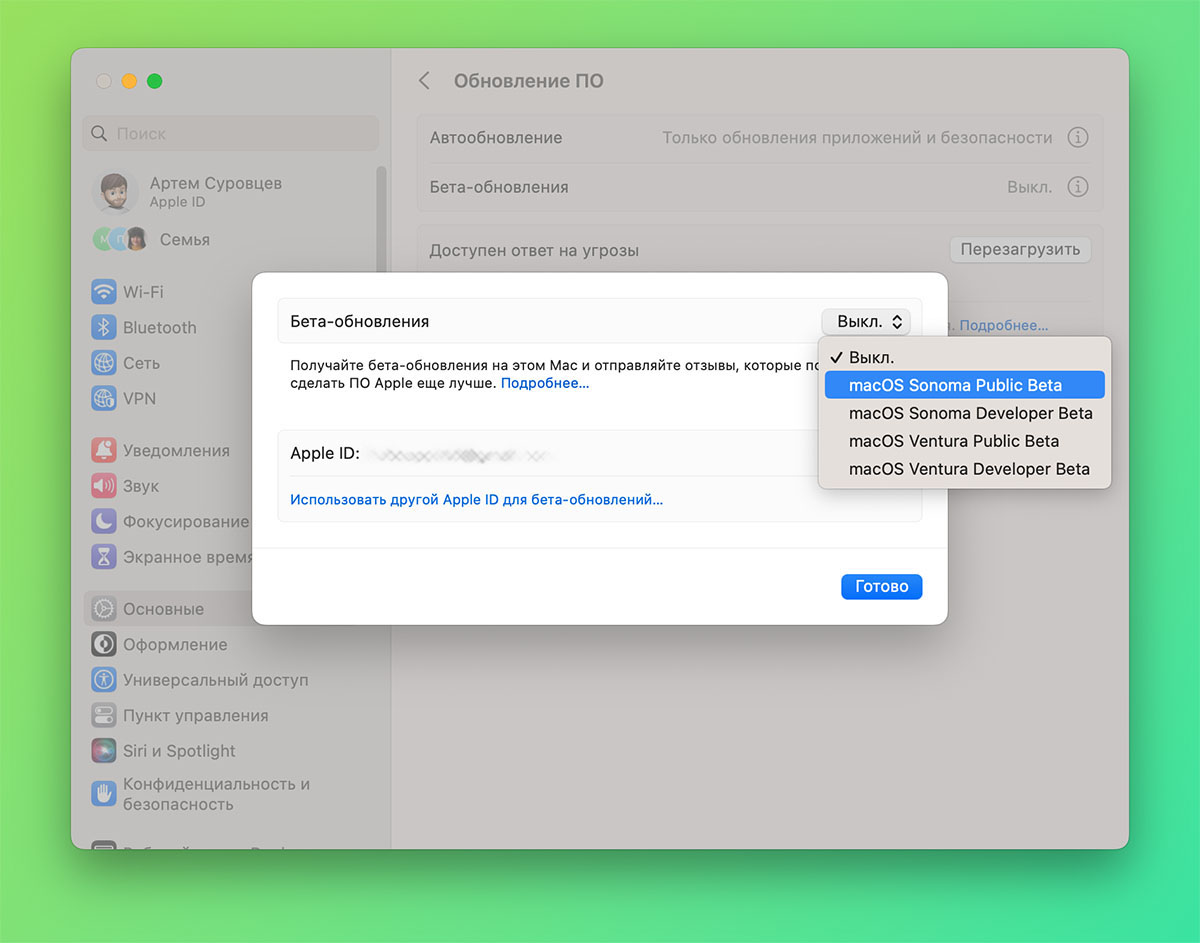
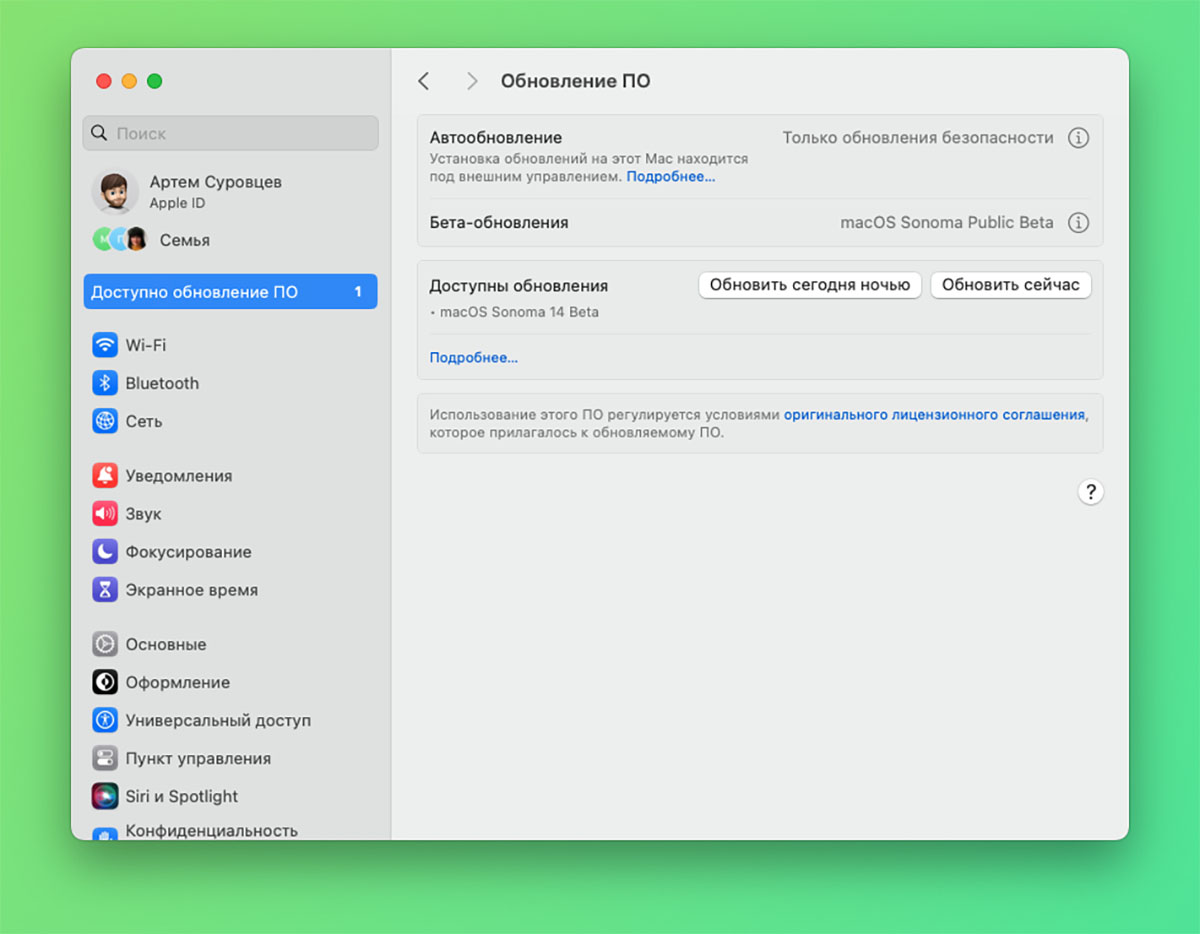
4. В выпадающем списке выберите macOS Sonoma Public Beta. После проверки доступных обновлений будет предложено установить публичную бета-версию macOS Sonoma
5. В начале установки обязательно выберите накопитель, куда будет загружена новая система. Это может быть внешний диск или логический раздел на встроенном накопителе.

Когда система будет установлена, на вашем Mac будет одновременно доступно две ОС.
Для выбора системы, которая будет загружаться при включении нужно задать клавишу Option (Alt) после нажатия кнопки питания или перезагрузки компьютера.
В закладки
How to clean install macOS Sonoma

Installing a new macOS always gives a feeling of a fresh start. However, file and app clutter may affect the smooth macOS Sonoma experience.
If you want to give your Mac a clean sweep, get CleanMyMac X. It will help remove unwanted software and files, fix performance issues, and speed things up on macOS Sonoma.
Features described in this article refer to the MacPaw site version of CleanMyMac X.
There are several ways to upgrade to macOS Sonoma. You could just use Software Update in System Settings to do it. But that will install Sonoma on top of everything else that’s on your Mac and could cause problems later on with file conflicts, for example. The solution is to do a clean install. We’ll show you how to do that in this article.
What is a clean install?
A clean install of a new version of macOS is where you erase your boot disk completely and then install the new version on the erased disk. This is the safest method to install a new OS because there is no possibility of file conflicts or clutter causing problems. A clean install can also be a good last resort for fixing problems on your Mac. However, a clean install is also the least convenient and most time-consuming method, so you may not want to do it every time you update macOS.
Back up your Mac
It’s essential that you back up your Mac before you start to clean install macOS Sonoma. If you don’t, you will lose all your data and settings. The best way to back up is to use Time Machine. That way, when you come to set up Sonoma, you can restore your data and settings using Migration Assistant during the setup process. If you don’t want to use Time Machine, you can use any backup tool, but it will be less easy to restore data and settings.
Your Mac accumulates clutter every time you use it. Temporary files that were never deleted, cache files, language files for languages you don’t use — they all take up space on your boot disk. And if you back up without clearing the clutter, you’ll back that up, too. That means backup and restoring take longer, and you end up with less free space than you could have. You could even argue that restoring from a backup with junk files on it defeats the object of a clean install.
The easiest way to clear out all those junk files is to use CleanMyMac X. It has several modules designed to clear out the clutter and free up space. Its System Junk module, for example, scans your Mac looking for junk files and then allows you to get rid of them with a click. You can download CleanMyMac X for free here and try it for yourself. Once installed, you just open the app, navigate to System Junk from the sidebar, click Scan, and click Clean. And just like that, the junk is gone.

How to clean install macOS Sonoma
There are three parts to doing a clean install of macOS Sonoma:
- Download the installer and create a bootable clean install macOS Sonoma USB stick.
- Erase your boot drive.
- Install macOS Sonoma.
Download the installer and create a bootable USB stick
- Open the Mac App Store app and search for ‘macOS Sonoma.’ Click Get to download it.


Erase your boot drive
The process for erasing your startup disk is different depending on which Mac you have.
On a Mac with Apple silicon or an Intel-based Mac with a T2 security chip, click the Apple menu and choose System Settings > General > Transfer or Reset, then Erase all Content and Settings. Follow the instructions on the screen to erase your Mac.

On an Intel-based Mac that doesn’t have a T2 Security chip, do the following:
- Reboot your Mac into recovery mode by holding down Command-R.
- Choose Disk Utility from the macOS Utilities menu.
- Select your startup disk and choose Erase.
- Format it as APFS and give it a name.
- Click Erase.
Install macOS Sonoma
Once you’ve erased your Mac, shut it down or press the power button to turn it off. Plug in the USB stick with the installer on it. To install macOS Sonoma on a Mac with Apple silicon, press and hold the power button until you see the startup options screen and choose the USB stick. Then, follow the instructions on the screen to install Sonoma.
On an Intel-based Mac, press and hold the Option key, then press the power button, and when asked to choose a startup disk, select the USB stick and then follow the instructions on the screen.
How to reinstall macOS Sonoma
If you need to reinstall macOS Sonoma after installing it the first time, you can boot your Mac in Recovery Mode and choose reinstall macOS from macOS Utilities. If you want to do a clean reinstall, use Disk Utility to erase your startup disk, then reinstall macOS Sonoma.
Performing a clean install of macOS Sonoma takes longer and involves much more work than a regular upgrade, but your Mac should run more smoothly as a result.

Frequently Asked Questions
What is a clean install?
A clean install is when you completely erase your startup disk before installing a new version of the OS.
Why do a clean install?
A clean install is a good way of clearing out all the clutter that accumulates as you use your Mac.
Can you install Sonoma without internet?
You will need an internet connection to download the installer from the App Store. Then, once you create a bootable installer, you no longer need internet to proceed with the installation.
What’s the best way to back up before a clean install?
Time Machine is the most convenient method. It’s already installed on your Mac, and you can restore your data and settings from a Time Machine backup after you install the new OS.
How to Create a macOS Sonoma Bootable USB on a PC or Mac
![]()
macOS Sonoma is the fourteenth major release of Apple’s operating system for Mac computers. It was announced during the Worldwide Developers Conference (WWDC) in June 2023 and released to the public in the fall of the same year.
If you are eager to test it out, the first step is to create a bootable Sonoma USB so you can install it on a target computer. In this tutorial, we will show you how to create a macOS Sonoma Bootable USB on a Windows PC and Mac.
Part 1: Create a macOS Sonoma Bootable USB on a Windows PC
It is quite common to build a hackintosh these days. Before getting started with macOS Sonoma, you should make a macOS Sonoma installation drive first. Fortunately, you can do this on a Windows PC now, no matter it is Windows 11, Windows 10 or Windows 7. In addition, if your Mac was unable to boot in and you want to install macOS Sonoma on it, then you need to create a Sonoma bootable USB on a PC too.
Preparation:
- macOS DMG File
- UUByte DMG Editor
- A 3.0 or 3.1 USB flash drive (at least 16 GB)
UUByte DMG Editor is a powerful and user-friendly software designed to work with macOS disk image files, commonly known as DMG files. DMG files are a popular format used on Apple’s macOS to package and distribute software, and UUByte DMG Editor provides an efficient way to create bootable USB from macOS DMG files.
Whether you are a developer distributing software or a Mac user looking to customize and modify disk images, UUByte DMG Editor offers a comprehensive set of features to meet your needs. This software simplifies the process of working with DMG files, making it accessible to both beginners and experienced users.
Step 1: Download macOS Sonoma DMG File
Below are a list of links you can use to download the latest macOS Sonoma DMG file:
macOS Sonoma Beta 4 DMG by techrechard.com.dmg
Edit description
macOS Sonoma Beta 4 DMG by techrechard.com
MediaFire is a simple to use free service that lets you put all your photos, documents, music, and video in a single…
Step 2: Backup and Connect a USB to PC
Insert the USB drive into your Mac. Note that all data on the USB drive will be erased during this process, so back up any important files before proceeding.
Step 3: Download and Install DMG Editor Software on Your PC
Download the DMG Editor setup file from here and follow the screen instruction to install it on the PC.
Step 4: Open DMG Editor and Import Sonoma DMG File
Now, launch DMG Editor software from your PC and click the Burn button from the welcome screen. After that, import macOS Sonoma dmg file and pick up the USB drive name.
Step 4: Start Burning Sonoma DMG File to USB
Once the settings is completed, click the Burn button to start burning Sonoma dmg file to USB drive. This is the process for creating macOS Sonoma bootable USB on a Windows PC. You should wait about 8 minutes.
UUByte DMG Editor is an excellent choice for anyone working with DMG files on macOS. Whether you need to create bootable installation media, package software for distribution, or simply customize disk images to suit your preferences, UUByte DMG Editor provides the essential tools to get the job done efficiently.
Part 2: Create a macOS Sonoma Bootable USB on a Mac
The task becomes much easier when you are on a Mac because Apple has a built-in app for creating macOS bootable USB. You don’t need to download dmg file and third-party software to make a Sonoma bootable USB on Mac in this way.
Step 1: Download macOS Sonoma Install App
Make sure you have downloaded the macOS installer from the App Store. The installer will be available in the Applications folder with the name “Install macOS Sonoma.app.”
If you could not find the app in Mac App Store, please download the installation package from here:
Double click the .pkg file and follow the instructions. In a few minutes, you will see an app named “Install macOS Sonoma” in the Application folder.
Step 2: Plug in a USB Flash Drive
Connect a USB flash drive to your Mac and make sure you can see the drive name from the Finder app. This indicates the drive is recognized by this Mac.
Step 3: Open the Terminal app
Go to “Applications” > “Utilities” and launch “Terminal.” This is where you’ll enter the commands to create the bootable USB.
Step 4: Start Creating macOS Sonoma Bootable USB
In the Terminal window, enter the following command to create the bootable USB. Replace “MyVolume” with the actual name of USB drive.
sudo /Applications/Install\ macOS\ Sonoma.app/Contents/Resources/createinstallmedia — volume /Volumes/MyVolume
When prompted, enter your Mac’s administrator password. You won’t see the characters as you type and this is normal.
After entering your password, you’ll be asked to confirm the erasure of the USB drive. Type “Y” and press “Return” to proceed.
The Terminal will now start creating the bootable USB. This process may take some time, so be patient. Once it’s done, you’ll see a message indicating that the process was successful.
Your bootable Sonoma USB drive is now ready to be used. You can use it to install macOS Sonoma on other Mac computers or for troubleshooting purposes. Always ensure you have a backup of your important data before performing any OS installation or major modifications to your system.
Tips: If you don’t like command prompt or there were something wrong with the commands, you can use the DMG Editor app to create macOS Sonoma bootable USB instead. Just download the file from here and follow the steps in the Part 1.
That’s ! You will get a Sonoma bootable USB in no time!
Bonus: Why My macOS Sonoma USB Not Bootable?
There could be several reasons why your macOS Sonoma drive is not bootable. Some of the common issues and troubleshooting steps include:
Incorrect macOS Installer Image: Make sure you are using the correct macOS installer image (DMG or ISO) to create the bootable drive. The installer image may be corrupted or incomplete, which can prevent the creation of a bootable drive.
File Format: Ensure that the USB drive you are using is correctly formatted as “Mac OS Extended (Journaled)” with the GUID Partition Map scheme. Improper formatting can lead to bootable drive creation failure.
Permissions: Verify that you have the necessary permissions and administrative privileges to create a bootable drive using TransMac. Running the software with administrative rights might be required.
USB Drive Issues: Ensure that the USB drive you are using is in good working condition and has enough free space to accommodate the macOS installer image.
Corrupted Download: If you downloaded the macOS installer image from an unofficial source or the download was interrupted, the image might be corrupted. Try re-downloading the macOS installer from the official App Store.
Antivirus or Firewall: Your antivirus or firewall software might be interfering with TransMac’s operation. Temporarily disable them before creating the bootable drive.
Frequently Asked Questions
- Can Rufus make macOS bootable USB?
Rufus is primarily a Windows-based utility used for creating bootable USB drives from ISO images of various operating systems, including Windows, Linux, and other utilities. However, Rufus does not officially support creating bootable macOS USB drives from macOS installer images (DMG files) due to the different file systems and boot mechanisms used by macOS compared to Windows and Linux.
2. What software is used to make bootable macOS USB?
UUByte DMG Editor, SysGeeker UltraDMG and TransMac. These are the three software you can use on a PC to create a mac bootable USB on a Windows PC.
3. Can you install macOS Sonoma on a bootable USB?
Yes, you can install macOS on a bootable USB drive, and it is a useful method for various purposes, such as performing a clean macOS installation, troubleshooting macOS issues, or testing macOS on different computers.
4. How to install macOS Sonoma in Windows?
Yes. A Windows PC running macOS is usually referred to a hackintosh. It is a term used to describe a non-Apple computer (usually a PC) that has been modified or customized to run macOS, Apple’s operating system for Mac computers. In other words, it’s a computer built using off-the-shelf PC hardware components but configured to run macOS, which is typically designed to work exclusively on Apple’s proprietary hardware.
5. Is TransMac free?
No. TransMac is not a free software. It is a commercial application developed by Acute Systems, and a license is required to use its full features. TransMac is primarily used to access and manage Mac-formatted drives (HFS, HFS+, and APFS) on Windows computers. It allows Windows users to read, write, copy, and format Mac disks directly from their PCs.
6. What programs are similar to TransMac?
UUByte DMG Editor is the best alternative to TransMac if it does not work. Both are the popular programs to create Mac bootable USB on a Windows PC.
The Final Words
Creating a Sonoma bootable USB drive on both a PC and a Mac is a valuable skill that allows users to perform clean installations of macOS, troubleshoot system issues, and access the macOS recovery environment. While the process differs slightly between PC and Mac, the end result is a powerful tool that can be used on various Mac computers.
For PC users, creating a macOS bootable USB involves using third-party tools or virtualization software to access macOS installer images. This method requires careful attention to hardware compatibility and adherence to Apple’s licensing terms.
On the other hand, Mac users can easily create a macOS bootable USB using the Terminal application and an official macOS installer downloaded from the App Store. This method offers a more straightforward approach, ensuring compatibility with Mac hardware and adherence to Apple’s terms of service.
Regardless of the method used, a Sonoma bootable USB empowers users with a versatile tool to install, repair, or upgrade macOS systems efficiently. However, it is essential to exercise caution, back up important data, and use official macOS installer images from trusted sources to ensure a smooth and secure process.
Overall, knowing how to create a macOS Sonoma bootable USB on both PC and Mac platforms provides users with greater control over their macOS installations, enhancing their Mac computing experience and enabling them to make the most of Apple’s powerful operating system.
Как установить macOS Sonoma на неподдерживаемый Mac
Apple обновляет операционную систему macOS для настольных компьютеров и ноутбуков раз в год, как по маслу, добавляя новые функции и улучшения. Это все очень хорошо, но последняя версия macOS от Apple, Sonoma, не будет работать на Mac mini, MacBook Air или MacBook Pro, выпущенных до 2018 года, iMac, выпущенных до 2019 года, или Mac Pro, выпущенных до 2019 года. Если ваш Mac слишком стар, чтобы его можно было поддержать, тебе не повезло… Или нет?
Что делать, если ваш Mac или MacBook старше упомянутых выше? Официально это означает, что ваш Mac не может быть официально обновлен до macOS Sonoma. Хотя неофициально это возможно. Если Apple считает, что ваш Mac слишком стар для запуска Sonoma или любых других версий macOS, обновить его будет непросто, но это возможно с помощью OpenCore Legacy Patcher.
OpenCore Legacy Patcher для macOS Sonoma, который позволит это сделать, появился 2 октября 2023 года.
Согласно этому сообщению GitHub, OpenCore Legacy Patcher 1.0.0 добавляет macOS Sonoma на 83 компьютера Mac, которые в противном случае не поддерживались бы.
Патчеры также доступны для других версий macOS, включая Ventura и Monterey.
Зачем запускать новую версию macOS на старом Mac?
Не только Sonoma ограничена новыми компьютерами Mac. macOS Ventura не будет работать на MacBook, MacBook Pro или iMac, выпущенных до 2017 года, а также на MacBook Air или Mac mini до 2018 года. macOS Monterey не будет работать на моделях MacBook Air, MacBook Pro или iMac, выпущенных до конца 2015 года, а если у вас Mac mini до 2014 года или Mac Pro до 2013 года, вам не повезло.
Есть веская причина, по которой вы можете захотеть запустить одну из этих трех версий macOS на своем Mac. Apple поддерживает только последние три версии с обновлениями безопасности. Это означает, что, если ваш Mac не может обновиться, он может быть уязвим для угроз безопасности. См.: Как долго Apple поддерживает компьютеры Mac.
Мой Mac слишком стар для обновления?
У нас есть программа проверки совместимости с macOS, поэтому вы можете увидеть, какие версии macOS должны работать на вашем Mac.
Следующие компьютеры Mac могут работать с Sonoma.
- MacBook Air 2018 года и новее
- MacBook Pro 2018 года и новее
- Mac mini 2018 года и новее
- iMac 2019 года и новее
- имак про с 2017 года
- Mac Pro 2019 года и новее
- Mac Studio 2022 года и новее
Вот обзор компьютеров Mac, на которых будет работать Ventura:
- Модели MacBook 2017 года и новее.
- Модели MacBook Air 2018 года или новее.
- Модели MacBook Pro 2017 года и новее.
- Модели Mac mini 2018 года или новее
- Модели iMac 2017 года или новее
- iMac Pro (все модели)
- Модели Mac Pro 2019 года или новее.
- Mac Studio (все модели)
Вот обзор компьютеров Mac, на которых будет работать Monterey:
- Модели MacBook начала 2016 года или новее.
- Модели MacBook Air начала 2015 года или новее.
- Модели MacBook Pro начала 2015 года или новее.
- Модели Mac mini 2014 года или новее.
- iMac 2015 года или новее
- iMac Pro (все модели)
- Модели Mac Pro конца 2013 года и новее.
Если ваш Mac поддерживается, прочтите статью «Как обновить macOS», чтобы узнать простой способ обновить свой Mac до последней совместимой операционной системы.
Стоит ли устанавливать последнюю версию macOS на старый Mac?
Прежде чем вы продолжите следовать нашему руководству, небольшое предупреждение: есть причина, по которой Apple предпочитает не поддерживать новую операционную систему Mac на старых компьютерах Mac. У старых компьютеров Mac просто нет необходимых компонентов или мощности, необходимых для удовлетворения потребностей более современных систем. Поэтому, если вы устанавливаете Sonoma, Ventura, Monterey или более старую версию на неподдерживаемый Mac, не ждите, что она будет работать без сбоев.
Вам следует ожидать возникновения проблем. Например, известны проблемы с патчером и компьютерами Mac с чипом безопасности T1. Будьте готовы к тому, что ваш Mac не будет работать оптимально, и вы можете потерять данные. (По этой причине мы рекомендуем сначала сделать полную резервную копию вашего Mac). Например, на многих старых компьютерах Mac возникали проблемы с подключением к Wi-Fi после установки macOS Big Sur. Запуск macOS на неподдерживаемом Mac также может рассматриваться как нарушение условий Apple.
Хотите знать, стоит ли вообще обновлять свой Mac? Читайте: macOS Sonoma против Ventura.
Если вы действительно хотите запустить Sonoma, возможно, пришло время обновить ваш Mac и продать старый.
Прочтите «Как продать старый Mac» и наши часто обновляемые лучшие предложения для Mac:
- Лучшие предложения MacBook Air
- Лучшие предложения MacBook Pro в этом месяце
- Лучшие предложения Mac mini в этом месяце
- Лучшие предложения iMac в этом месяце
Как установить Sonoma на неподдерживаемый Mac
Если вашему Mac больше нескольких лет, и вы попытаетесь установить на него macOS Sonoma (или Ventura или Monterey), вы столкнетесь с несколькими препятствиями — первое из которых заключается в том, что обновление программного обеспечения не позволит вам установить новую версию macOS.
Однако это не означает, что установка Sonoma на старый Mac невозможна. Это так – нужен просто патч. К счастью, существует патчер для установки macOS Sonoma на старые компьютеры Mac — OpenCore Legacy Patcher. Загрузку и инструкции можно найти здесь.
Обратите внимание, что патчеры macOS не могут творить чудеса, и не все компьютеры Mac будут совместимы. Прежде чем устанавливать Ventura на старый Mac, убедитесь, что ваш Mac совместим с патчером. Список всех поддерживаемых компьютеров Mac можно найти здесь.
Процедура обновления до новой версии macOS на несовместимых компьютерах Mac выглядит следующим образом. Мы рекомендуем следовать инструкциям на странице GitHub.
- Прежде чем что-либо делать, на всякий случай сделайте резервную копию вашего Mac.
- Сначала вам нужно будет получить установочные файлы для нужной вам версии macOS — в данном случае Sonoma. Вам придется получить их, используя совместимый Mac. Если они не отображаются в обновлении программного обеспечения, вы можете получить установочные файлы из Mac App Store. Их размер превышает 12 ГБ, поэтому ожидайте, что загрузка займет некоторое время.
- После загрузки вам необходимо загрузить эти установочные файлы на USB-накопитель и подготовить USB-накопитель для установки macOS Sonoma. Мы объясним, как создать загрузочный установщик macOS, в отдельной статье. Вы сможете найти установочные файлы в Finder > Приложения. (Откройте Finder и нажмите Shift + Command + A). Патчер также поможет вам создать установщик macOS.
- Затем вам необходимо получить программное обеспечение-патчер, которое, по сути, обманет установочные файлы версии macOS, которую вы хотите установить, заставив поверить в совместимость Mac. Вы можете скачать последнюю версию патчера, о котором мы упоминали выше, здесь. Нажмите OpenCore-Patcher-GUI.app.zip, и он должен загрузиться.
- После извлечения архива из загрузки вы найдете приложение OpenCore-Patcher.
- Запустите приложение OpenCore-Patcher.
- Выберите «Создать и установить OpenCore». Если вы планируете установить программу на другой Mac, вам необходимо выбрать правильный Mac — нажмите «Настройки».
- После входа в сборку OpenCore процесс должен быстро построиться, а затем вы вернетесь в главное меню.
- Следующий шаг — выбрать «Установить OpenCore на USB/внутренний диск» из предложенных вариантов. (Рекомендуется устанавливать на диск FAT32.
- Как только это будет создано, вам необходимо перезагрузить Mac, удерживая клавишу Option (Alt).
- Когда Mac запустится, появится черный экран с несколькими вариантами дисков. Выберите загрузку EFI.
- Это загрузит OpenCore. Далее вам нужно выбрать «Установить macOS». В средстве выбора OpenCore вы должны увидеть опцию «Установить macOS Ventura».
- Теперь установите macOS Sonoma.

Мы рекомендуем вам выполнить действия, описанные здесь, если у вас возникнут какие-либо проблемы. Ожидайте, что обновление займет несколько часов.
Как установить обновления macOS на неподдерживаемый Mac
После установки macOS Sonoma (или любой другой версии macOS по вашему выбору) обновления будут появляться в разделе «Обновления программного обеспечения» по мере их доступности. Однако не следует устанавливать их. Вместо этого вам нужно создать USB-накопитель с новыми установочными файлами и установить обновление таким образом.
Как установить macOS на неподдерживаемый Mac
Процесс тот же, если вы хотите установить Ventura, Monterey или другую версию macOS на свой Mac. Как и выше, загрузку и инструкции можно найти здесь.
Вы используете тот же патчер, что и выше, поскольку этот патчер поддерживает Big Sur и новее для исправлений. Вы можете проверить, совместим ли ваш Mac с патчером, здесь.
Процедура обновления до новой версии macOS на несовместимых компьютерах Mac аналогична описанной выше, однако вам потребуется использовать установочные файлы Monterey (которые можно получить в Mac App Store). Их объем составляет 12 ГБ, поэтому ожидайте, что это займет некоторое время.
После запуска OpenCore вы сможете выбрать «Установить macOS». В средстве выбора OpenCore вы должны увидеть опцию «Установить macOS Monterey».
Как установить Big Sur на неподдерживаемый Mac
Установить Big Sur на неподдерживаемый Mac так же сложно, но, опять же, это не означает, что установка Big Sur на старый Mac невозможна. Вы можете использовать тот же патчер, что и выше, также доступен патчер для установки macOS Big Sur на старые компьютеры Mac — big-sur-micropatcher можно скачать с GitHub.
Убедитесь, что патчер совместим с вашим Mac — вы должны найти эту информацию на странице патча (ссылка выше).
Процедура обновления несовместимого Mac до Big Sur аналогична описанной выше. На этот раз вы можете получить установочные файлы по этой ссылке Mac App Store. Следуйте нашему руководству, указанному выше, чтобы создать загрузочный установщик.
- Если вы загружаете патчер Big Sur с GitHub, нажмите кнопки «Код» и «Загрузить Zip».
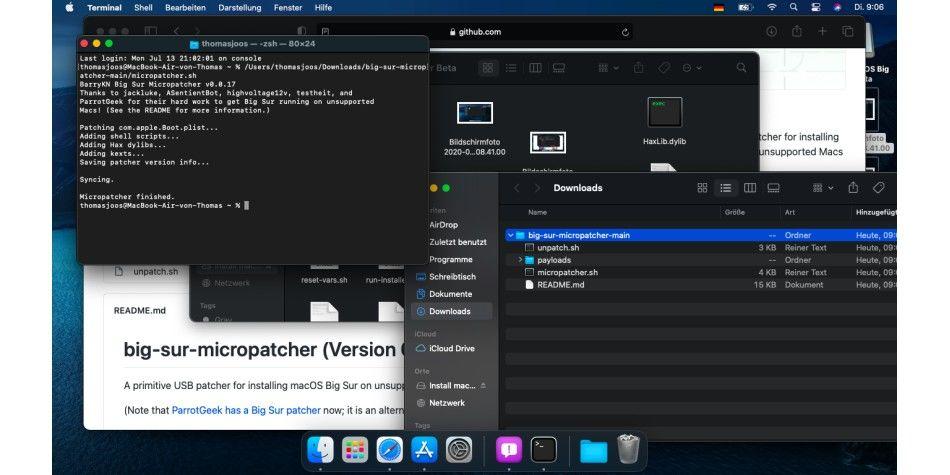
- После извлечения архива из загрузки вы найдете файл «micropatcher.sh».
- Откройте окно терминала и перетащите файл в терминал. Затем запустите команду.
- Теперь установите macOS из загрузочного установщика.
В некоторых случаях после установки все еще остаются задачи, которые необходимо выполнить. Их можно найти в инструкции к big-sur-micropatcher. Подготовив Mac с помощью USB-накопителя, запустите терминал и введите «/Volumes/Image Volume/set-vars.sh». Скрипт является частью патча для macOS Big Sur и меняет важные настройки загрузки и системные файлы.
Обновление может занять несколько часов. В нашем случае иногда казалось, что во время обновления произошел сбой установщика. В этом случае вам следует подождать, так как установка обычно еще продолжается. Со временем могут быть найдены лучшие способы обновления машины. В настоящее время самым безопасным подходом является обновление с помощью загрузочного USB-накопителя.
Как запустить Catalina на старом Mac
Apple сообщает, что macOS Catalina будет работать на следующих компьютерах Mac:
- Модели MacBook начала 2015 года или новее.
- Модели MacBook Air середины 2012 года или новее.
- Модели MacBook Pro середины 2012 года или новее.
- Модели Mac mini конца 2012 г. или новее.
- Модели iMac конца 2012 года или новее.
- iMac Pro (все модели)
- Модели Mac Pro конца 2013 года.
Вы можете скачать патчер macOS Catalina от разработчика, известного как DOSDude1. Патч позволит вам установить Catalina на старый Mac.
Взлом Catalina работает не на всех Mac, но многие из них предусмотрены. Ты можешь
посмотрите, поддерживается ли здесь ваш Mac.
DODDude1 предлагает видеоурок на своем сайте здесь. Мы упростили приведенные ниже шаги, но рекомендуем вам следовать его руководству.
- Загрузите последнюю версию патча Catalina здесь. (Вы можете сделать пожертвование).
- Откройте приложение Catalina Patcher.
- Нажмите Продолжить.
- Выберите «Загрузить копию».
- Начнется загрузка (Каталины) — поскольку ее объем почти 8 ГБ, вероятно, это займет некоторое время.
- Подключите флешку.
- Выберите «Создать загрузочный установщик» из вариантов.
- Подключите загрузочный установщик к Mac, который вы хотите обновить.
- Перезагрузите Mac, удерживая клавишу Option/Alt. Это приведет к открытию Mac в диспетчере автозагрузки.
- Выберите загрузочный установочный диск и нажмите Enter.
- Теперь ваш Mac должен открыться в Recovery.
- Выберите «Переустановить macOS» и дождитесь установки новой версии macOS.
- После завершения установки следует еще раз перезагрузить Mac в режиме восстановления, выбрав диск, на котором находится загрузочный установщик.
- Теперь выберите «После установки macOS», и на ваш Mac будут установлены необходимые исправления, чтобы Catalina могла работать.
- Когда исправления будут применены, выберите Force Cache Rebuild.
- Перезапуск.
- После перезагрузки ваш Mac должен загрузиться с полностью рабочей копией macOS Catalina.
Если вы используете версию macOS, предшествующую High Sierra или Mojave, вам необходимо отформатировать жесткий диск в APFS.
Дополнительные советы по установке macOS с помощью загрузочного установщика можно найти здесь.
Как запустить Mojave на старом Mac
Apple сообщает, что macOS Mojave будет работать на следующих компьютерах Mac:
- Модели Mac 2012 года выпуска или новее.
- iMac Про (с 2017 г.)
- Модели MacBook 2015 года выпуска или новее.
- Модели MacBook Pro 2012 года выпуска или новее.
- Модели MacBook Air 2012 года выпуска или новее.
- Модели Mac mini 2012 года выпуска или новее.
- Модели Mac Pro конца 2013 г. (плюс модели середины 2010 г. и середины 2012 г. с рекомендованным графическим процессором с поддержкой Metal)
Как и в случае с Catalina, был написан инструмент исправления DOSDude1, который позволяет установить macOS Mojave на старый Mac.
Вы можете скачать Mojave Patch Tool здесь.
Как запустить High Sierra и старше на старом Mac
У старой macOS High Sierra было немного больше возможностей. Apple заявила, что он будет успешно работать на MacBook или iMac конца 2009 года или новее, а также на MacBook Air, MacBook Pro, Mac mini или Mac Pro 2010 года или новее.
DOSDude1 написал аналогичный патч для High Sierra и более ранних версий Sierra. Установив патч, вы сможете вернуться к моделям начала 2008 года. Маловероятно, что это сработает как во сне, поэтому Apple не советует поступать таким образом. Но вы должны быть в состоянии добиться приемлемой производительности.